Automotive / Roof Rack Accessories
Installation Manual for Front Runner Ineos Grenadier Ladder LAIG001
Step-by-step installation guide for the Front Runner ladder designed for the Ineos Grenadier (2022-Current). Includes parts list, assembly instructions, and torque specifications.
Quick answers from the manual
Quick answer
- This manual provides instructions for assembling and installing the Front Runner ladder (LAIG001) on an Ineos Grenadier (2022-Current). p. 1
Key actions
- Assemble ladder sides, brackets, and rungs using provided hardware. p. 3, 4
- Mount the ladder to the vehicle using crush bush assemblies. p. 4, 5
Technical specifications
| Parameter | Value | Meaning | Pages |
|---|---|---|---|
| M6 Torque | 8-10Nm | Tightening torque for M6 screws | p. 5 |
| M8 Torque | 15-20Nm | Tightening torque for M8 bolts | p. 5 |
Where to find it in the PDF
- Parts List p. 2
- Installation p. 3, 4, 5
Table of contents
Manual images
Click an image to enlargeImportant Information
This document provides installation instructions for the Front Runner ladder designed for the Ineos Grenadier (2022-Current). Important: Improper attachment can result in automobile accidents, serious bodily injury, or death. Ensure all products are properly assembled and secured. If you lack mechanical experience, have the product installed by a professional.
Parts List
Before beginning, verify all components are present:
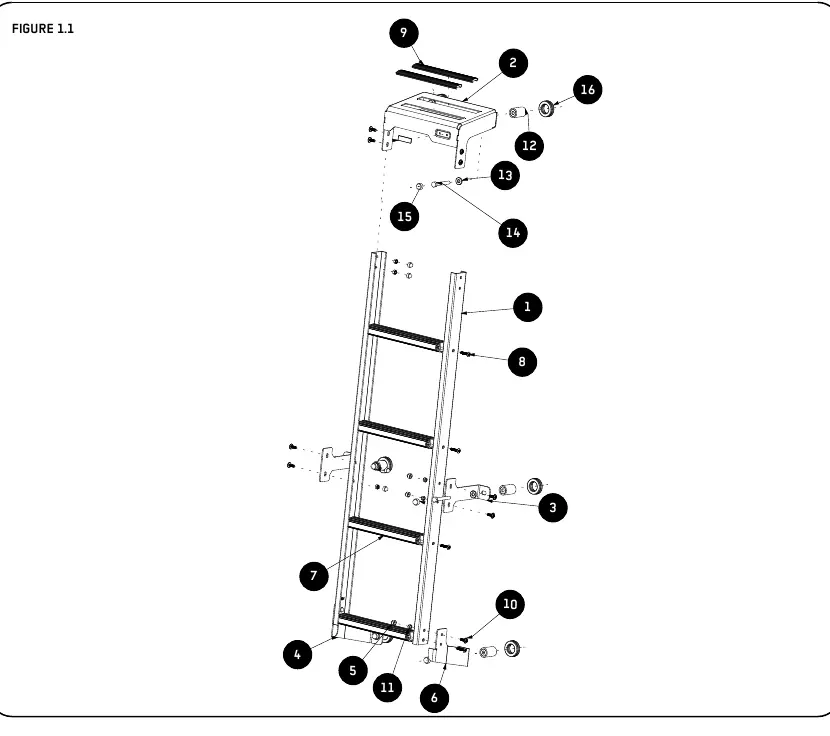
- Ladder sides (1005mm)
- Ladder Top Bracket
- Center Mounting Brackets
- Bottom Mounting Brackets (LH 154.39mm and RH 170.38mm)
- Ladder Steps (239mm)
- Rubber Steps (202mm)
- Hardware: M6 Nut Caps, M6 x 25 Thread Forming Screws, M6 x 16 Flange Button Head Screws, M6 Nyloc Nuts, Crush Bush Assemblies, M8 x 19 x 3 Flat Washers, M8 x 60 Hex Bolts, M8 Nut Caps, 30mm Grommets
Tools Needed
- Torx bits: T30, T40, T45
- Wrenches: 10mm, 13mm
- Anti-seize lubricant
- Cordless driver
Installation Steps

Assembly
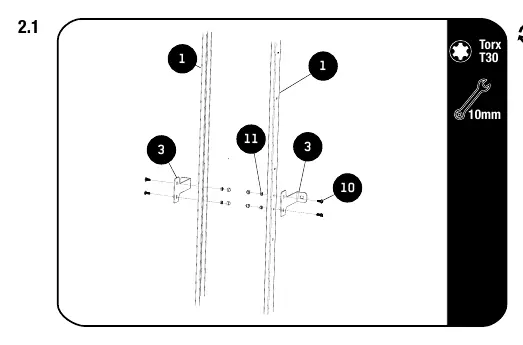
- Center Brackets: Loosely assemble the two Center Mounting Brackets to the Ladder Side profiles using M6 x 16 Flange Button Head Screws and M6 Nyloc Nuts. Do not fully tighten.
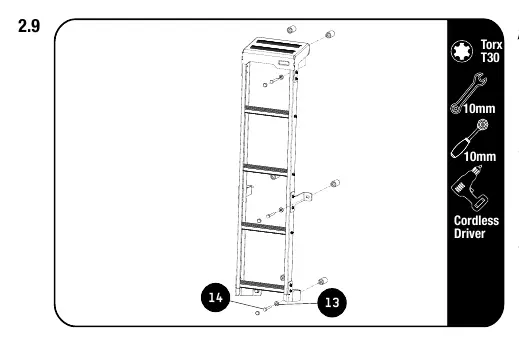
- Top Bracket: Loosely assemble the Ladder Top Bracket to the Ladder Side profiles using M6 x 16 Flange Button Head Screws and M6 Nyloc Nuts. Do not fully tighten.
- Rungs: Assemble the three ladder rungs to the ladder side profiles using M6 x 25 Thread forming screws. Apply anti-seize to screw threads before inserting.
- Bottom Brackets: Assemble the bottom ladder rung together with the two bottom mounting brackets to the ladder side profile using M6 x 25 Thread forming screws, M6 x 16 Button Head screws, and M6 Nyloc Nuts. Note: Item 6 is RH (170.50mm) and Item 4 is LH (154.50mm).
Vehicle Mounting
- Preparation: If the vehicle has an OEM ladder, remove the 6 rubber grommets and use a T40 Torx to remove the 6 bolts holding the ladder in place. Slide the ladder away from the rear door. If no ladder is fitted, remove the 6 blank plugs from the rear door using a T45 Torx.
- Grommets and Bushings: Fit the six 30mm grommets into the open cavities. Slide the six Crush Bush assemblies into the cavities in the rear door.
- Final Mounting: Fit the assembled ladder to the Crush Bush assemblies using M8 x 60 Hex Bolts and M8 x 19 x 3 Flat Washers. Fully tighten the M8 x 60 Hex Bolts and all previously loosely assembled M6 x 16 Button Head Screws.
- Finishing: Place M6 Nut caps over M6 Nyloc Nuts and M8 Nut caps over M8 Hex bolts.
Torque Specifications
- M6 Hardware: 8-10Nm (5.9 - 7.38 ft lb)
- M8 Hardware: 15-20Nm (11.06 - 14.75 ft lb)
Practical help
Common problems
Ladder not fitting correctly
Ensure you have correctly identified the LH (154.39mm) and RH (170.38mm) bottom mounting brackets.
Difficulty inserting thread-forming screws
Apply anti-seize to the screw threads before inserting to facilitate the process.
Before use
- Verify all parts are present according to the parts list.
- Ensure you have T30, T40, and T45 Torx bits.
- Check if the vehicle has an OEM ladder installed (requires removal).
- Apply anti-seize to all thread-forming screws.
- Ensure all bolts are tightened to the specified torque.
Images and diagrams
- Figure 1.1 shows the exploded view of the ladder assembly.
- Steps 2.1-2.4 detail the assembly of brackets and rungs.
- Steps 2.5-2.9 detail the mounting process to the vehicle.
Model compatibility
- Designed for Ineos Grenadier (2022-Current).

Manual page author
Michael Turner
Technical manual editor
Reviews PDF manuals for structure, safety notes, and practical product details so readers can find the right information quickly.