Automotive / Roof Racks
Installation Guide for Front Runner RAM Pro Master 3500 159" WB EXT High Roof Van Rack Kit
Comprehensive installation guide for the Front Runner Van Rack Kit (KVRP009T) for RAM Pro Master 3500. Includes parts list, assembly steps, torque specifications, and safety warnings.
Quick answers from the manual
Quick answer
- This manual provides installation instructions for the Front Runner Van Rack Kit (KVRP009T) for the RAM Pro Master 3500. It covers parts identification, assembly of side profiles, wind deflectors, and slats, along with torque specifications. p. 1, 11
Key actions
- Assemble Side Profiles p. 6
- Install Wind Deflector p. 7, 8
- Install Narrow Slats p. 9, 10
Technical specifications
| Parameter | Value | Meaning | Pages |
|---|---|---|---|
| Torque (Joiners) | 16Nm | Tightening torque for side profile joiners | p. 6 |
| Torque (Feet) | 25Nm | Tightening torque for securing feet to roof | p. 6 |
| Torque (Wind Deflector/Slats) | 20Nm | Tightening torque for wind deflector and slats | p. 8, 11 |
Where to find it in the PDF
- Parts List p. 2, 3, 4
- Installation Steps p. 5, 6, 7, 8
Table of contents
Manual images
Click an image to enlargeImportant Information
This document provides installation instructions for the Front Runner Van Rack Kit (KVRP009T) designed for the RAM Pro Master 3500 159" WB EXT High Roof (2014-Current). Before beginning, ensure you have all components and the necessary tools. Improper installation may void your warranty and pose safety risks. Always verify the vehicle manufacturer's recommended roof load rating before loading the rack.
Parts List
The kit includes the following main components:
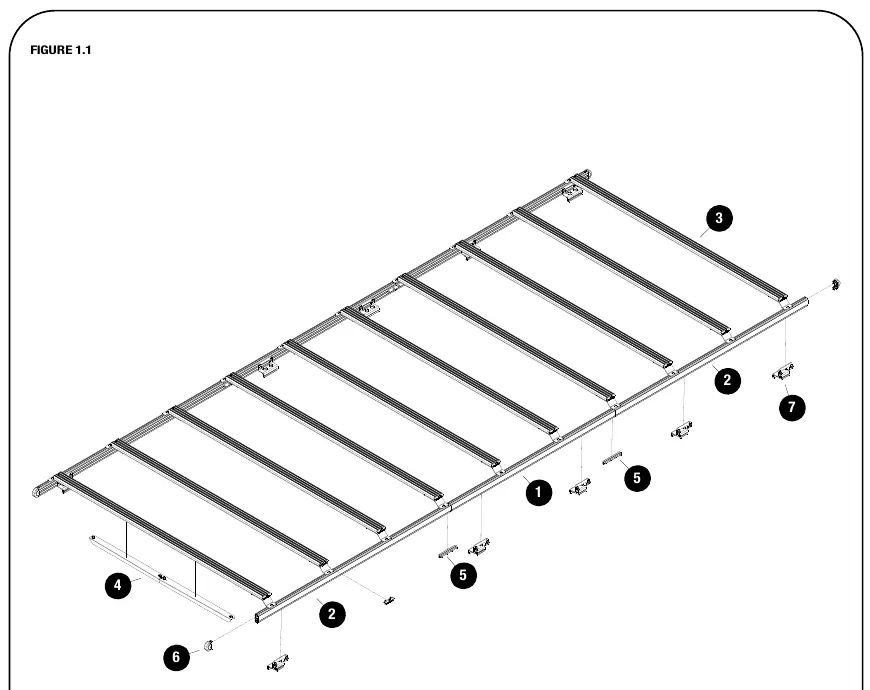
- Side Profiles (1156mm and 1358mm)
- Slat Assemblies
- Van Rack Wind Deflector
- Van Rack Joiner Kit
- Van Track End Caps
- FPCR Foot (Pair)
Tools Needed: 4mm wrench, 5mm wrench, 13mm wrench, and a friend to assist with installation.
Installation Steps
Plug Removal
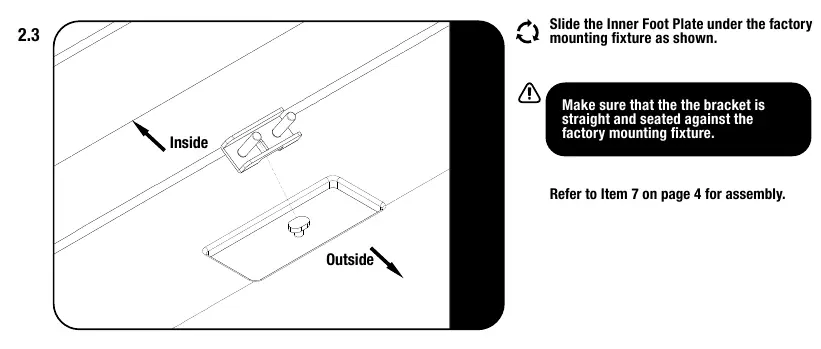
Locate the factory mounting fixtures on the vehicle's roof. Slide the Inner Foot Plate under the factory mounting fixture. Ensure the bracket is straight and seated securely against the fixture.
Side Profile Assembly
Loosely assemble the FPCR Feet using M8 x 16 Button Head Bolts, M8 Flat Washers, and M8 Nyloc Nuts. Slide them into the side profiles. Place the Joiner into the Side Profile and twist into position. Assemble the Side Profiles using the Rack Joiners and M6 x 16 Button Head Bolts. Tighten the joiners to 16Nm. Secure the feet to the roof using the Inner Foot Bracket, M8 x 16 Flat Washers, and M8 Nyloc Nuts. Tighten to 25Nm.
Wind Deflector Assembly
Insert Button Head Bolts, M8 Half Nuts, and M8 Schnorr Washers into the Narrow Slat. Loosely assemble the Wind Deflector using M8 x 12 Button Head Bolts, M8 Schnorr Washers, and M8 Thin Nut. Slide the assembly into the T-slot of the Narrow Slat. Center the Wind Deflector on the rack, leaving a 10mm gap between the LH and RH deflectors, and tighten to 20Nm.
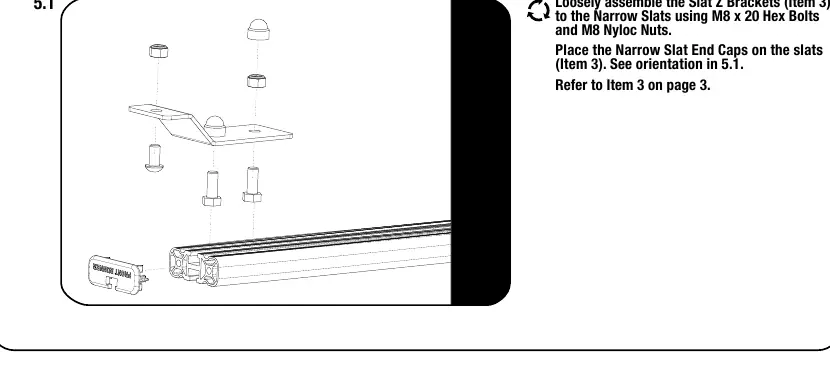
Narrow Slat Assembly
Assemble the Slat Z Brackets to the Narrow Slats using M8 x 20 Hex Bolts and M8 Nyloc Nuts. Place the Narrow Slat End Caps on the slats. Slide the pre-assembled slats into the Side Profiles. Space the slats at 404mm increments or as desired. If a roof A/C is fitted, space the slats around the A/C at 202mm increments on shorter lengths and 404mm on longer lengths. Tighten all fasteners to 20Nm.
Safety and Maintenance
Periodically inspect all attachments for adjustment, wear, and damage. Ensure all fasteners are tightened to the specified torque. Front Runner rack kits often have a higher load rating than the vehicles they are mounted to; always refer to the vehicle manufacturer's stated load capacity.
Practical help
Common problems
Rack feels unstable
Ensure all fasteners are tightened to the specified torque (16Nm, 20Nm, 25Nm) and that the feet are securely seated against the factory mounting fixtures.
Difficulty installing feet
Ensure the Inner Foot Plate is slid correctly under the factory mounting fixture and the bracket is seated straight.
Wind deflector noise or misalignment
Ensure there is a 10mm gap between the LH and RH wind deflectors and they are centered on the rack.
Before use
- Gather all components listed in the 'Get Organized' section.
- Ensure you have a 4mm, 5mm, and 13mm wrench.
- Have a friend available to assist with lifting and securing the side profiles.
- Verify the vehicle roof is clean and clear of debris.
- Check the vehicle manufacturer's roof load rating.
Specs in practice
- Tightening Torque (Side Profile Joiners)
- 16Nm / 11.8 ft lbs
- Tightening Torque (Side Profile to Roof)
- 25Nm / 18.4 ft lbs
- Tightening Torque (Wind Deflector/Slats)
- 20Nm / 14.75 ft lbs
Images and diagrams
- Figure 1.1 shows the exploded view of the rack assembly.
- Page 5 shows the factory mounting fixture location and inner foot plate installation.
- Page 6 illustrates the side profile assembly and torque points.
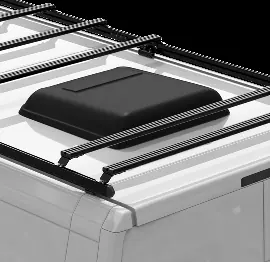
- Page 11 shows slat spacing when a roof A/C unit is installed.
Model compatibility
- Designed for RAM Pro Master 3500 159” WB EXT High Roof (2014-Current).
- Additional slats can be added (RRNS1475 sold separately).

Manual page author
Emily Carter
User documentation editor
Prepares concise manual descriptions and highlights the most useful setup, operation, and maintenance information for readers.