Lighting / Decorative Lighting
Installation Instructions for GE Advantium 240V Built-In Microwave Oven
Comprehensive installation guide for the GE Advantium 240V Built-In Microwave Oven (models CSB923, PSB9240). Includes detailed electrical requirements, cabinet cutout dimensions for standard and flush mounting, and step-by-step...
Quick answers from the manual
Quick answer
- This document provides installation instructions for the Advantium 240V Built-In Microwave Oven. It covers electrical requirements, cabinet cutout dimensions, and step-by-step mounting procedures. p. 2, 3, 4, 5
Key actions
- Prepare the cabinet opening according to the specific dimensions for your installation type (Standard or Flush). p. 5, 6, 7, 8
- Install the junction box within reach of the oven conduit. p. 4
- Connect the oven wiring to the branch circuit (3-conductor or 4-conductor). p. 10
Technical specifications
| Parameter | Value | Meaning | Pages |
|---|---|---|---|
| Electrical Rating | 120/208 or 120/240 volt, 60 Hz, 30 amps | Power supply requirements | p. 4 |
| Minimum Installation Height | 36-3/4" | Minimum height from floor to cutout | p. 3, 5 |
Show 1 more answers Show less
Where to find it in the PDF
- Design Information p. 3
- Installation Preparation p. 4, 5, 6, 7
- Installation Instructions p. 9, 10, 11
Table of contents
Manual images
Click an image to enlargeQuick Guide from the Manual
This document provides essential installation instructions for the Advantium 240V Built-In Microwave Oven. Installation requires basic mechanical and electrical skills and takes approximately 1 hour. Always ensure the oven is installed at least 36-3/4" above the floor and that the cabinet is firmly attached to the house structure.
Design Information
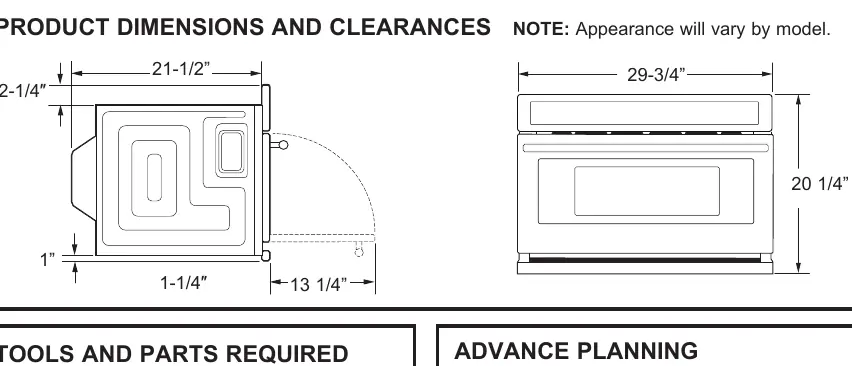
The oven is designed for installation in a 30" wide oven cabinet. Cutout dimensions vary depending on whether you are installing with or without an accessory storage drawer, and whether you are using a standard or flush mount method.
Tools and Parts Required
- #2 Phillips screwdriver
- Hand held drill
- High speed drill bit (3/32" diameter)
- 3/8" slot head screwdriver
- Level and Saw
- Safety glasses or goggles
- Junction box, electrical cable, and UL-listed conduit connectors
Installation Preparation
Electrical Requirements
The product rating is 120/208 or 120/240 volt, 60 Hz, 30 amps. It must be connected to a separate, dedicated 30-ampere branch circuit protected by a time delay fuse or circuit breaker. All electrical connections must meet National Electrical Code or prevailing local codes.
Preparing the Opening
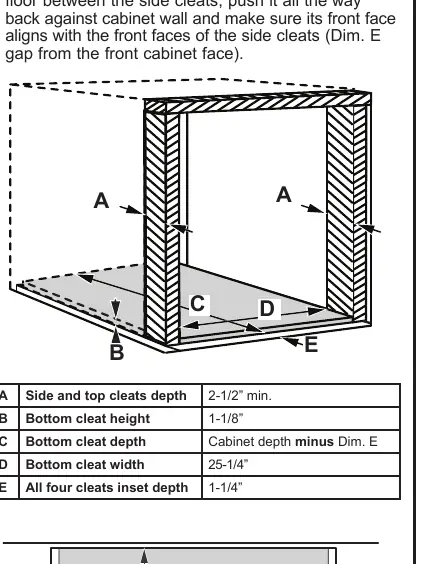
Ensure the cabinet opening is prepared according to the specific dimensions provided in the manual for your installation type (Standard or Flush). The support must be level, rigidly mounted, and flush with the bottom edge of the cutout. Construct a solid oven floor using at least 3/8" plywood supported by 2x4 or 2x2 runners on all sides.
Installation Instructions
- Remove Packaging and Parts: Remove all packing material and tape. Locate the parts package containing mounting screws.
- Route Conduit: Insert the conduit into the cabinet opening. Connect the oven wiring to the branch circuit (3-conductor or 4-conductor) as specified in the wiring diagrams.
- Install Bottom Trim: Align the bottom trim tabs to the slots in the bottom of the oven and secure using the 3 provided brass screws (not required if installing with an accessory storage drawer).
- Install Mounting Screws: Slide the oven into the opening, center it, and drill pilot holes through the side flanges. Drive the color-matched screws into the side flanges.
- Finalize Installation: Turn on the power at the source. The interior light should turn on when the door is opened.
Practical help
Common problems
Oven tips over
Ensure the oven is securely installed in a cabinet firmly attached to the house structure. Never allow anyone to climb, sit, stand, or hang on the oven door.
Electrical shock risk
Ensure the appliance is properly grounded. Do not connect to a gas pipe. Do not have a fuse in the neutral or grounding circuit.
Improper installation
Ensure the mounting surface can support the cabinet load, the oven weight, and any additional loads.
Before use
- Ensure you have a 30-ampere dedicated branch circuit.
- Verify the cabinet opening dimensions match the installation type (Standard vs. Flush).
- Ensure the cabinet floor is at least 3/8" plywood supported by 2x4 or 2x2 runners.
- Have a #2 Phillips screwdriver, drill, level, and saw ready.
- Ensure the oven is installed at least 36-3/4" above the floor.
Show more Show less
Specs in practice
- Electrical Rating
- 120/208 or 120/240 volt, 60 Hz, 30 amps.
- Minimum Height
- 36-3/4" from the floor to the cutout.
- Cabinet Width
- Designed for a 30" wide oven cabinet.
Images and diagrams
- The manual provides detailed cutout dimension diagrams for standard and flush mount installations.
- Wiring diagrams are provided for both 3-conductor and 4-conductor branch circuits.
Model compatibility
- Not approved for use above another built-in Advantium Speedcook oven.
- Not approved for side-by-side installation or below a countertop.
- Cannot be installed in an island or peninsula cabinet arrangement.

Manual page author
David Miller
Documentation analyst