Home Appliances / Small Kitchen Appliances
User Manual for Gemini GFS2DB-V3 Food Steamer
Comprehensive user guide for the Gemini GFS2DB-V3 2-Tier Mini Multi-Functional Food Steamer. Includes operating instructions, cooking time references, maintenance tips, and troubleshooting steps.
Quick answers from the manual
Quick answer
- The Gemini GFS2DB-V3 is a 2-tier food steamer. To operate, connect to power, select a function using the 'Function/Cancel' button, adjust time with '+' or '-', and optionally set a reservation time. p. 4, 10
Key actions
- Operating the steamer p. 4, 10
- Setting a reservation p. 4, 10
First start
- Connect to power, select function, adjust time, and start. p. 4, 10
Problems and fixes
Display not working
Check power supply, plug, and socket.
p. 7, 12Error codes
| Code | Meaning | Action | Pages |
|---|---|---|---|
| E00 | Overheat protection / Water ran dry | Add water to resume normal operation. | p. 3, 9 |
Maintenance and reset
- Clean heating plate with white vinegar to remove scale. p. 6, 11
Technical specifications
| Parameter | Value | Meaning | Pages |
|---|---|---|---|
| Power | 350W | Power consumption | p. 7, 12 |
Where to find it in the PDF
- Safety Instructions p. 2, 8
- Operating Instructions p. 4, 10
- Specifications p. 7, 12
Table of contents
Manual images
Click an image to enlargeQuick guide from the manual
The Gemini GFS2DB-V3 is a 2-tier multi-functional food steamer designed for household use. Before first use, ensure the power supply matches the specifications (220-240V~ 50/60Hz) and the socket is properly grounded. Always place the unit on a flat, stable surface away from heat-sensitive materials. If the unit runs dry, it will display "E00"; add water to resume operation.
Product overview
The unit consists of the following main components:
- Cover: Top lid for the steamer.
- Steaming Trays (SUS304): Two trays for holding food.
- Steamer: The main container for steaming.
- Base: The main unit containing the heating element and control panel.
Operating instructions
To operate the steamer:
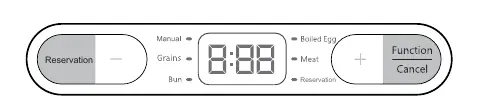
- Connect the power supply.
- Press the Function/Cancel button to select the desired function. The corresponding indicator light will turn on, and the default time will be displayed.
- While the indicator is flashing, use the + or - buttons to adjust the working time.
- To set a reservation, press the Reservation button after selecting a function, then adjust the time using the + or - buttons. The system will start automatically after the reservation time ends.
Cooking time reference
The following table provides reference cooking times for various ingredients:
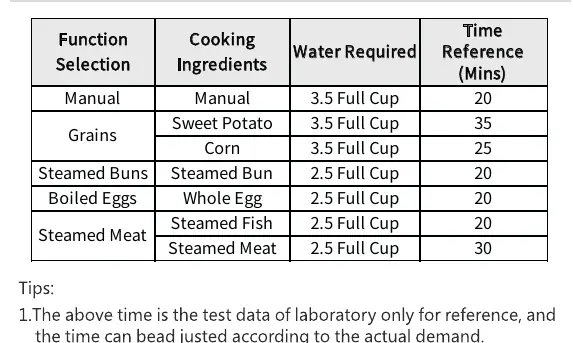
- Manual: 20 mins (3.5 cups water)
- Grains (Sweet Potato): 35 mins (3.5 cups water)
- Grains (Corn): 25 mins (3.5 cups water)
- Steamed Buns: 20 mins (2.5 cups water)
- Boiled Eggs: 20 mins (2.5 cups water)
- Steamed Meat (Fish): 20 mins (2.5 cups water)
- Steamed Meat: 30 mins (2.5 cups water)
Note: Do not add water beyond the maximum water mark. When steaming grains, slice food to a thickness not exceeding 3cm.
Maintenance and cleaning
- Unplug the power cord after use.
- Clean the racks, steamer, and lid with dishwashing liquid and a sponge. Do not use steel wool or hard brushes.
- Wipe the exterior of the main unit with a damp cloth. Do not immerse the main unit in water.
- If scale forms on the heating plate, boil water with white vinegar to remove residue and maintain efficiency.
Troubleshooting
If the display is not working, check the following:
- Is there a power outage?
- Is the power plug securely connected?
- Is the power socket turned on?
- Is the power cord properly installed at the product?
If food is not cooked well, ensure the steaming time is sufficient.
Practical help
Common problems
Display not working
Check power supply, ensure the plug is connected, and the socket is switched on.
Food not cooked properly
Increase the steaming time.
Unit displays E00
The unit has run dry. Add water to resume normal operation.
Before use
- Ensure the socket is properly grounded.
- Verify input voltage is 220-240V~ 50/60Hz.
- Place on a flat, stable surface.
- Do not place on heat-sensitive surfaces like carpets.
- Ensure water is added according to the recipe requirements.
Images and diagrams
- The unit features a modular design with a cover, two SUS304 steaming trays, a steamer container, and the base unit.
Model compatibility
- For indoor household use only.
- Not suitable for commercial use or high-humidity environments.

Manual page author
Michael Turner
Technical manual editor
Reviews PDF manuals for structure, safety notes, and practical product details so readers can find the right information quickly.