Lighting / Fixtures
User Manual for Globo Dentsy Pendant Light 17013H1
Quick guide for the Globo Dentsy Pendant Light (17013H1, 17013H1G, 17013H1B). Includes installation steps, electrical connection, and touch control operation.
Table of contents
Quick guide from the manual
This document provides installation and operation instructions for the Globo Dentsy pendant light series (17013H1, 17013H1G, 17013H1B). The fixture features integrated LED lighting with touch control capabilities.
Installation
Before beginning, ensure the main power supply is switched off. The installation involves mounting the bracket to the ceiling, connecting the electrical wires, and securing the fixture.
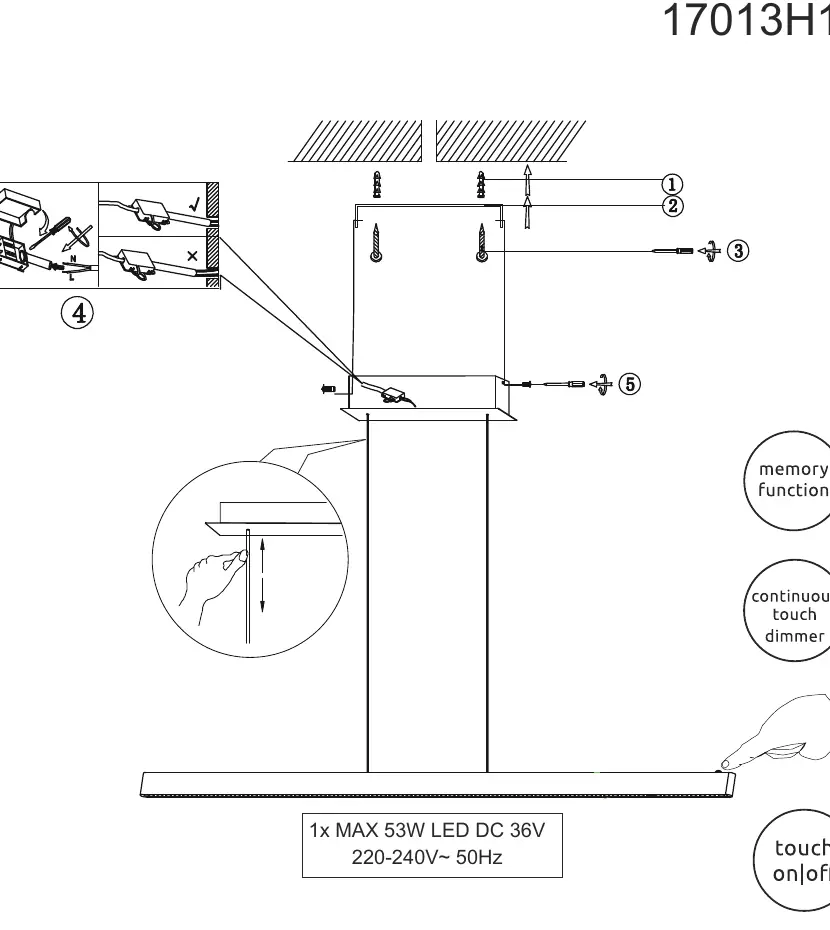
- Mount the bracket to the ceiling using the provided screws.
- Connect the electrical wires (L and N) according to the diagram. Ensure the connection is secure and insulated.
- Attach the fixture to the mounted bracket.
Operation
The pendant light is equipped with touch-sensitive controls:
- Touch on/off: Tap the designated area to turn the light on or off.
- Continuous touch dimmer: Hold the touch area to adjust the brightness level.
- Memory function: The light remembers the last brightness setting when turned back on.
Technical Specifications
- Power: 1x MAX 53W LED DC 36V
- Voltage: 220-240V~ 50Hz
- Energy Efficiency Class: E
Important Notes
The light source and the control gear are permanently integrated into the product design. They are not interchangeable or replaceable. Do not attempt to disassemble the fixture to replace these components.
Manufacturer information
Globo Lighting
Practical help
Common problems
Light does not turn on
Check the electrical connection and ensure the main power supply is active.
Dimmer not responding
Ensure the touch sensor area is clean and dry. Verify the power supply is stable.
Before use
- Turn off the main power supply before starting installation.
- Verify the ceiling structure can support the weight of the pendant light.
- Ensure the local voltage matches 220-240V~ 50Hz.
Show more Show less
Specs in practice
- Energy Class
- E
Images and diagrams
- Step 1-2: Mount the bracket to the ceiling.
- Step 3: Secure the fixture to the bracket.
- Step 4: Connect the electrical wires (L and N).
- Step 5: Finalize the fixture mounting.
Model compatibility
- The light source is not replaceable.
- The control gear is not replaceable.

Manual page author
David Miller
Documentation analyst