Lighting / Fixtures
Installation Guide for Hinkley 4300 Wall Sconce
Step-by-step installation and wiring guide for the Hinkley 4300 wall sconce. Includes mounting instructions, electrical connection procedures, and weatherproofing tips.
Quick answers from the manual
Quick answer
- The Hinkley 4300 is a wall sconce installed by attaching a mounting strap to a junction box, connecting the electrical wires, and securing the fixture with ball knobs. Glass is installed by removing the socket ring, placing the glass, and re-securing the ring. p. 1
Key actions
- Mounting the fixture p. 1
- Making electrical connections p. 2
- Installing glass p. 1
- Sealing/Caulking p. 3
Where to find it in the PDF
- Mounting Instructions p. 1
- Wiring and Grounding Instructions p. 2
- Caulking Instructions p. 3
Table of contents
Manual images
Click an image to enlargeQuick guide from the manual
This document provides instructions for the installation, wiring, and weatherproofing of the Hinkley 4300 wall sconce. Always turn off the power supply at the circuit breaker before beginning any installation work. If you are unsure about wiring, consult a qualified electrician.
Mounting the fixture
The fixture is installed by attaching a mounting strap to the junction box, followed by securing the fixture backplate to the strap.
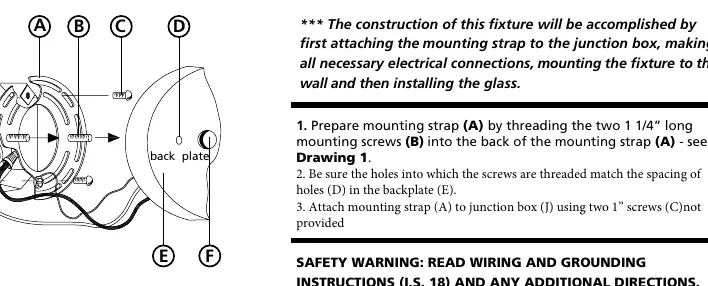
- Prepare the mounting strap: Thread the two 1 1/4" mounting screws (B) into the back of the mounting strap (A). Ensure the screw spacing matches the holes (D) in the fixture backplate (E).
- Attach to junction box: Secure the mounting strap (A) to the junction box (J) using two 1" screws (C). Note that these screws are not provided.
- Mount the fixture: Slip the mounting screws (B) through the holes (D) in the backplate (E). While holding the fixture in place, thread the two ball knobs (F) onto the ends of the mounting screws and tighten to secure the fixture to the wall.
Electrical connections
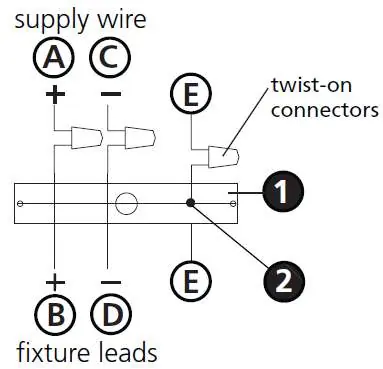
Refer to the included I.S. 18 wiring and grounding instructions for specific details on connecting supply wires to the fixture leads. Ensure all connections are made using appropriately sized twist-on connectors.
Installing the glass
- Remove the socket ring (3) from the socket (1).
- Place the glass (2) over the socket (1).
- Thread the socket ring (3) back onto the socket (1) and tighten securely.
- Repeat these steps for any remaining glass pieces.
Weatherproofing
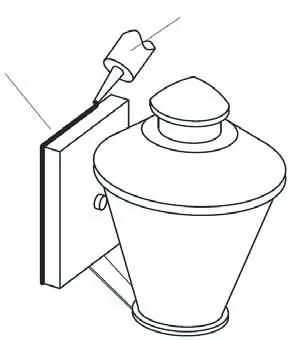
For outdoor installations, it is recommended to seal the gap between the fixture backplate and the wall using a high-quality waterproof caulk or silicone sealant. Apply sealant to the top and both sides of the backplate. It is also recommended to apply a small bead of sealant under the ball knobs used to mount the fixture.
Manufacturer information
Hinkley Lighting
Practical help
Common problems
Water entering the junction box
Use a high-quality waterproof caulk or silicone sealant to seal the gaps between the fixture backplate and the wall.
Fixture is loose on the wall
Ensure the mounting strap is firmly attached to the junction box and that the ball knobs are fully tightened onto the mounting screws.
Before use
- Turn off the power supply at the circuit breaker.
- Verify the junction box is compatible with the mounting strap.
- Ensure you have 1" screws for attaching the strap to the junction box (not provided).
- Have silicone sealant ready if installing outdoors.
- Confirm all parts (mounting strap, screws, glass, socket rings) are present.
Show more Show less
Specs in practice
- Mounting screws (B)
- 1 1/4 inch long screws used to attach the fixture to the mounting strap.
- Junction box screws (C)
- 1 inch screws used to attach the mounting strap to the junction box (not provided).
Images and diagrams
- Drawing 1: Illustrates the mounting strap assembly and how to attach the fixture to the wall.
- Drawing 2: Shows the glass installation process, specifically removing the socket ring.
- Wiring Diagrams: Provide visual guidance for connecting supply wires to fixture leads.
Model compatibility
- If the wall surface is lap siding, use caulk and a specialized fixture mounting platform.
- Consult local authorities for specific code requirements regarding new wiring.

Manual page author
David Miller
Documentation analyst