Home / Electrical Timers
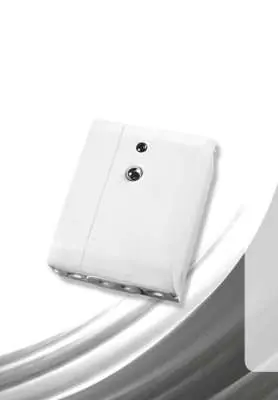
Installation and Operating Instructions for Timeguard NSLDD1000 Dusk to Dawn Light Controller
Quick guide for the Timeguard NSLDD1000 2300W Dusk to Dawn Light Controller. Includes installation steps, wiring diagrams, technical specifications, and troubleshooting tips.
Quick answers from the manual
Quick answer
- The Timeguard NSLDD1000 is a 2300W Dusk to Dawn light controller. It features adjustable Lux and Time settings (2, 4, 8 hours or dusk to dawn) and is IP44 rated for external use. p. 1, 2
Key actions
- Install the unit p. 3
- Wire the connections p. 4
- Adjust settings p. 7
First start
- Connect to mains and switch power ON. p. 7
- Verify operation via red LED. p. 7
Show 3 more answers Show less
Problems and fixes
Light sensor will not operate at night
Turn Time Delay to minimum, then adjust DUSK control slowly anti-clockwise until the lamp illuminates.
p. 8
Light activates during the daytime
Adjust the setting anti-clockwise to lower the level of ambient light required for activation.
p. 8Technical specifications
| Parameter | Value | Meaning | Pages |
|---|---|---|---|
| Voltage | 230V AC 50 Hz | Operating voltage | p. 2 |
| Max Load (Halogen) | 2300W | Maximum switching load | p. 2 |
| Max Load (Fluorescent) | 500W | Maximum switching load | p. 2 |
| Max Load (LED) | 80W | Maximum switching load | p. 2 |
Where to find it in the PDF
- General Information & Safety p. 2
- Installation p. 3
- Connection Diagram p. 4
- Testing & Setup p. 6, 7
- Troubleshooting p. 8
Table of contents
Manual images
Click an image to enlargeQuick guide from the manual
The Timeguard NSLDD1000 is a 2300W Dusk to Dawn light controller designed for external applications. This guide covers the essential installation, wiring, and configuration steps. Always ensure the mains supply is isolated before performing any work.
Safety
- Before installation or maintenance, ensure the mains supply is switched off and the circuit supply fuses are removed or the circuit breaker is turned off.
- It is recommended that a qualified electrician is consulted for installation in accordance with current IEE wiring and Building Regulations.
- Ensure the total load on the circuit does not exceed the rating of the circuit cable, fuse, or circuit breaker.
- This PIR is of Class II construction and must not be earthed.
Technical Specifications
- Voltage: 230V AC 50 Hz
- Maximum Switching Load: 2300W Halogen, 500W Fluorescent, 80W LED
- Operation: Dusk to Dawn, or Dusk to 2/4/8 hours OFF (adjustable)
- IP Rating: IP44 (suitable for restricted external applications)
Installation
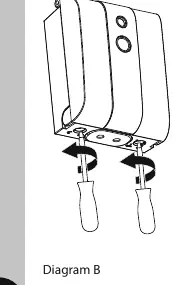
- Ensure the mains supply is isolated.
- Install an isolating switch to enable power to be switched ON/OFF for maintenance.
- Open the unit by gently prying the "ears" on each side. The front cover is hinged at the top and swings upwards.
- Mark the position of the fitting holes using the unit as a template. Drill holes, taking care to avoid hidden cables or pipes, and insert rawl plugs.
- Pass the 230V 50Hz mains supply and load cables through the cable entry points, ensuring grommets are used to maintain the IP rating.
- Fix the unit to the wall using appropriate screws.
- Terminate the cables into the terminal block, ensuring correct polarity.
- Attach the supplied cable clamp without overtightening.
- Close the front cover.
Connection Diagram
Connect the cables to the terminal block as follows:
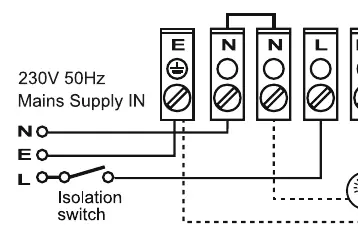
- 230V 50Hz Mains Supply IN: Live (Brown or Red) to L, Neutral (Blue or Black) to N.
- Load: Switch Live (Brown or Red) to L1, Neutral (Blue or Black) to N.
- Note: A 'Loop Terminal' is provided for 3-core cable use. N terminals are common.
Testing and Setup
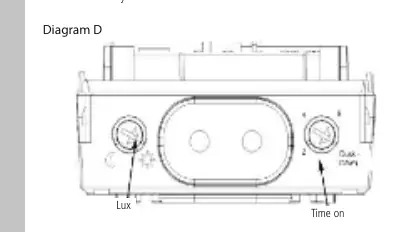
The adjustment knobs are located on the side of the sensor head. They are factory set to "Daylight Mode" (LUX set to the 'Sun' symbol).
Setting up for Automatic Operation
- Set the Dusk control knob fully clockwise and the Time control to the required number of hours or dusk/dawn.
- When the ambient light reaches the desired darkness level, slowly rotate the control anti-clockwise until the lamp illuminates.
- Leave the control set at this point.
- If the unit operates too early (while still light), adjust the control slightly anti-clockwise. If it operates too late (when very dark), adjust slightly clockwise.
Troubleshooting
- Light sensor will not operate at night: The ambient light may be too bright for the current DUSK setting. Turn the Time Delay knob to minimum, then adjust the DUSK control slowly anti-clockwise until the lamp illuminates.
- Light activates during the day: Adjust the DUSK setting anti-clockwise to lower the level of ambient light required for activation.
Practical help
Common problems
Light sensor will not operate at night
Ambient light may be too bright. Turn Time Delay to minimum, then adjust DUSK control slowly anti-clockwise until the lamp illuminates.
Light activates during the daytime
Adjust the DUSK setting anti-clockwise to lower the level of ambient light required for activation.
Before use
- Ensure mains supply is switched off and isolated
- Consult a qualified electrician for installation
- Verify total load does not exceed circuit ratings
- Ensure grommets are used to maintain IP44 rating
- Check polarity of connections at the terminal block
Show more Show less
Specs in practice
- 2300W Halogen
- Maximum load capacity for halogen lighting.
- 500W Fluorescent
- Maximum load capacity for fluorescent lighting.
Images and diagrams
- Diagram A: Opening the unit by prying the side ears.
- Diagram B: Mounting the unit to the wall.
- Diagram C: Terminal block layout and cable clamping.
- Diagram D: Location of Lux and Time adjustment knobs.
Model compatibility
- Class II construction, must not be earthed.
- Requires 230V 50Hz mains supply.
- Suitable for restricted external applications.

Manual page author
Emily Carter
User documentation editor