Electronics / AV Switchers
User Manual for Gofanco 1080p 4x1 HDMI Multi-Viewer
Quick guide for the Gofanco 1080p 4x1 HDMI Multi-Viewer. Includes installation steps, connection diagrams, remote control functions, and video mode settings.
Table of contents
Manual images
Click an image to enlargeQuick Guide from the Manual
The Gofanco 1080p 4x1 HDMI Multi-Viewer allows you to display four HDMI sources on a single screen simultaneously. It supports various split-screen modes, including Quad, Dual, and Full Screen. Ensure all devices are powered off before making connections to prevent damage.
Package Contents
- 1080p 4x1 HDMI Multi-Viewer
- Power adapter (12V/2A)
- Remote control
- Surface mounting accessories
- User guide
Product Layout
Front Panel: Contains the Power Jack, HDMI Out port, Audio button, Mode button, and IR Window for the remote control.

Back Panel: Contains four HDMI Input ports (1-4) for connecting your source devices.
Hardware Installation


- Power off all devices, including HDMI sources and the display.
- Connect your HDMI source devices to the HDMI In connectors using HDMI cables (not included).
- Connect your HDMI display to the HDMI Out connector using an HDMI cable (not included).
- Plug the included power adapter into the Multi-Viewer's power jack, then connect it to a reliable power outlet.
- Power on all devices. The unit is now ready for use.
Device Control
Video Mode Button: Located on the front panel, this button cycles through various sub-modes for Quad, Dual, and Single/Full Screen layouts. Refer to the manual for the specific selection order of these modes.
Audio Selection Button: Located on the front panel, this button allows you to select the audio source from Input 1, 2, 3, 4, or Mute.
Remote Control
The remote control provides direct access to:
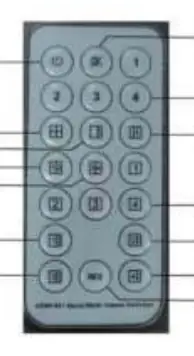
- Power On/Off
- Mute
- Audio selection (1-4)
- Specific split-screen modes (2x2, 1x3, H Quadview, Side by Side)
- Full Screen selection for any input
- Resolution switching (720P/1080P)
Specifications
- HDMI Interface: 4 Inputs, 1 Output
- HDCP Version: 1.2
- Audio: PCM 2-channel
- Resolution: Up to 1080p @60Hz
- Power Supply: DC 12V/2A
- Power Consumption: 10W (max)
Practical help
Common problems
No image on display
Ensure all HDMI cables are securely connected and the source devices are powered on. Verify the display is set to the correct HDMI input.
Remote control not responding
Ensure the IR window on the front panel is not obstructed and the remote has fresh batteries.
Audio not playing
Use the Audio button on the front panel to cycle through inputs or check if the Mute function is active.
Before use
- Power off all devices before connecting cables.
- Ensure you have high-quality HDMI cables (not included).
- Verify that your HDMI source devices are compatible with 1080p resolution.
- Confirm the power adapter (12V/2A) is available and ready for connection.
Specs in practice
- PCM 2-channel
- The supported audio format; ensure your source devices are set to output PCM audio.
Images and diagrams
- Front Panel: Identifies the power input, HDMI output, control buttons, and IR receiver.
- Back Panel: Identifies the four HDMI input ports.
- Connection Diagram: Illustrates the flow from source devices (DVD, PC, etc.) to the Multi-Viewer and finally to the HDMI display.
Model compatibility
- Supports up to 1080p resolution; not compatible with 4K sources.
- HDMI cables are not included in the package.

Manual page author
Emily Carter
User documentation editor
Prepares concise manual descriptions and highlights the most useful setup, operation, and maintenance information for readers.