Electronics / Video Transmission
User Manual for Gofanco Wireless HDMI KVM Extender 1080p - 150m
Quick guide for the Gofanco Wireless HDMI KVM Extender 1080p - 150m. Includes installation steps, connection diagrams, troubleshooting, and technical specifications.
Table of contents
Manual images
Click an image to enlargeQuick Guide
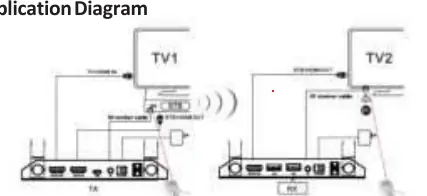
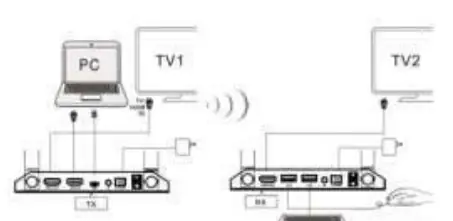
The Gofanco Wireless HDMI KVM Extender 1080p - 150m allows you to transmit HDMI signals wirelessly up to 150 meters (492ft) line-of-sight. It supports KVM functionality, enabling you to control a source device (like a PC) from a remote location using a USB keyboard and mouse. The system includes a Transmitter (TX) and a Receiver (RX) and requires no cables between them.
Package Contents
- 1x Transmitter unit
- 1x Receiver unit
- 1x IR blaster cable
- 1x IR receiver cable
- 4x Antennas
- 2x Power adapters
- 1x User guide
Product Layout
Front Panel (TX & RX):

- WiFi LED: Slow flashing green (detecting signal), fast flashing green (transferring data).
- Pairing LED: Flashing red (detecting signal), solid red (paired).
- Power LED: Solid red (powered on), solid blue (HDMI source detected).
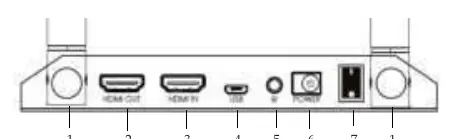
Transmitter Rear Panel (TX): Includes antenna connectors, local HDMI output, HDMI input, Micro USB (for PC connection), IR Out, power jack, and power switch.
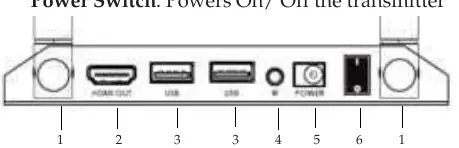
Receiver Rear Panel (RX): Includes antenna connectors, HDMI output, USB Type-A ports (for keyboard/mouse), IR In, power jack, and power switch.
Hardware Installation
- Power off all devices, including the HDMI source and display.
- Install the included antennas on both the TX and RX units.
- Connect your HDMI source device to the Transmitter's HDMI Input.
- Optional: Connect a local display to the Transmitter's Local HDMI Output to monitor the signal.
- Optional: Connect the IR Blaster cable to the Transmitter's IR port and position the eye towards the source device's IR window.
- Connect your HDMI display to the Receiver's HDMI Output.
- Optional: Connect the IR Receiver cable to the Receiver's IR port.
- Plug your USB keyboard and mouse into the Receiver's USB ports.
- Connect the power adapters to both units and power them on.
- Power on your HDMI source and display devices.
Troubleshooting
If you experience issues, check the following:
- No video output: Ensure the source device is powered on, the transmitter's HDMI Signal LED is active, and all HDMI cables are securely connected. Try connecting the source directly to the display to verify the signal.
- Poor video quality: Ensure cables are connected properly. Adjust the antenna angles on both units (position them as far apart as possible). Ensure the units are within the required signal range and remove obstacles blocking the line-of-sight.
Specifications
Wireless Range: Up to 150m (492ft) line-of-sight.Resolution: Supports up to 1080p.Latency: 16ms (Tx+Rx).Power: 5V/2A adapters.Connectivity: 2.4GHz wireless; KVM extension via USB.
Practical help
Common problems
No video output on remote display
Verify the source device is on, check that the transmitter's HDMI Signal LED is lit, ensure cables are secure, and test the source directly with the display.
Poor video quality
Check cable connections, adjust antenna angles to be further apart, reduce the distance between units, and remove physical obstacles blocking the line-of-sight.
Before use
- Power off all HDMI source and display devices.
- Install all 4 antennas on the TX and RX units.
- Ensure you have HDMI cables available (not included).
- Verify USB keyboard and mouse are ready for KVM control.
- Ensure a clear line-of-sight environment for optimal range.
Specs in practice
- Wireless Range
- Up to 150m (492ft) in a line-of-sight environment.
- Power Adapter
- Requires 5V/2A power supply.
- Wireless Frequency
- Operates on 2.4GHz.
Images and diagrams
- Figure 1: Front panel LED indicators for WiFi, Pairing, and Power status.
- Figure 2: Transmitter rear panel showing HDMI, USB, IR, and power ports.
- Figure 3: Receiver rear panel showing HDMI, USB, IR, and power ports.
- Figure 4: IR control setup diagram.
- Figure 5: Keyboard and mouse control setup diagram.
Model compatibility
- Supports HDMI 1.4.
- Wireless performance is affected by thick walls, brick, glass, and electronic interference.
- Avoid placing near microwaves or other wireless devices.

Manual page author
Michael Turner
Technical manual editor
Reviews PDF manuals for structure, safety notes, and practical product details so readers can find the right information quickly.