Home Appliances / Space Heaters
User Manual for Goldair 2000W Ceramic Wall Heater GCW300
Quick guide for the Goldair 2000W Ceramic Wall Heater (GCW300). Learn about installation, remote control operation, Wi-Fi setup, safety precautions, and maintenance.
Quick answers from the manual
Quick answer
- The Goldair GCW300 is a wall-mounted ceramic heater. It must be installed 1.8m above the floor. It is controlled via remote and supports Wi-Fi app connectivity. p. 1, 6, 7, 9
Key actions
- Install the heater p. 6, 7
- Set the time p. 9
- Pair with App p. 11, 12
First start
- Plug in, switch on at the rear, and use the remote to control settings. p. 8, 9
Problems and fixes
Heater overheating
Ensure vents are clean and not covered. Check for dust/fluff.
p. 3, 13Maintenance and reset
- Clean vents regularly with a vacuum. Do not use abrasive cleaners. p. 3, 13
Technical specifications
| Parameter | Value | Meaning | Pages |
|---|---|---|---|
| Power | 2000W | Heating capacity | p. 1, 13 |
Where to find it in the PDF
- Installation p. 6, 7
- Operation p. 8, 9, 10
- Wi-Fi Setup p. 11, 12
Table of contents
Manual images
Click an image to enlargeQuick guide from the manual
The Goldair GCW300 is a wall-mounted ceramic heater designed for indoor household use. It features remote control operation, a 24-hour timer, thermostat control, and Wi-Fi connectivity for app-based management. Safety Warning: Never cover the heater, keep it at least 1 meter away from flammable materials, and do not use it in small rooms occupied by vulnerable persons without supervision.
Installation
The heater must be wall-mounted before use. Ensure the wall is heat-resistant and complies with local building regulations.
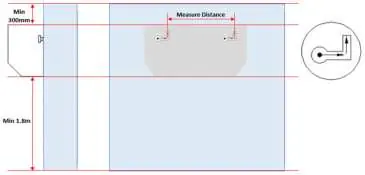
- Clearances: Install at least 1.8m above the floor, 300mm from the ceiling, and 200mm from side walls.
- Placement: Do not mount directly under or over an electrical power socket. It is recommended to install to the side of the socket.
- Mounting: Measure the distance between mounting holes on the back of the unit, mark the wall, drill holes, insert wall plugs, and fix screws (leaving heads out approx. 10mm). Hang the heater and slide it to lock into place.
Operation
The heater is controlled primarily via the remote control. Switch on the main power button located at the rear of the unit first.
- Time Setting: Press the SET button to cycle through day (WEEK), hour, and minute settings using the '+' or '-' buttons.
- Modes: Use the MODE button to toggle between Low Heat, High Heat, and Fan-only (no heat) modes.
- Thermostat: Adjust the temperature from 10°C to 49°C using the '+' or '-' buttons.
- Timer: Use the '24H' button to set an automatic shut-off delay from 1 to 24 hours.
- Smart Start: A button on the back of the heater activates high heat and swing settings.
Wi-Fi and App Setup
The heater supports 2.4GHz Wi-Fi networks. Download the Goldair app, register an account, and follow the in-app instructions. To enter pairing mode, ensure the device is in standby, then hold the small black button on the back of the heater for 5 seconds until the Wi-Fi icon flashes.
Maintenance and Safety
- Cleaning: Always unplug and allow the unit to cool before cleaning. Use a damp cloth (not wet) to wipe the exterior. Vacuum the air vents and grills regularly to remove dust and fluff, which is a common cause of overheating.
- Safety Devices: The unit includes a resettable thermal link and a non-resettable thermal fuse. If the unit overheats, investigate the cause (e.g., blocked vents).
- Battery: The remote uses a CR2025 coin battery. Keep out of reach of children.
Manufacturer information
Goldair
Practical help
Common problems
Heater smells or smokes on first use
This is a normal occurrence caused by the initial heating of internal elements and should not happen again.
Heater turns off automatically
Check if the 'Auto' (open window) function is active or if the thermal cut-out has triggered due to overheating.
Remote control not responding
Ensure you are within 3 meters and aiming directly at the sensor on the front panel. Check the CR2025 battery.
Before use
- Ensure the heater is securely wall-mounted.
- Verify the area is clear of flammable materials (1m distance).
- Check that the power cord is not damaged.
- Ensure the wall is heat-resistant.
- Confirm the unit is not covered.
Specs in practice
- Thermostat Range
- Adjustable from 10°C to 49°C.
- Safety Devices
- Includes a resettable thermal link and a non-resettable thermal fuse.
Images and diagrams
- The installation diagram illustrates the required clearances: 1.8m from the floor, 300mm from the ceiling, and 200mm from side walls.
Model compatibility
- Requires 2.4GHz Wi-Fi for app connectivity.
- Not compatible with 3G/4G internet connections.

Manual page author
Emily Carter
User documentation editor
Prepares concise manual descriptions and highlights the most useful setup, operation, and maintenance information for readers.