Home Appliances / Space Heaters
User Manual for Goldair Select 2000W Convector Heater GSCV120
Quick guide for the Goldair Select 2000W Convector Heater GSCV120. Learn about safe assembly, operating instructions, thermostat settings, and maintenance.
Quick answers from the manual
Quick answer
- The Goldair GSCV120 is a 2000W convector heater. It requires the feet to be attached with screws before use. It features three heat settings (750W, 1250W, 2000W) and a thermostat. p. 1, 4, 5
Key actions
- Attach feet p. 4
- Operate heater p. 5
First start
- Initial use p. 5
Problems and fixes
Heater not working
Check power supply, ensure not covered, check thermal fuse.
p. 6Maintenance and reset
- Cleaning p. 6
Technical specifications
| Parameter | Value | Meaning | Pages |
|---|---|---|---|
| Wattage | 1800-2000W | Power consumption | p. 6 |
| Supply | 220-240VAC 50Hz | Voltage and frequency | p. 6 |
Where to find it in the PDF
- Safety Guide p. 2, 3, 4
- Assembly p. 4
- Operation p. 5, 6
- Warranty p. 7
Table of contents
Manual images
Click an image to enlargeQuick guide from the manual
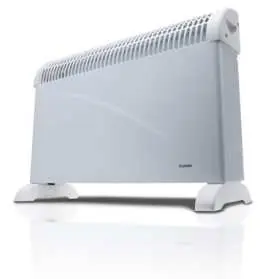
The Goldair Select 2000W Convector Heater (Model GSCV120) is designed for indoor household use. Before operating, ensure the feet are securely attached using the provided screws. The heater features three heat settings and a thermostat for temperature control. Always maintain a 1-metre clearance from all sides and never cover the unit to prevent fire hazards.
Assembly
The heater must not be used without the feet fitted. The unit is supplied with '1 way screws' for permanent installation of the feet.
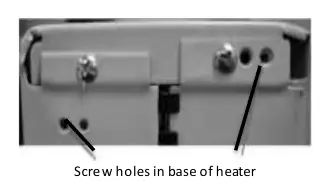
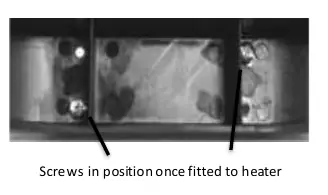
- Remove all packaging and check for damage.
- Locate the 2 feet and 4 screws (usually taped to one of the feet or the plug head).
- Attach each foot to the base of the heater using 2 screws.
- Tip: Slightly angle the screws when inserting them; they will straighten as you tighten them.
Operating Your Heater
Ensure the heater is placed on a flat, stable, and heat-resistant surface. Once positioned, plug the unit into a mains outlet.
Heat Control Switches
- 750W: Low heat setting.
- 1250W: Medium heat setting.
- 2000W: High heat setting (750W and 1250W switches used together).
Thermostatic Control
- Rotate the thermostat knob clockwise to the maximum position.
- When the room reaches a comfortable temperature, slowly turn the knob anti-clockwise until the heater turns off (you will hear a click).
- The heater will now cycle on and off to maintain the set temperature.
Safety Precautions
- Do not cover: Covering the heater presents a fire risk and will permanently disable the unit via the safety fuse.
- Clearance: Keep all objects at least 1 metre away from the front, sides, and rear.
- No Timers: Do not use with external timers, programmers, or remote-control systems.
- Supervision: Never leave the heater unattended while in use.
- Environment: Do not use in small rooms occupied by persons unable to leave on their own, or near flammable liquids.
Care and Cleaning
Regular cleaning is required for trouble-free operation.
- Always unplug the heater and allow it to cool down completely before cleaning.
- Remove dust and fluff from air vents and grills using a vacuum cleaner.
- Wipe the exterior with a damp cloth (not wet) rinsed in hot soapy water.
- Do not use abrasive cleaning products, petrol, thinners, or polishing agents.
- Ensure the heater is completely dry before plugging it back in.
Safety Devices
The appliance includes two protection devices:
- Resettable Thermal Link: Automatically disconnects power if the heater overheats. It will reset after cooling down. If this happens, investigate the cause of overheating.
- Thermal Fuse: Permanently disconnects the appliance in case of severe overheating (non-resettable).
Manufacturer information
Goldair
Practical help
Common problems
Heater not working
Check power supply, ensure the unit is not covered, and check if the thermal fuse has been triggered.
Slight odour or smoke on first use
This is a normal occurrence caused by the initial heating of internal elements and should not happen again.
Plug overheating
Ensure the power cord is not tight and the plug is fully inserted into the socket.
Before use
- Ensure feet are attached with the provided screws.
- Check for transport damage.
- Ensure the heater is on a flat, stable, heat-resistant surface.
- Keep 1 metre clearance from all sides.
- Ensure hands are dry before handling the plug.
Images and diagrams
- The assembly diagram shows the screw holes in the base of the heater and the screws in position once the feet are fitted.
Model compatibility
- Do not use with external timers, programmers, or remote-control systems.
- Not for commercial or industrial use.
- Do not use in the immediate surrounds of a bath, shower, or swimming pool.

Manual page author
David Miller
Documentation analyst
Organizes user manual content into clear summaries, with attention to model details, product context, and everyday usability.