Automotive / Jump Starters
User Guide for GYS GYSPACK AIR Battery Charger and Booster
Quick guide for the GYS GYSPACK AIR battery charger and booster. Includes instructions for jump starting, using the air compressor, 12V power supply, battery maintenance, and troubleshooting.
Table of contents
Manual images
Click an image to enlargeQuick guide from the manual
The GYSPACK AIR is a portable battery booster with an integrated 12V battery, air compressor, and 12V power supply. To ensure optimal performance and battery longevity, it is critical to recharge the unit after every use and keep it plugged in until the next use.
Device description
The device features a control panel with a test button, ON/OFF switch, air pressure gauge, and various ports. It includes integrated clamps for jump starting, a 12V cigarette lighter socket for power, and an air compressor for inflating tires and other items.

Safety instructions
- For indoor use only. Do not expose to rain or excessive moisture.
- Do not charge non-rechargeable batteries.
- Do not use if the power cord or plug is damaged.
- Do not cover the device or obstruct cooling vents.
- Keep away from heat sources and temperatures exceeding 50°C.
- Wear safety goggles and protective gloves when handling batteries.
- In case of acid contact with eyes or skin, rinse immediately with water and seek medical assistance.
Battery test
Before starting a vehicle, test the internal battery by pressing the test button:
- Green light: Battery is charged. Starting is possible.
- Orange/Red light: Do not use the device. Recharge immediately.
Jump starting a vehicle
- Disconnect the GYSPACK AIR from the mains and turn the vehicle ignition to OFF.
- Set the device switch to OFF.
- Connect the red clamp to the positive (+) terminal and the black clamp to the negative (-) terminal of the vehicle battery.
- Set the device switch to ON.
- Turn the vehicle ignition key (max 6 seconds). If the engine does not start, wait 3 minutes before the next attempt.
- After starting, set the switch to OFF and disconnect the clamps in reverse order.
Charging the internal battery
The device features an automatic charger with a Floating System. To charge:
- Place the unit vertically.
- Connect the power supply to a 230V outlet and the device.
- The green indicator shows the battery is fully charged.
- If the device remains in charging mode for more than 24 hours (red/orange light), stop charging as the battery may be damaged.
Using as a 12V DC power supply
The cigarette lighter socket is protected by a 20A thermal circuit breaker. To use:
- Set the switch to OFF.
- Open the socket cap and insert the electrical device's plug (cable not included).
Using the air compressor
- Ensure the device switch is set to OFF.
- Connect the air hose to the item to be inflated.
- Press the ON button to start the compressor.
- Monitor the pressure gauge and stop when the desired pressure is reached.
- The compressor should run for a maximum of 10 minutes. Allow 10 minutes to cool down before reuse.
Maintenance and battery replacement
Regularly clean the device with a dry cloth and remove dust from the casing. Maintenance should be performed by qualified personnel. To replace the battery:
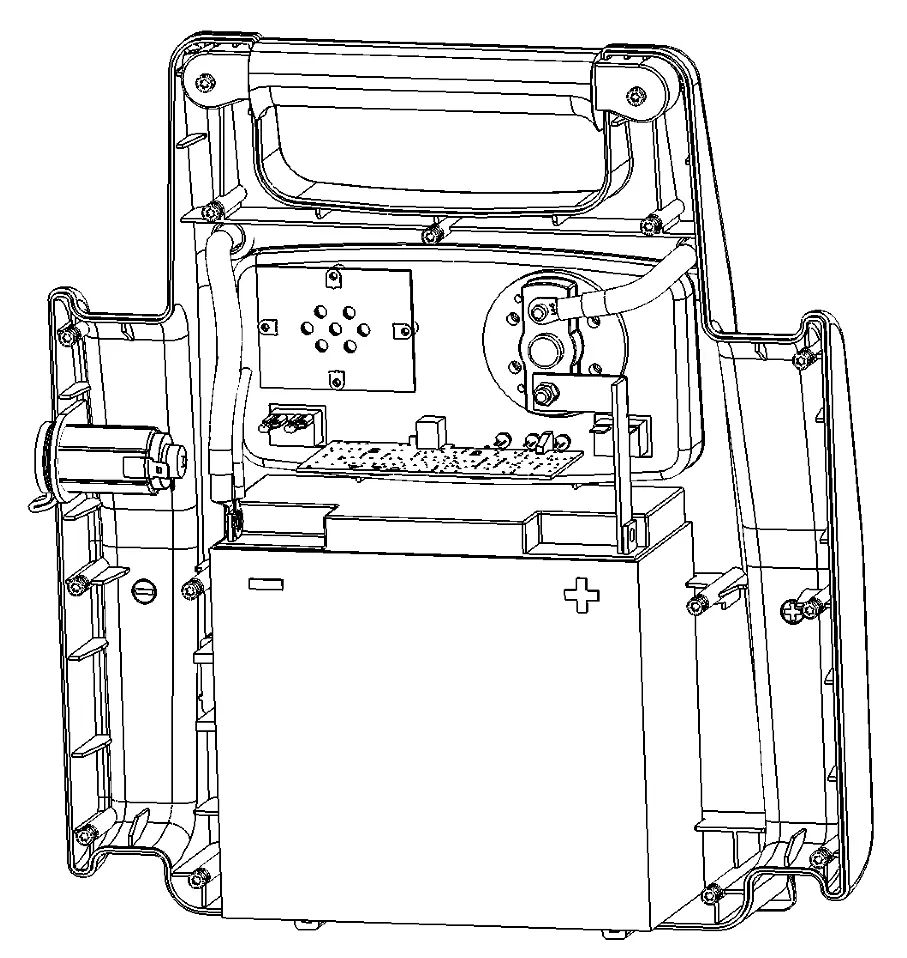
- Disconnect the unit from the power supply.
- Unscrew the 15 screws on the back panel and remove it.
- Disconnect the battery terminals (+ and -).
- Remove the battery and install a new one, ensuring correct polarity (terminal - on the left, + on the right).
- Tighten the nuts to 4 N.m and reattach the back panel.
Troubleshooting
If the device beeps, it detects polarity reversal; check the battery connections. If sparks appear, ensure the switch is OFF before connecting clamps. If the unit fails to start the vehicle, ensure the battery is charged and the vehicle battery is 12V.
Manufacturer information
GYS
Practical help
Common problems
Device beeps
Polarity reversal detected. Check battery polarity.
Sparks when connecting clamps
Switch is on ON. Turn off before connecting clamps to the battery.
Vehicle won't start
Check if switch is ON, battery is charged, or if jump start attempts were too frequent (wait 3 minutes between attempts).
Compressor won't start
Battery is discharged. Recharge the unit.
Before use
- Ensure the device is stored in a vertical position.
- Check the internal battery level using the test button.
- Ensure the vehicle ignition is OFF before connecting.
- Verify the vehicle battery is 12V.
- Recharge the unit after every use.
Specs in practice
- 1250A peak / 480A
- Jump start current capacity.
Images and diagrams
- The manual includes a wiring diagram and a battery replacement guide showing the 15 screws to remove the back panel.
Model compatibility
- Compatible with 12V lead-acid batteries (liquid or GEL).
- Do not use on 24V vehicles.

Manual page author
Emily Carter
User documentation editor
Prepares concise manual descriptions and highlights the most useful setup, operation, and maintenance information for readers.