Automotive / Backup Cameras
User Manual for Type S 12V Jump Starter AC530171
Quick guide for the Type S 12V Jump Starter (AC530171). Includes jump starting steps, charging instructions, safety warnings, and troubleshooting.
Table of contents
Manual images
Click an image to enlargeQuick guide from the manual
This jump starter is designed for 12V vehicles only. Before use, ensure the device is charged to at least 50%. When jump starting, you have a 90-second window to start the vehicle after connecting the clamps; if the time expires, you must disconnect and reconnect the clamps to reset the process. Always ensure the vehicle is in Park (or Neutral for manual transmissions) with the emergency brake engaged.
Product Overview
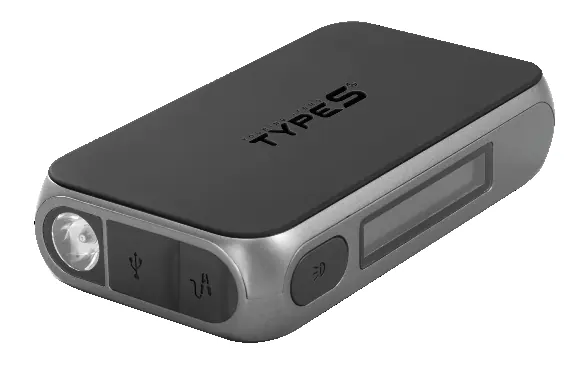
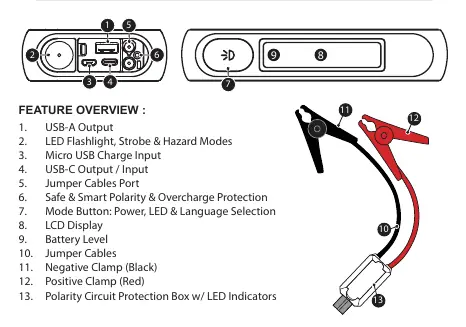
The device features a USB-A output, USB-C input/output, LED flashlight with strobe and hazard modes, and a jumper cable port. The included jumper cables are equipped with a polarity protection box that provides visual and audible status indicators.
Safety Warnings
- For 12V vehicles only: Do not use on non-12V vehicles.
- Moisture: Do not allow the product to get wet or immerse it in water.
- Temperature: Do not store in locations exceeding 104°F (40°C).
- Handling: Do not disassemble or modify the unit.
- Battery Leakage: If leakage occurs, avoid skin contact and dispose of properly at a battery recycling center.
- Personal Safety: Wear safety glasses and gloves. Remove metal items like rings or watches when working near lead-acid batteries.
Charging the Jump Starter
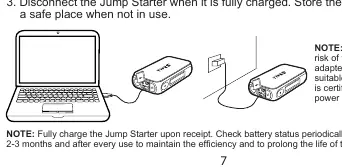
Fully charge the unit upon receipt and every 2-3 months to maintain battery health. You can charge at home using a computer USB-A port or a 2A USB wall adapter, or in a car using the included 12V USB charger. Connect the Micro USB cable to the input port on the jump starter. The battery indicator will glow while charging and show 100% when fully charged.
Jump Starting Procedure
- Press the Mode Button to power on the jump starter and ensure the battery level is 50% or higher.
- Insert the gray end of the jumper cables into the jump starter port.
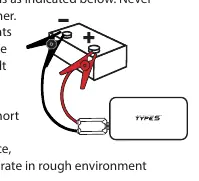
- Connect the RED clamp to the POSITIVE (+) battery post.
- Connect the BLACK clamp to the NEGATIVE (-) battery post.
- Check the LED status on the polarity protection box. If it is flashing red and beeping, do not proceed.
- Once connected, the LCD will display: Ready, Start vehicle ignition.
- Start the vehicle within 90 seconds.
- Once the engine starts, disconnect the clamps within 30 seconds, starting with the RED/POSITIVE clamp, then the BLACK/NEGATIVE clamp.
- Unplug the gray cable end from the jump starter to reset.
Polarity Protection Circuit Status
The polarity protection box provides status updates via lights and sound. A solid green light indicates the battery is ready. A solid red light indicates the jump starter needs charging. If the red light is flashing and beeping, disconnect the cables and check connections. If the red light is solid and the green light is solid, the unit has timed out; disconnect and reconnect to reset.
Troubleshooting
If the vehicle does not start, ensure the clamps are securely connected to the battery posts. If the jump starter times out (90 seconds), disconnect and reconnect the cables. If the flashlight does not turn on, ensure the unit is not currently charging, as this feature is disabled during charging. For further assistance, contact Type S at 1-866-294-9244 or [email protected].
Practical help
Common problems
Cannot jump start
Ensure clamps are connected to the correct battery posts (Red to +, Black to -), the unit has at least 50% charge, and the 90-second timer has not expired.
LED on clamp box keeps flashing
The protection circuit is active. Refer to the status table on the indicator box or the manual.
Flashlight does not turn on
The unit may be charging. Flashlight is disabled while charging; unplug the unit or wait for charging to finish.
Before use
- Ensure vehicle is in Park (or Neutral for manual transmission) with Emergency Brake engaged.
- Check that Jump Starter battery level is > 50%.
- Ensure battery clamps are free from rust and dirt.
- Verify vehicle is a 12V system.
- Unplug all USB charging cables from the jump starter.
Specs in practice
- Jump Start Current
- 200A - 350A.
- Operating Temperature
- -20°C to 34°C (-4°F to 93°F).
- Housing Protection
- IP64 Splash-Resistant (when ports are covered).
Images and diagrams
- The jump starter features a USB-A output, USB-C input/output, jumper cable port, and LED flashlight.
- The jumper cables include a polarity protection box with LED indicators.
Model compatibility
- For 12V vehicles only (cars, trucks, boats, motorcycles).
- Not for use on non-12V vehicles.

Manual page author
David Miller
Documentation analyst
Organizes user manual content into clear summaries, with attention to model details, product context, and everyday usability.