Industrial / Electrical
Hager 125A-160A RCD Add-on-Block User Manual
Quick guide for the Hager 125A-160A RCD add-on-block. Includes installation steps, wiring instructions, setting adjustments, and maintenance procedures.
Table of contents
Manual images
Click an image to enlargeQuick guide from the manual
This document provides installation and operation instructions for the Hager 125A-160A RCD add-on-block. It is designed to be attached to an MCCB (Molded Case Circuit Breaker). Ensure all electrical work is performed by qualified personnel.
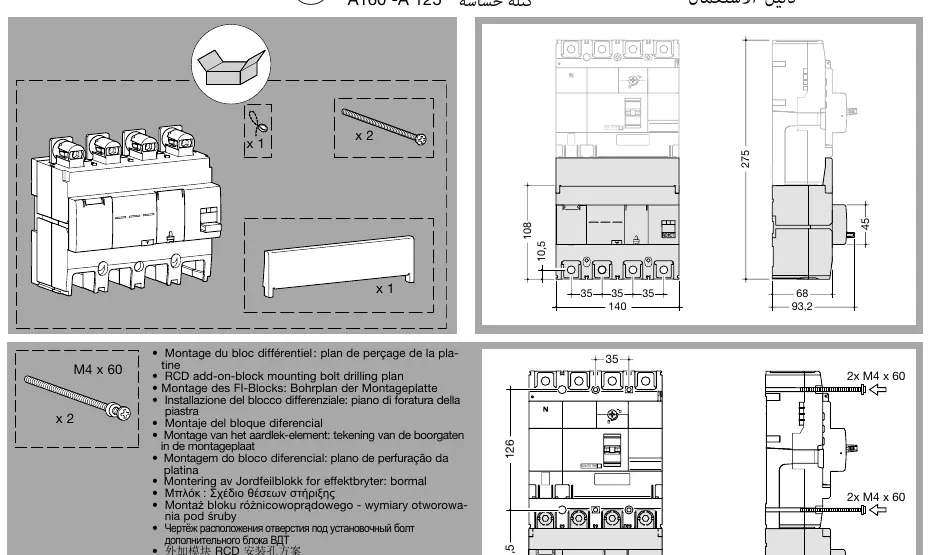
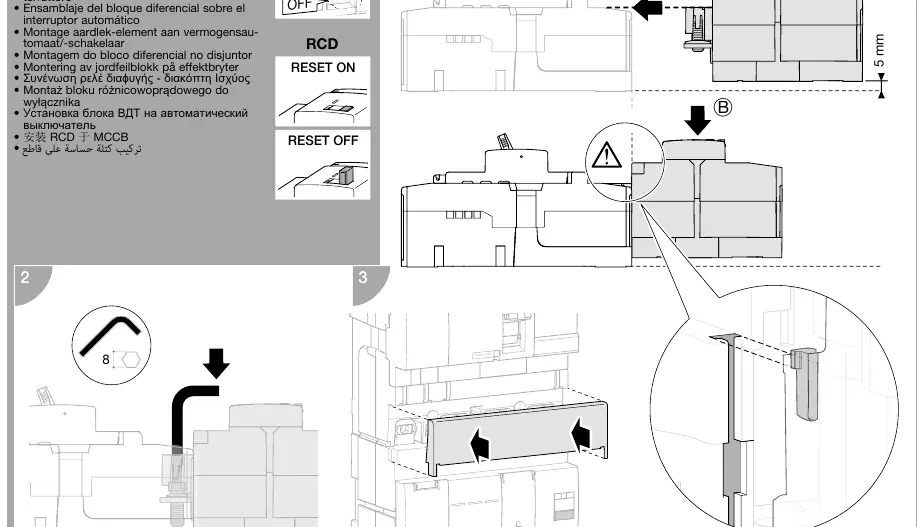
Installation
The RCD block must be mounted securely to the MCCB. Follow the drilling plan provided in the manual to ensure correct alignment. Use the provided M4 x 60 bolts to secure the unit. Ensure the MCCB is in the OFF position before beginning the installation process.
Operation and Indicators
The device features a reset button, a test button, and LED indicators for status monitoring:
- Reset Button: Used to reset the device after a trip.
- Test Button: Used to perform a functional test of the RCD.
- LED Indicator: A blinking LED indicates the device is running correctly.
- Signalization: The device signals leakage current in the installation at 25% - 50% of IΔn.
Settings
The RCD block allows for adjustment of sensitivity (IΔn) and time delay (Δt). Use a screwdriver to adjust the settings on the front panel of the unit. Refer to the table in the manual to select the appropriate combination of IΔn and Δt for your specific application requirements.

Wiring and Connections
Follow the connection diagrams provided in the manual for proper wiring. Ensure all connections are tightened to the specified torque (12 Nm). The device supports remote signaling for leakage current detection.
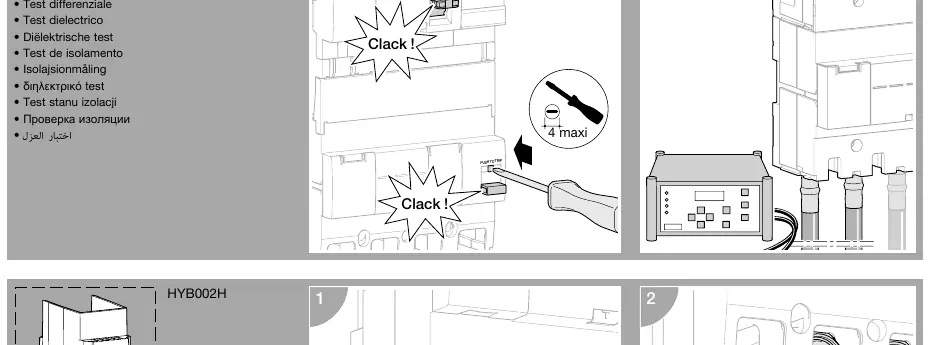
Maintenance and Testing
Perform a monthly functional test using the Test button to ensure the device is operating correctly. A dielectric test should be performed periodically to verify the insulation integrity of the internal circuits. Ensure the internal circuit is excluded during insulation tests.
Manufacturer information
Hager Group
Practical help
Common problems
LED not blinking
Verify that the device is powered and the MCCB is in the ON position.
Device trips unexpectedly
Check the IΔn and Δt settings to ensure they are appropriate for the installation load.
Before use
- Ensure the MCCB is in the OFF position.
- Verify the drilling plan matches the mounting surface.
- Check that all bolts are tightened to 12 Nm.
- Confirm the IΔn and Δt settings are configured correctly for the circuit.
Images and diagrams
- The drilling plan shows the required spacing for mounting bolts.
- The wiring diagram illustrates the connection points for remote signaling.
- The settings diagram shows how to adjust the IΔn and Δt dials.
Model compatibility
- Designed for use with specific MCCB models.
- Ensure the RCD block rating (125A-160A) matches the circuit requirements.

Manual page author
David Miller
Documentation analyst
Organizes user manual content into clear summaries, with attention to model details, product context, and everyday usability.