Home Appliances / Cooktops Hobs
User Manual for Hendi Induction Cooker 2000W
Quick guide for Hendi Induction Cooker 2000W (models 239278, 239391). Includes safety, operation, error codes, and maintenance instructions.
Quick answers from the manual
Quick answer
- This manual provides instructions for the Hendi Induction Cooker 2000W (models 239278, 239391), covering safety, operation, maintenance, and troubleshooting. p. 1, 3, 6, 7
Key actions
- To start cooking, place a suitable pan, connect to power, press On/Standby, then select Power or Temperature function. p. 6
First start
- Remove packaging, check for damage, clean the appliance, ensure it is dry, place on a stable heat-resistant surface with 15-20cm ventilation space. p. 5
Show 5 more answers Show less
Problems and fixes
E1
Appliance too hot. Clear obstacles, unplug, remove pan, let cool.
p. 7
E2
Pan overheated/empty. Unplug, remove pan, let cool, ensure water in pan.
p. 7
E3
Abnormal supply voltage. Check electrical supply.
p. 7Error codes
| Code | Meaning | Action | Pages |
|---|---|---|---|
| E1 | Appliance too hot | Clear obstacles, unplug, remove pan, let cool. | p. 7 |
| E2 | Pan overheated/empty | Unplug, remove pan, let cool, ensure water in pan. | p. 7 |
| E3 | Abnormal supply voltage | Check electrical supply. | p. 7 |
Maintenance and reset
- Always unplug and let cool completely before cleaning. Use a damp cloth with mild soap. Do not use abrasive sponges or water jets. p. 7
Technical specifications
| Parameter | Value | Meaning | Pages |
|---|---|---|---|
| Power | 2000W | Rated input power | p. 8 |
| Voltage | 220-240V~ | Operating voltage | p. 8 |
Where to find it in the PDF
- Operation p. 6
- Troubleshooting p. 7
Table of contents
Manual images
Click an image to enlargeQuick guide from the manual
This induction cooker is designed for buffet and household use. Before first use, ensure the appliance is clean, dry, and placed on a stable, heat-resistant surface with at least 15-20 cm of ventilation space around it. Always unplug the appliance and let it cool down completely before cleaning or storage.
Touch control panel
The control panel features the following functions:
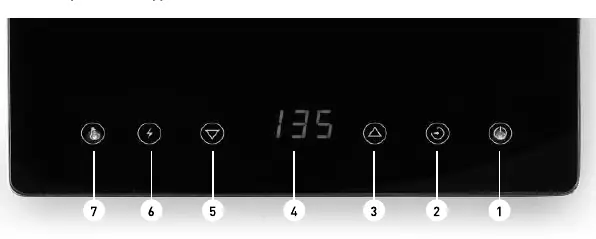
- ON/Standby button: Powers the unit on or into standby mode.
- Timer function: Sets cooking duration.
- Increase/Decrease settings: Adjusts time, temperature, or power.
- Power function: Activates power adjustment mode.
- Temperature function: Activates temperature adjustment mode.
- Digital display: Shows current settings and remaining time.
Operation
Place a suitable pan in the center of the heating surface. Connect the power plug to a suitable outlet. Press the ON/Standby button, then select either the Power or Temperature function to begin cooking. If the timer is not set, the appliance will operate continuously. The unit will automatically switch to standby if no buttons are pressed for 2 hours.
Suitable cooking equipment
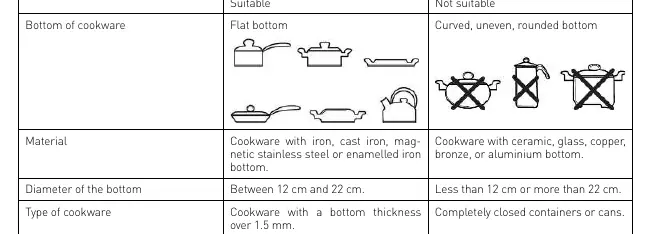
Only use cookware with a flat bottom, made of iron, cast iron, magnetic stainless steel, or enamelled iron. The bottom diameter should be between 12 cm and 22 cm, with a thickness of at least 1.5 mm. Do not use ceramic, glass, copper, bronze, or aluminum cookware.
Cleaning and Maintenance
Always unplug the appliance and allow it to cool completely before cleaning. Use a damp cloth with a mild soap solution for the exterior. Never immerse the appliance in water or use abrasive sponges, steel wool, or metallic utensils.
Troubleshooting
If the appliance does not function properly, check the following error codes:
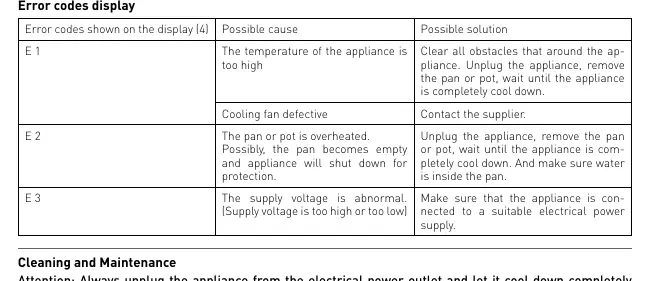
- E1: Appliance too hot. Clear obstacles, unplug, remove pan, and let cool.
- E2: Pan overheated or empty. Unplug, remove pan, let cool, and ensure water is in the pan.
- E3: Abnormal supply voltage. Check the electrical power supply.
Manufacturer information
HENDI Tools for Chefs
Practical help
Common problems
Appliance does not switch ON
Check power plug connection and ensure On/Standby button is pressed.
Cooling fan runs after standby
This is normal; it cools internal components. Wait until it stops.
E1 Error
Appliance too hot. Clear obstacles, unplug, remove pan, let cool.
E2 Error
Pan overheated/empty. Unplug, remove pan, let cool, ensure water in pan.
E3 Error
Abnormal supply voltage. Check electrical supply.
Before use
- Remove all packaging
- Check for damage
- Clean before use
- Ensure appliance is dry
- Place on stable, heat-resistant surface
- Ensure 15-20cm ventilation space
Show more Show less
Specs in practice
- Protection Class
- Class I
Images and diagrams
- 1: ON/Standby button
- 2: Timer function
- 3: Increase setting
- 4: Digital display
- 5: Decrease setting
Model compatibility
- Use flat-bottomed cookware
- Material: iron, cast iron, magnetic stainless steel, enamelled iron
- Diameter: 12cm - 22cm
- Thickness: >1.5mm

Manual page author
David Miller
Documentation analyst