Electronics / Televisions
Hisense 10000-BTU Portable Air Conditioner Quick Start Guide
A comprehensive quick start guide for the Hisense 10000-BTU portable air conditioner, covering installation, hose assembly, and basic operation.
Table of contents
Product Overview and Preparation
The Hisense 10000-BTU portable air conditioner is designed for efficient cooling in residential spaces. Before beginning the installation, ensure the unit has been kept in an upright position for at least two hours to allow the internal components to stabilize. Verify that all parts listed in the package, including the flexible exhaust hose, window adapter, foam seals, and slider panels, are present. You will need basic tools such as a Phillips screwdriver, a pencil, and scissors to complete the setup.
Window Installation
The included window kit is compatible with most vertical-sliding windows ranging from 18 to 50 inches in width. Select the appropriate combination of slider panels based on your window dimensions. Apply the adhesive foam seals to the window sash and frame to ensure an airtight fit. Insert the assembled window panels into the window opening and extend them as necessary. Secure the window-lock bracket with the provided wood screws to prevent the window from being opened from the outside. Use the non-adhesive foam seal to fill any remaining gaps between the glass and the window frame to prevent outside air and insects from entering.
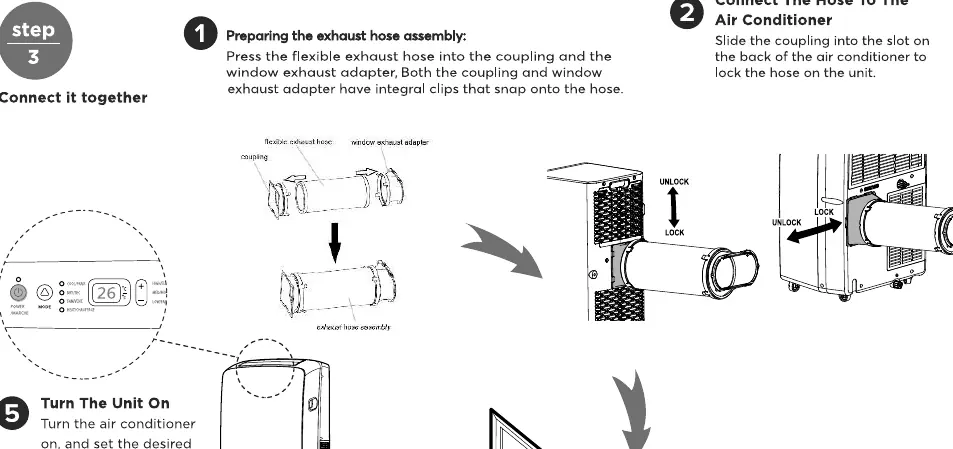
Exhaust Hose Assembly and Connection
Proper ventilation is critical for the performance of your air conditioner. Connect the flexible exhaust hose to the window adapter and the unit's exhaust port. The hose assembly features integrated clips that snap securely into place. Once assembled, slide the hose connector into the slot on the back of the air conditioner until it locks. Position the unit at least 20 inches away from the window to ensure adequate airflow and efficient operation.
Operation and Maintenance
To start the unit, plug the power cord into a grounded 3-prong outlet. Do not use an extension cord, as this poses a significant electrical shock hazard. Turn the unit on using the control panel and select your desired mode and temperature settings. For models equipped with a heat pump, the unit features a waterless design for cooling, but may require draining during heating or high-humidity conditions. If the unit displays an E5 error code, the internal tank is full and must be drained. Always turn off and unplug the unit before performing any maintenance or moving it to a new location. Ensure the drain hose is not kinked or pinched during the draining process.
Manufacturer information
Hisense
Practical help
Common problems
E5 error code displayed
The internal water tank is full and requires draining.
Before use
- Keep unit upright for at least 2 hours
- Verify all parts are present
- Ensure grounded 3-prong outlet is available
- Measure window width for panel selection
Specs in practice
- Window Compatibility
- Fits vertical-sliding windows 18 to 50 inches wide.
Images and diagrams
- Window kit panel configuration chart
- Exhaust hose assembly and locking mechanism
- Drainage port location for heat pump models
Model compatibility
- Compatible with vertical-sliding windows only.
- Do not use extension cords.

Manual page author
Michael Turner
Technical manual editor
Reviews PDF manuals for structure, safety notes, and practical product details so readers can find the right information quickly.