Electronics / Televisions
Quick Start Guide for Hisense 100L5F Laser TV
Comprehensive quick start guide for the Hisense 100L5F Laser TV, covering safety warnings, installation, image adjustment, remote control pairing, and troubleshooting.
Table of contents
Manual images
Click an image to enlargeQuick guide from the manual
This guide provides essential steps to set up and operate your Hisense 100L5F Laser TV. Key actions include mounting the screen, positioning the unit, connecting cables, and performing geometric image correction. Always handle the device with two people due to its weight and protect the lens during transport.
Safety Warnings
- Laser Radiation: Do not look directly into the lens when the device is on. This is a Class 2 laser product.
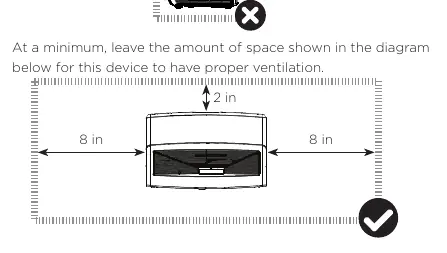
- Ventilation: Keep air vents clear. Do not place the device in narrow or enclosed spaces. Ensure at least 2 inches of space above and 8 inches on the sides for proper airflow.
- Handling: Do not place water-containing vessels or fire sources (candles) on the device. If water or objects enter the unit, unplug it immediately.
- Maintenance: Do not touch the lens with hands. Clean only with professional optical cleaning materials.
Setup and Installation
Before positioning the Laser Cinema, connect all necessary cables (HDMI, Ethernet, etc.) to the back ports. Position the unit parallel to the screen surface. The recommended distance from the back panel to the wall is 8 1/8 inches. Plug in the power cord and press the power button to start.
Adjusting the Display Image
If the image is not aligned with the screen, use the following adjustments:
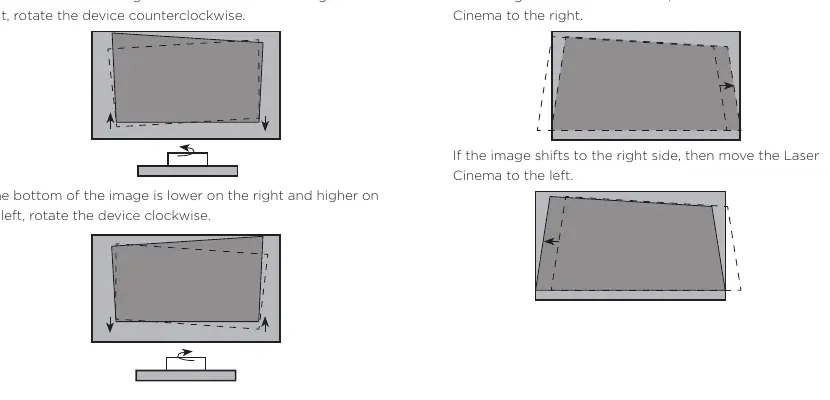
- Parallel Alignment: Rotate the device clockwise or counterclockwise to align the bottom of the image with the screen.
- Geometric Correction: Use the Screen Setup Menu to adjust corner and midpoint points to fit the display border within the screen area.
- Feet Adjustment: Use the wrench provided to rotate the leveling feet to adjust the height and tilt of the unit for a perfect fit.
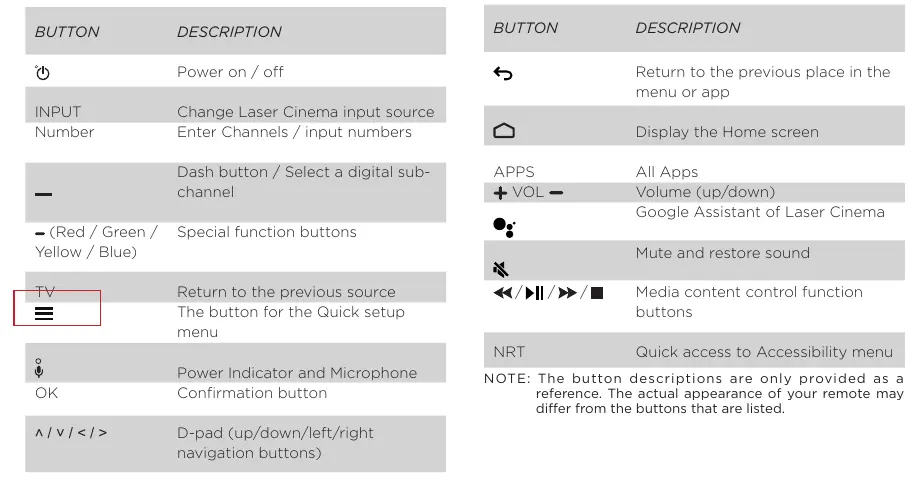
Using the Remote Control
To pair the remote, keep it within 10 feet of the Laser Cinema. Press and hold the menu button (represented by three horizontal lines) for at least 3 seconds. If pairing fails, ensure the device is not in standby mode and try again.
Maintenance and Troubleshooting
If you experience issues, turn the device off and on again. Common solutions include:
- No sound or picture: Check power connections and ensure the unit is not in standby mode.
- Distorted/Wavy image: Move nearby electrical appliances away from the Laser Cinema.
- Black and white picture: Unplug the unit for 60 seconds and check color settings.
- Remote not working: Replace batteries and ensure they are installed correctly.
Product Specifications
The 100L5F features a 100-inch active screen size with 3840 x 2160 resolution. It consumes 348W of power and operates on 120V/60Hz. Connectivity includes built-in wireless (2x2 dual band), 4 HDMI ports, 2 USB ports, and a LAN port.
Manufacturer information
Hisense
Practical help
Common problems
No sound or picture
Check if the power cord is plugged into a powered AC outlet and press the Power button on the remote to exit standby mode.
Distorted or wavy sound/picture
Turn off nearby electrical appliances or move them farther away from the Laser Cinema. Try a different power outlet.
Remote control does not work
Confirm the unit is powered on, check battery installation, or replace the batteries.
Picture is black and white
Unplug the Laser Cinema from the AC outlet, wait 60 seconds, and replug it. Check that the Color setting is 50 or higher.
Before use
- Use two people to move the device due to its weight.
- Protect the lens during handling.
- Connect all cables to the back ports before positioning the unit.
- Ensure the unit is parallel to the screen surface.
- Clear air vents on both sides.
- Pair the remote control within 10 feet of the unit.
Specs in practice
- Power Consumption
- 348W during operation.
- Operating Temperature
- 41°F to 95°F (5°C to 35°C).
- Connectivity
- Built-in 2x2 dual-band wireless and Ethernet LAN port.
Images and diagrams
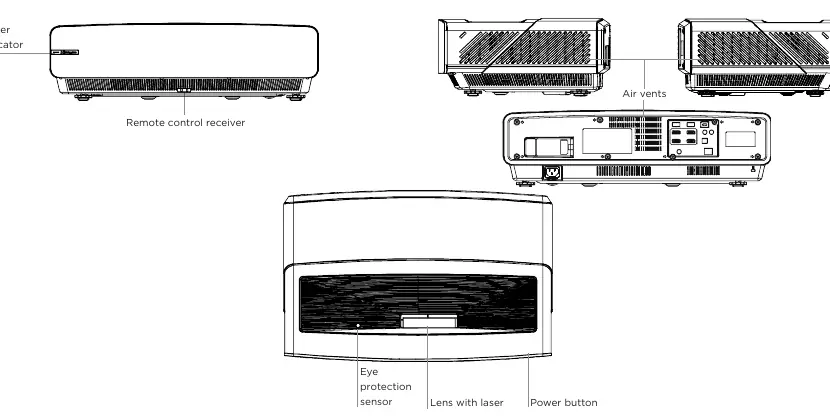
- The Laser Cinema Diagram identifies the power indicator, remote receiver, air vents, eye protection sensor, lens, and power button.
- The ventilation diagram illustrates the required 8-inch clearance on sides and 2-inch clearance above the unit.
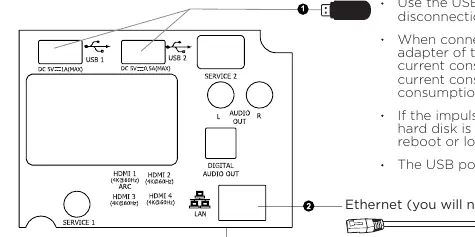
- The port diagram shows locations for HDMI, USB, LAN, and Audio Out connections.
Model compatibility
- USB ports support 5V. USB 2.0 max current is 500mA; USB 3.0 max current is 1A.
- The unit only recognizes USB Memory Sticks for browsing photos, music, and movies.
- Requires a router for Internet connectivity via Ethernet or Wi-Fi.

Manual page author
Emily Carter
User documentation editor
Prepares concise manual descriptions and highlights the most useful setup, operation, and maintenance information for readers.