Electronics / Televisions
User Manual for Hisense 100QD6QF Series TV
Quick setup guide and user manual for Hisense 100QD6QF series televisions. Includes instructions for stand installation, wall mounting, port connections, remote control pairing, and troubleshooting.
Table of contents
Manual images
Click an image to enlargeQuick guide from the manual
This guide provides essential setup and operation instructions for your Hisense TV. Before discarding any packaging, ensure you have checked all foam inserts for accessories, including the remote, power cord, and screws. The TV is heavy (125.7 lbs / 57.0 kg with stand), so ensure your furniture or wall mount can support this weight. Three or more people are recommended for installation.
Installation and Setup
Stand Installation:
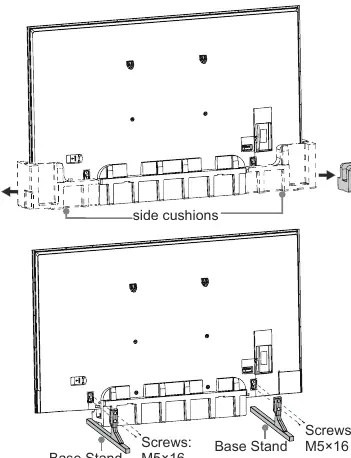
- Ensure the TV is placed on a stable surface.
- Insert the base stands into the bottom slots of the TV.
- Secure each stand tightly using the provided M5x16 screws.
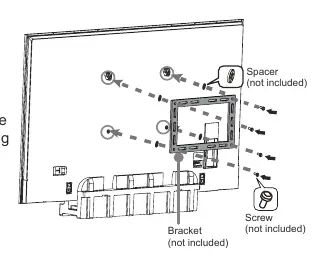
Wall Mounting:
- Remove the TV stand if previously attached.
- Use a compatible wall mount bracket (not included).
- Ensure the wall is strong enough to support the TV weight.
- Use spacers between the TV and the bracket.
- The wall mount hole pattern is 800 x 400 mm, requiring M8 screws.
- Ensure the TV remains parallel to the wall and does not lean forward.
Connecting Devices
The TV features various ports on the back panel:
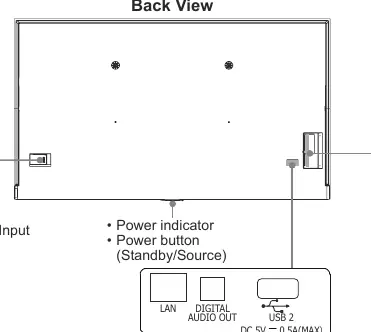
- HDMI: Connect external devices like game consoles or media players.
- USB: Connect USB storage devices for media playback. USB 3.0 is faster than 2.0, but both are compatible.
- ANT/CABLE: Connect an outdoor VHF/UHF antenna.
- AV IN: Connect composite video and audio cables.
- DIGITAL AUDIO OUT: Connect to an external digital audio system via optical cable.
- LAN: Connect an Ethernet cable for wired internet access.
- HEADPHONE: Connect headphones (microphones not supported).
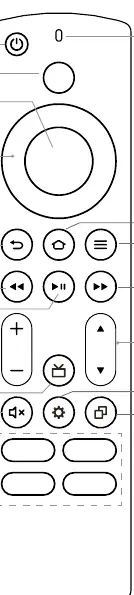
Remote Control and Voice Features
The included Voice Remote with Alexa allows you to control your TV using voice commands. To pair the remote, hold the HOME button during the first-time setup. If the remote does not work, check the batteries and ensure they are installed correctly. The remote includes dedicated buttons for power, navigation, volume, channel control, and quick access to apps.
Troubleshooting
If you encounter issues, try these steps:
- No sound or picture: Check power connections and ensure the TV is not in standby mode.
- Wavy or distorted picture: Move nearby appliances away from the TV to avoid interference.
- Clicking sound: This is normal and caused by the plastic cabinet expanding or contracting due to temperature changes.
- Remote not working: Replace batteries and ensure they are installed correctly.
Product Specifications
The TV features a 99.5-inch (252.7 cm) diagonal screen with 3840 x 2160 resolution. It supports dual-band wireless connectivity and operates in temperatures between 41°F and 95°F (5°C - 35°C).
Manufacturer information
Hisense
Practical help
Common problems
No sound or picture
Check if the power cord is plugged into a powered AC outlet and press the Power button to wake from standby.
Sound and/or picture is distorted or wavy
An electric appliance may be causing interference. Move nearby appliances away from the TV or try a different power outlet.
Remote control does not work
Confirm the TV has power, replace the batteries, and ensure they are installed correctly.
Plastic cabinet makes a clicking sound
This is normal; it occurs when the television cabinet expands or contracts due to temperature changes.
Before use
- Check all foam packaging for accessories before discarding.
- Ensure furniture or wall mount can support 125.7 lbs (57.0 kg).
- Have your Wi-Fi network password ready.
- Ensure three or more people are available to assist with installation.
- Remove protective film only after installation is complete.
Specs in practice
- Screen Resolution
- 3840 x 2160 (4K UHD)
- Weight (with stand)
- 125.7 lbs (57.0 kg)
- Wall Mount Pattern
- 800 x 400 mm (requires M8 screws)
- Operating Temperature
- 41°F - 95°F (5°C - 35°C)
Images and diagrams
- Back View: Identifies the location of the power button, power input, and all connection ports (HDMI, USB, LAN, etc.).
- Remote Control: A numbered diagram explaining the function of each button, including Power, Voice, D-pad, and App buttons.
- Stand Installation: Shows the insertion of base stands into the bottom slots and securing them with M5x16 screws.
- Wall Mount: Illustrates the use of spacers and screws when attaching the TV to a wall mount bracket.
Model compatibility
- Headphones with microphones are not supported.
- USB 3.0 port is backwards compatible with USB 2.0 devices.
- Wall mount screws must be 11.0 - 13.0 mm in length from the attaching surface.

Manual page author
Michael Turner
Technical manual editor
Reviews PDF manuals for structure, safety notes, and practical product details so readers can find the right information quickly.