Electronics / Televisions
User Manual for Hisense 100U7Q 100-inch 4K Ultra HD LED TV
Quick guide and user manual for the Hisense 100U7Q 100-inch 4K Ultra HD LED TV. Learn how to connect devices, set up your network, use the remote, and configure picture and sound settings.
Table of contents
Manual images
Click an image to enlargeQuick guide from the manual
This manual provides essential instructions for setting up and operating your Hisense 100U7Q 4K LED TV. Before using the TV, ensure it is connected to a power source and that you have completed the initial Setup Wizard. The TV supports various external devices, network connections, and customizable settings for picture and sound.
Connecting devices to your TV
You can connect various external devices to your TV using the available ports:
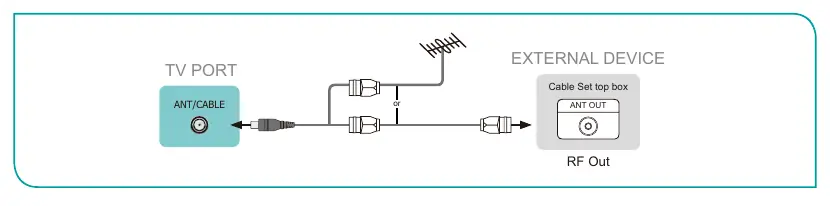
- Antenna/Cable/Satellite: Connect a coaxial cable to the ANT/CABLE port.
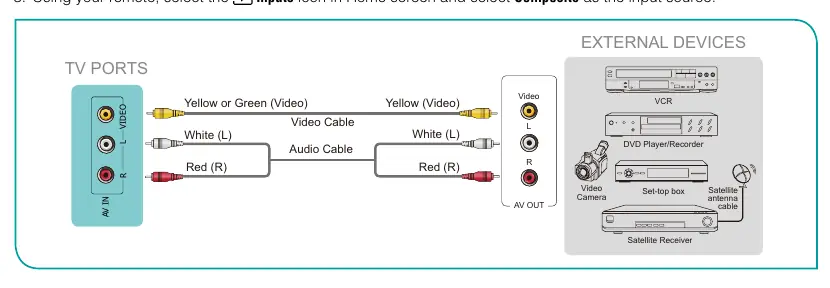
- AV Devices: Use composite video cables (yellow/white/red) to connect to the AV IN ports.
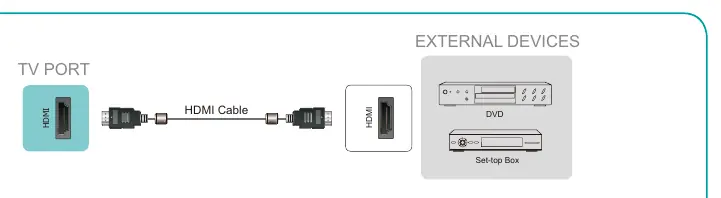
- HDMI Devices: Connect high-powered 4K Ultra-HD devices to the HDMI ports. HDMI 2.0 is recommended for optimal performance.
- Headphones: Connect to the HEADPHONE port. Note that built-in speakers will be disabled when headphones are connected.
- USB Devices: Connect hard drives or USB sticks to the USB port for media playback.
- Audio Receivers: Connect to the DIGITAL AUDIO OUT port or use the HDMI/ARC port for sound bars.
Connecting to a network
The TV can connect to the internet via:
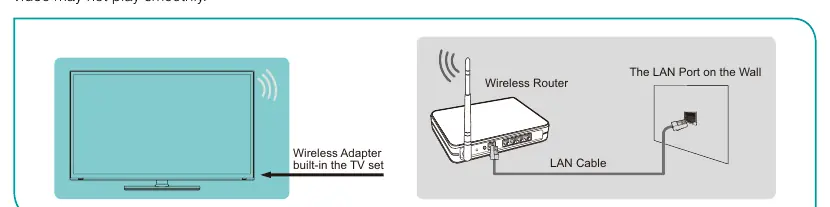
- Wireless Network: Use the built-in wireless LAN adapter. Ensure your router supports IEEE 802.11ac/b/g/n.
- Wired Network: Connect an Ethernet cable from your modem or router to the LAN port on the back of the TV.
Using your TV remote control
The remote control supports both infrared and Bluetooth connections. Key functions include:

- Power: Turn the TV on or off.
- Input: Change the TV input source.
- Home: Access the Home screen.
- Menu: Access TV settings.
- Google Assistant: Use voice commands.
- Media Controls: Play, pause, and navigate content.
Menu settings
Access the Menu to customize your viewing experience:
- Picture: Adjust Backlight, Picture Mode (Vivid, Standard, Theater, etc.), Contrast, Brightness, and Advanced Settings like Motion Enhancement.
- Sound: Select Sound Mode, adjust Audio Output (TV Speaker, ARC, Bluetooth), and configure Advanced Settings like Equalizer and Digital Audio Out.
- Channels: Perform auto channel scans, manual scans, and manage favorite lists.
- Parental Control: Block content based on ratings, channels, or inputs. Requires a PIN.
Apps and Media
You can install, remove, and move apps from the Apps screen. The Media center allows you to browse and play photos, music, and videos from connected USB devices or compatible mobile devices.
Troubleshooting
If you encounter issues, try turning the TV off and on again. Check power connections, volume settings, and ensure external devices are properly connected. If the remote is unresponsive, check the batteries.
Manufacturer information
Hisense
Practical help
Common problems
No sound or picture
Check if the power cord is plugged into a powered AC outlet. Press the power button on the remote to activate the unit from standby mode. Check if the LED light is on.
No sound, but picture is normal
Check the volume settings and ensure 'Mute' mode is not set to On.
Distorted or wavy picture/sound
An electric appliance may be affecting the TV. Turn off nearby appliances and move them farther away. Try another power outlet.
Remote control does not work
Confirm the TV has power. Change the batteries in the remote control and ensure they are installed correctly.
Before use
- Connect the power cord to an AC outlet.
- Insert two AAA batteries into the remote control.
- Connect your antenna, cable, or satellite box.
- Connect any external AV or HDMI devices.
- Complete the initial Setup Wizard upon first power-on.
Specs in practice
- Remote Range
- Works up to 26 feet at a 30-degree horizontal or vertical angle.
Images and diagrams
- Wiring diagrams for antenna, AV, HDMI, and network connections are provided on pages 8, 9, and 11.
- Remote control button layout is detailed on page 13.
Model compatibility
- Headphones with microphones are not supported.
- Only digital sound bars requiring a wired connection are compatible.
- USB 1.1 and 2.0 devices are supported (max 500mA).
- Some models may not support all picture/sound settings.

Manual page author
Michael Turner
Technical manual editor
Reviews PDF manuals for structure, safety notes, and practical product details so readers can find the right information quickly.