Lighting / Fixtures
User Guide for Home Depot 3 Light LED AC Puck Light Kit 22333NKIT-WH
Quick guide for the Home Depot 3 Light LED AC Puck Light Kit (22333NKIT-WH). Includes installation steps for left/right cabinet mounting, wiring instructions, dimmer compatibility, and safety warnings.
Quick answers from the manual
Quick answer
- This guide covers the installation and operation of the Home Depot 3 Light LED AC Puck Light Kit (22333NKIT-WH). It includes instructions for surface mounting, wiring, and dimmer compatibility. p. 1, 5, 7
Key actions
- Install mounting caps to the underside of the cabinet. p. 5, 7
- Connect LED puck assemblies to each other and the power cord. p. 6, 8
First start
- Separate the mounting cap from the puck light, install the cap to the cabinet, attach the puck light, and connect the power cord. p. 5, 7
Show 2 more answers Show less
Technical specifications
| Parameter | Value | Meaning | Pages |
|---|---|---|---|
| Voltage | 120V/60Hz | Standard AC power | p. 2 |
| Power Consumption | 3.02W per light | Power usage per puck | p. 2 |
Where to find it in the PDF
- Safety Information p. 2
- Installation Options p. 5, 7
Table of contents
Manual images
Click an image to enlargeQuick guide from the manual
This document provides instructions for the Home Depot 3 Light LED AC Puck Light Kit (22333NKIT-WH). The system is designed for surface mounting inside cabinets and is linkable up to 30 units. Ensure you read all safety warnings before installation, including requirements for dry locations and minimum compartment sizes.
Installation
The manual provides two installation options depending on whether you start from the left or right side of the cabinet.
Tools and Hardware
- Tools required: Phillips screwdriver, drill.
- Hardware included: Mounting screws (AA), fasteners (BB).
Installation Steps
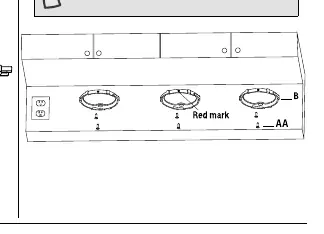
- Prepare the lights: Separate the mounting cap (B) from the LED puck assembly (A) by rotating it counterclockwise.
- Install mounting caps: Attach the mounting cap (B) to the underside of the cabinet using the provided mounting screws (AA). Ensure the red mark faces the front of the cabinet.
- Install LED assemblies: Align the puck light (A) with the mounting cap (B), ensuring the long wire is on the correct side, and turn clockwise to secure.
- Connect lights: Connect the LED puck assemblies to each other and attach the power cord (D) to the first puck light.
- Secure cords: Use the provided nail-on fasteners (BB) to attach the wires to the cabinet, ensuring the last puck light end wire/connector is secured.
Optional Installations
Direct Wire Installation: The fixture can be wired to a wall switch using the Direct Wire Junction Box (SKU1006126385), sold separately.
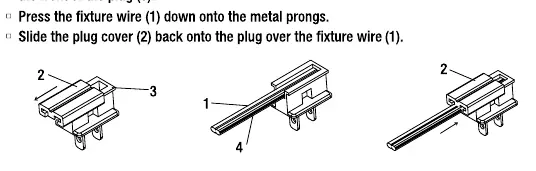
Quick Connector Plug: You can cut the fixture wire to the desired length. Remove the plug cover, press the fixture wire (with the grooved side to the right) onto the metal prongs, and slide the cover back on.
Dimmer Compatibility
This fixture is dimmable. Ensure you use compatible dimmers. The manual lists specific models from Lutron, Leviton, and Eaton. Always verify that the total wattage of the lights does not exceed the dimmer's capacity.
Safety and Maintenance
- Electrical: Rated at 120V/60Hz.
- Safety: Do not install in compartments smaller than 12 in. x 12 in. Do not mount near heat sources. Do not dismantle or alter the fixture.
- Usage: For indoor and dry location use only.
Manufacturer information
The Home Depot
Practical help
Common problems
Lights not working
Check the power connection and ensure the dimmer is compatible and functioning correctly.
Dimmer issues
Verify that the total wattage of the connected lights does not exceed the dimmer's capacity and that the dimmer model is on the compatible list.
Before use
- Ensure you have a Phillips screwdriver and a drill.
- Verify all parts (3 LED pucks, power cord, mounting caps, screws, fasteners) are present.
- Check that the installation surface is suitable for surface mounting inside a cabinet.
- Ensure the cabinet compartment is at least 12 in. x 12 in.
- Confirm the power source is 120V/60Hz.
Show more Show less
Specs in practice
- Power Consumption
- 3.02W per light
Images and diagrams
- The manual provides two installation options: starting from the left side or the right side of the cabinet.
- The quick connector plug installation allows for cutting the fixture wire to the desired length.
Model compatibility
- Compatible with specific Lutron, Leviton, and Eaton dimmers listed in the manual.
- Compatible with Direct Wire Junction Box (SKU1006126385), sold separately.

Manual page author
Emily Carter
User documentation editor