Lighting / Fixtures
User Guide for Home Accents Holiday 8FT Giant Sized LED Pre-Lit Cone Tree 22KY10004
Quick guide for the Home Accents Holiday 8FT Giant Sized LED Pre-Lit Cone Tree (22KY10004). Includes assembly steps, remote control operations, timer settings, and troubleshooting.
Quick answers from the manual
Quick answer
- This guide covers the assembly and operation of the 8FT Giant Sized LED Pre-Lit Cone Tree (22KY10004), including remote control functions and timer settings. p. 1, 3, 4, 5
Key actions
- Assemble the tree by connecting the frame, star, and power adapter. p. 4, 5
- Use the remote or controller box to select light modes. p. 5, 6
First start
- Remove packaging, connect the star topper, connect the power adapter, and plug in the tree. p. 4, 5
Show 3 more answers Show less
Problems and fixes
Tree does not light
Check all light string connections.
p. 7Maintenance and reset
- Disassemble and store in a cool, dry location protected from sunlight. p. 7
Where to find it in the PDF
- Safety Information p. 2
- Assembly p. 4, 5
- Remote Control p. 6
Table of contents
Manual images
Click an image to enlargeQuick guide from the manual
This guide provides instructions for the 8FT Giant Sized LED Pre-Lit Cone Tree (Model 22KY10004). The product is designed for seasonal use and includes a remote control for managing light functions and timer settings.
Safety Information
- Indoor/Outdoor Use: Only use outdoors if marked suitable. Connect to a Ground Fault Circuit Interrupting (GFCI) outlet for outdoor use.
- Placement: Do not place near gas or electric heaters, fireplaces, candles, or other heat sources.
- Handling: Do not secure wiring with staples or nails. Do not let lamps rest on the supply cord.
- Maintenance: Unplug when leaving the house or retiring for the night. Do not install on trees with metal needles or branch coverings.
Package Contents
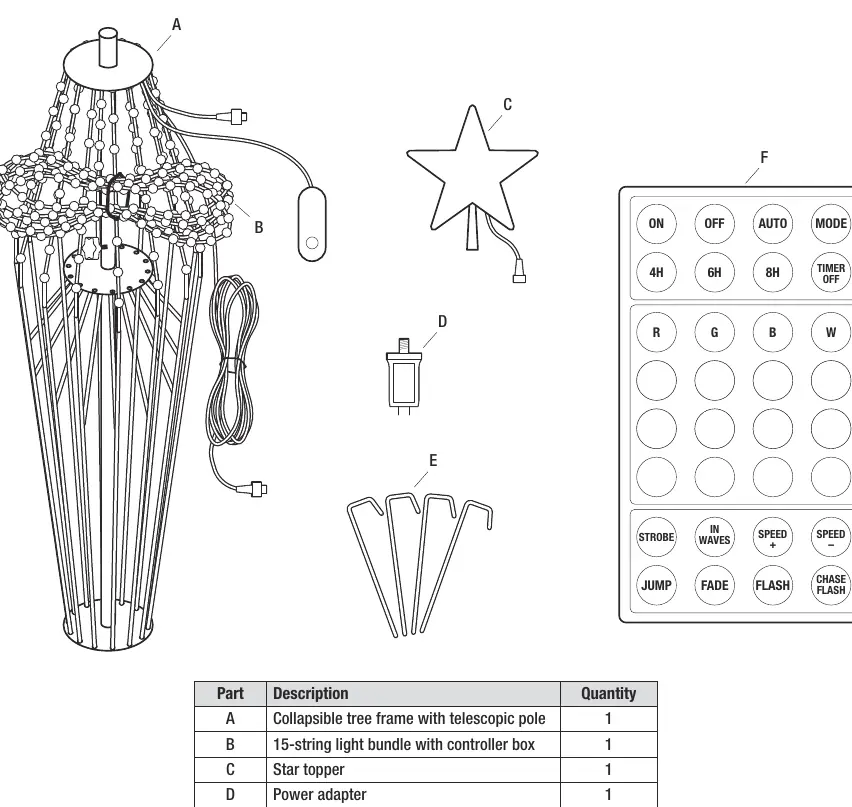
- Collapsible tree frame with telescopic pole
- 15-string light bundle with controller box
- Star topper
- Power adapter
- Ground stakes (4)
- Remote control
Assembly Instructions
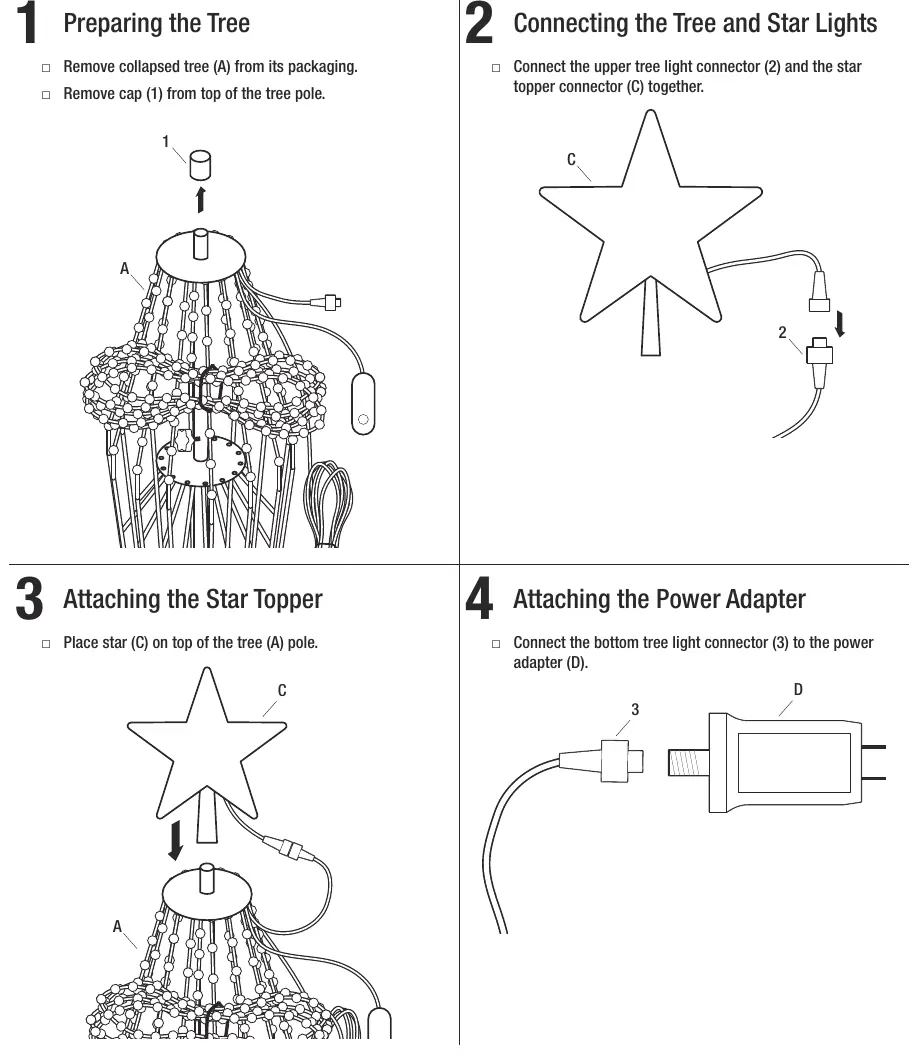
- Preparing the Tree: Remove the collapsed tree from packaging and remove the cap from the top of the tree pole.
- Connecting the Tree and Star Lights: Connect the upper tree light connector to the star topper connector.
- Attaching the Star Topper: Place the star topper on top of the tree pole.
- Attaching the Power Adapter: Connect the bottom tree light connector to the power adapter.
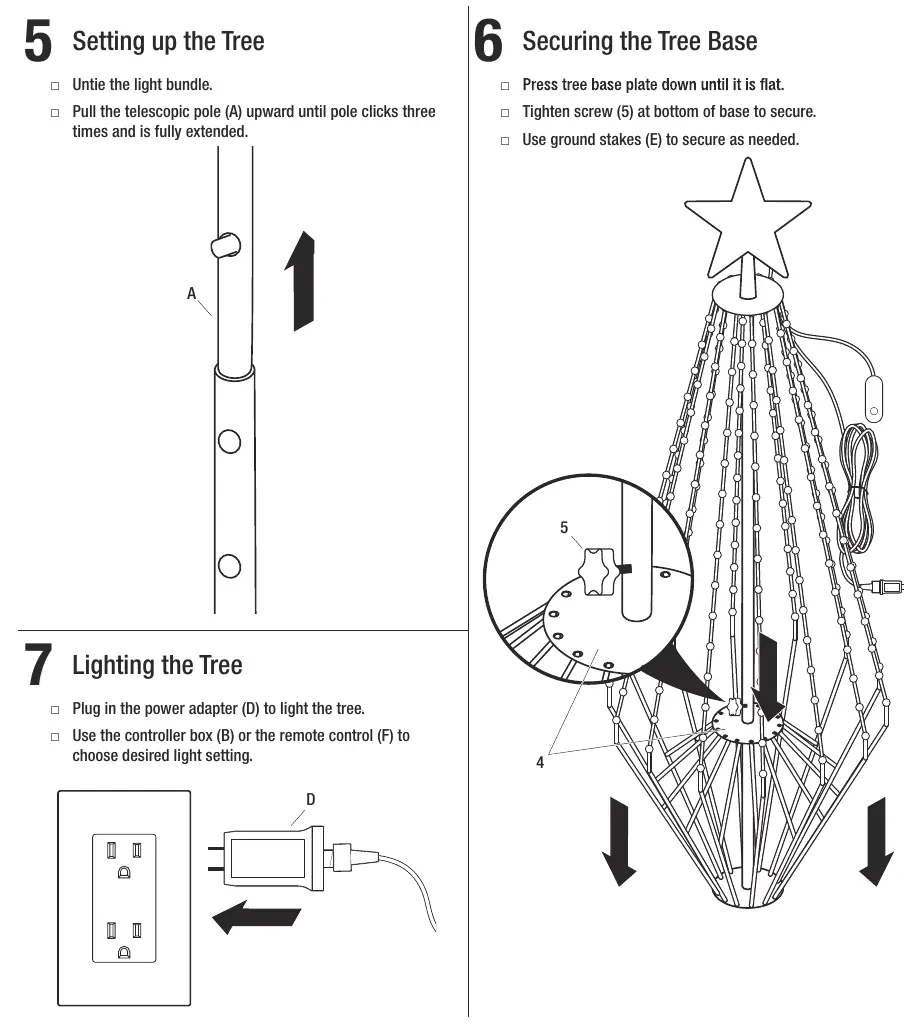
- Setting up the Tree: Untie the light bundle. Pull the telescopic pole upward until it clicks three times and is fully extended.
- Securing the Tree Base: Press the tree base plate down until flat. Tighten the screw at the bottom of the base to secure. Use ground stakes as needed.
- Lighting the Tree: Plug in the power adapter to light the tree. Use the controller box or remote control to choose the desired light setting.
Remote Control Operations
The remote control allows for the following settings:
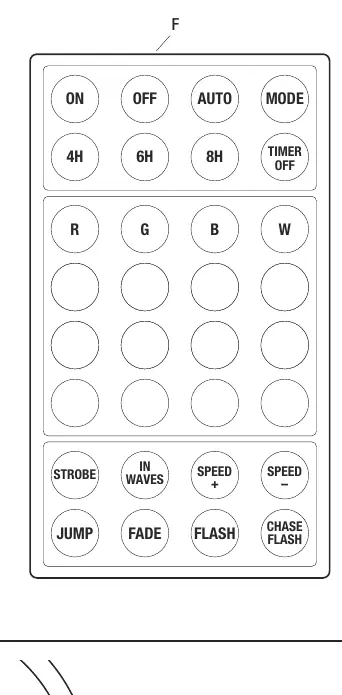
- Timer: 4H (4 hours on/20 off), 6H (6 hours on/18 off), 8H (8 hours on/16 off), or Timer Off.
- Speed: Adjust motion function speed with SPEED + and SPEED -.
- Light Functions: Includes 16 solid color functions, Strobe, In Waves, Jump, Fade, Flash, Chase-Flash, and Auto (rotation loop).
Care and Cleaning
When not in use, disassemble the tree and store it in a cool, dry location protected from sunlight.
Troubleshooting
If the tree does not light when plugged in, check to ensure all light string connections are secure.
Manufacturer information
The Home Depot
Practical help
Common problems
The tree does not light when plugged in.
Check to ensure all light string connections are secure.
Before use
- Check for missing or damaged parts.
- Ensure the tree is placed on a stable surface.
- Verify the tree is not placed near heat sources.
- Inspect wire insulation for damage.
- Ensure the tree is not placed on a live tree with metal needles.
Show more Show less
Images and diagrams
- Assembly involves connecting the tree frame, star topper, and power adapter.
- The remote control allows for timer settings, speed adjustment, and light mode selection.
Model compatibility
- For indoor and outdoor use (if marked).
- Do not install on trees with metal needles or branch coverings.

Manual page author
Emily Carter
User documentation editor