Plumbing / Sinks Faucets
Installation Instructions for Magic Home Drop-In Kitchen Sink
A complete installation and maintenance guide for the Magic Home Drop-In Kitchen Sink. Includes step-by-step mounting instructions, tool requirements, and care tips to prevent rust and stains.
Quick answers from the manual
Quick answer
- The Magic Home Drop-In Kitchen Sink is installed by tracing a template onto the countertop, cutting the opening, attaching mounting clips to the sink rim, applying silicone sealant, securing the sink with screws, and connecting the plumbing fixtures. p. 3, 4, 5
Key actions
- Position and trace the cut-out template on the countertop. p. 3
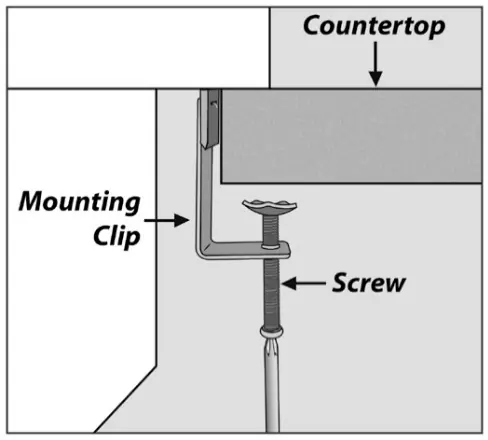
- Attach mounting hardware to the underside of the sink rim. p. 4
- Apply silicone sealant and secure the sink to the countertop. p. 4
Problems and fixes
Rust in new sink
Clean the sink immediately after installation and after every use. Use a scouring pad to remove rust.
p. 6
Scratches
Use toothpaste for minor scratches, scouring pad for moderate, or stainless steel polisher for serious ones.
p. 6Maintenance and reset
- Clean daily with a soft towel and warm water. Wipe dry to prevent mineral deposits. p. 7
Technical specifications
| Parameter | Value | Meaning | Pages |
|---|---|---|---|
| Gauge | 16 | Thickness of the stainless steel | p. 2 |
Where to find it in the PDF
- Installation Instructions p. 3, 4, 5
- Maintenance Instructions p. 6, 7
Table of contents
Manual images
Click an image to enlargeQuick guide from the manual
This document provides installation and maintenance instructions for the Magic Home Drop-In Kitchen Sink. Key safety precautions include wearing protective gear (gloves, eye protection) due to the weight and sharp edges of the sink. Professional installation by a licensed plumber is strongly recommended.
Tools required
- Safety glasses
- Marker
- Silicone adhesive sealant
- Tape measure
- Jigsaw
- Rags
- Wood braces
- Level
- Screws
- Bladed screwdriver
Installation steps
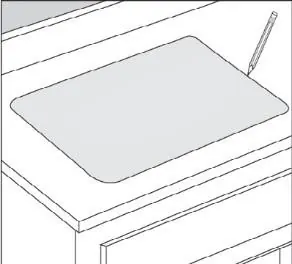

- Position Template: Check the cut-out template against the actual sink to ensure a proper fit, then place it in the desired location on the countertop.
- Trace Template: Trace the template onto the countertop using a pencil.
- Cut Countertop: Cut the opening in the countertop following the traced line. Use a saw appropriate for your countertop material.
- Attach Mounting Hardware: Attach the mounting hardware to the prongs protruding from the underside of the sink rim. Ensure the hooked side of the mounting clip faces away from the sink.
- Apply Sealant: Clean and dry the surface around the opening. Turn the sink upside down and apply silicone sealant (not included) underneath the sink rim.
- Secure Sink: Insert the sink into the opening, check alignment, and press firmly. Tighten the screws in the front, then the back and sides. Remove excess sealant and allow it to set for 30-60 minutes.
- Install Plumbing: Connect the drain to the sink, attach the trap, and connect the water supply to the faucet according to the faucet manufacturer's instructions. Run water to check for leaks.
Maintenance and care
To keep your stainless steel sink in good condition:
- Rust prevention: Clean the sink immediately after installation and after every use. Remove rust or mold using a scouring pad.
- Scratch care: For minor scratches, polish with a sponge and toothpaste. For moderate scratches, use a scouring pad. For serious scratches, use a stainless steel polisher.
- Hard water stains: Clean daily with a soft towel, warm water, and a small amount of wash-fluid. Wipe dry. Scouring powder can be used for stubborn stains.
Do's and Don'ts
- Do: Rinse the sink after using cleaning agents, rub in the direction of the grain, and keep the sink dry after use.
- Don't: Leave water spots, utensils, or steel cookware in the sink for long periods. Do not leave cleaning agents or bleach sitting in the sink. Do not use steel wool against the grain. Do not use the sink surface as a cutting board.
Manufacturer information
The Home Depot
Practical help
Common problems
Rust spots
Clean the sink immediately after installation and after every use. Remove rust using a scouring pad.
Scratches
Use toothpaste and a sponge for minor scratches, a scouring pad for moderate ones, or a stainless steel polisher for serious damage.
Hard water stains
Clean daily with warm water and a soft towel. Wipe dry. Use scouring powder if necessary.
Before use
- Inspect the sink for any noticeable damage before installation.
- Check all matching products inside the package.
- Consult your cabinet dealer before ordering custom cabinets.
- Ensure you have all required tools (jigsaw, silicone, etc.).
- Read the installation and maintenance instructions thoroughly.
Specs in practice
- Corner Design
- Vertical angle corner/R10 radius coved corner
Images and diagrams
- The manual includes diagrams for tracing the template, cutting the countertop, attaching mounting clips to the sink rim, and securing the sink to the countertop.
- A specific diagram illustrates the correct orientation of the mounting clip and screw assembly.
Model compatibility
- Installation must comply with applicable local plumbing and building codes.
- The sink is certified and listed by cUPC for USA and Canada.

Manual page author
David Miller
Documentation analyst
Organizes user manual content into clear summaries, with attention to model details, product context, and everyday usability.