Furniture / Tables & Desks
User Manual for Homedics 2-in-1 Nail Polish Dryer ND-H100WH
Quick guide for the Homedics 2-in-1 Nail Polish Dryer (ND-H100WH). Learn how to install batteries, operate the UV light and fan, and maintain your device safely.
Quick answers from the manual
Quick answer
- To use the Homedics 2-in-1 Nail Polish Dryer, insert 3 AAA batteries, apply polish to your nails, and place your fingers or toes on the activation panel to turn on the UV light and fan. Remove your fingers to turn it off. p. 2, 3
Key actions
- Insert batteries p. 2, 3
- Turn on/off p. 3
First start
- Insert 3 AAA batteries into the compartment as shown in Fig. 1. p. 2, 3
Problems and fixes
Nail polish not drying
Ensure the coat is not too thick and nails are directly under the UV lights.
p. 3Maintenance and reset
- Clean with a damp cloth only. Do not immerse in liquid. p. 3
Technical specifications
| Parameter | Value | Meaning | Pages |
|---|---|---|---|
| Batteries | 3 x AAA | Power source | p. 2, 3 |
Where to find it in the PDF
- Product Features p. 2
- Instructions for Use p. 3
- Safety Warnings p. 4, 5
- Warranty p. 6
Table of contents
Manual images
Click an image to enlargeQuick guide from the manual
The Homedics 2-in-1 Nail Polish Dryer is designed to dry regular or gel nail polish using a combination of UV light and a fan. The device is battery-operated and features an activation panel for easy, hands-free operation.
Product features
- Activation panel: Used to turn the device on and off.
- UV light: Cures/dries the nail polish.
- Fan drying vents: Provides airflow to assist in the drying process.
- Battery cover: Located on the bottom, houses 3 x AAA batteries.
Instructions for use
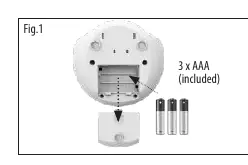
- Battery installation: Remove the battery cover on the bottom of the unit and insert 3 AAA batteries (included) according to the diagram in the battery compartment.
- Preparation: Apply your chosen nail polish or gel polish to your nails.
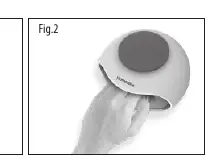
- Operation: Place your fingers or toes on the activation panel and gently press down. This will automatically turn on both the UV light and the fan.
- Drying: Ensure your nails are positioned directly under the UV lights for optimal results. You may need to readjust your fingers or toes during the process to ensure even drying.
- Duration: Each layer of UV nail polish should dry in less than 5 minutes. Note that drying time varies by brand and that thick coats may not dry properly.
- Turning off: Simply remove your fingers or toes from the activation panel to turn the device off.
Maintenance and storage
Cleaning: Always turn the device off and allow it to cool before cleaning. Use only a damp cloth to wipe the surface. Do not immerse the device in water, alcohol, or any other liquid. Avoid using abrasive cleaners, steel wool, or corrosive liquids.
Storage: Store the device in its original box or in a safe, dry, and cool place. Keep away from sharp edges or pointed objects that could damage the surface.
Safety warnings
- This appliance is not intended for use by children under 12 without supervision.
- Keep the device dry; do not operate in wet or moist conditions.
- Do not insert metallic objects or pins into the device.
- Do not operate near aerosol sprays or where oxygen is being administered.
- Do not use under blankets or pillows to avoid overheating.
- Do not attempt to repair the device yourself; contact a HoMedics Service Centre.
- Consult a doctor before use if you have pacemakers, are pregnant, have photosensitivity, or are taking photosensitizing medications.
- Discontinue use immediately if you experience discomfort, skin irritation, or if the device becomes excessively hot.
Manufacturer information
HoMedics
Practical help
Common problems
Device does not turn on
Check if the 3 AAA batteries are inserted correctly according to the diagram in the battery compartment.
Nail polish is not drying
Ensure the polish coat is not too thick and that your nails are positioned directly under the UV lights.
Before use
- Ensure you have 3 AAA batteries.
- Check that the device is clean and dry.
- Ensure you are not using the device near aerosols or oxygen.
- Verify you are not using the device if you have photosensitivity or are taking photosensitizing medications.
Specs in practice
- Power Source
- 3 x AAA batteries (included).
Images and diagrams
- Fig. 1: Battery compartment installation.
- Fig. 2: Correct hand placement on the activation panel.
Model compatibility
- Suitable for regular nail polish or gel polish.

Manual page author
David Miller
Documentation analyst
Organizes user manual content into clear summaries, with attention to model details, product context, and everyday usability.