Power / Car Chargers
User Manual for Porodo Lifestyle 2-IN-1 Full-Body Grooming Kit
Quick guide for the Porodo Lifestyle 2-IN-1 Full-Body Grooming Kit. Learn how to use, charge, maintain, and install attachments for your trimmer.
Quick answers from the manual
Quick answer
- The Porodo 2-IN-1 Grooming Kit is a waterproof trimmer with a 90-minute battery life, USB-C charging, and a travel lock. It is designed for body, hair, and facial grooming. p. 3, 4, 7
Key actions
- Lock/Unlock Travel Mode p. 7, 9
- Charging p. 6
First start
- Fully charge the device before the first use. p. 9
Problems and fixes
Device is locked
Press and hold the second button for 3 seconds to unlock.
p. 9Maintenance and reset
- Clean the device when the faucet indicator flashes (after 30 minutes of use). p. 5
Technical specifications
| Parameter | Value | Meaning | Pages |
|---|---|---|---|
| Input | DC 5V/1A | Required power input | p. 2 |
| Working Time | 90 Min | Battery life per charge | p. 2 |
Where to find it in the PDF
- Product Overview p. 2
- Schematic View p. 4
- Maintenance p. 8
Table of contents
Manual images
Click an image to enlargeQuick Guide
The Porodo Lifestyle 2-IN-1 Full-Body Grooming Kit is a versatile trimmer designed for beard, hair, and body grooming. Key features include a travel lock, LED display, and waterproof design (IPX7). Always ensure the device is fully charged before use and use only a 5V/1A power adapter for charging.
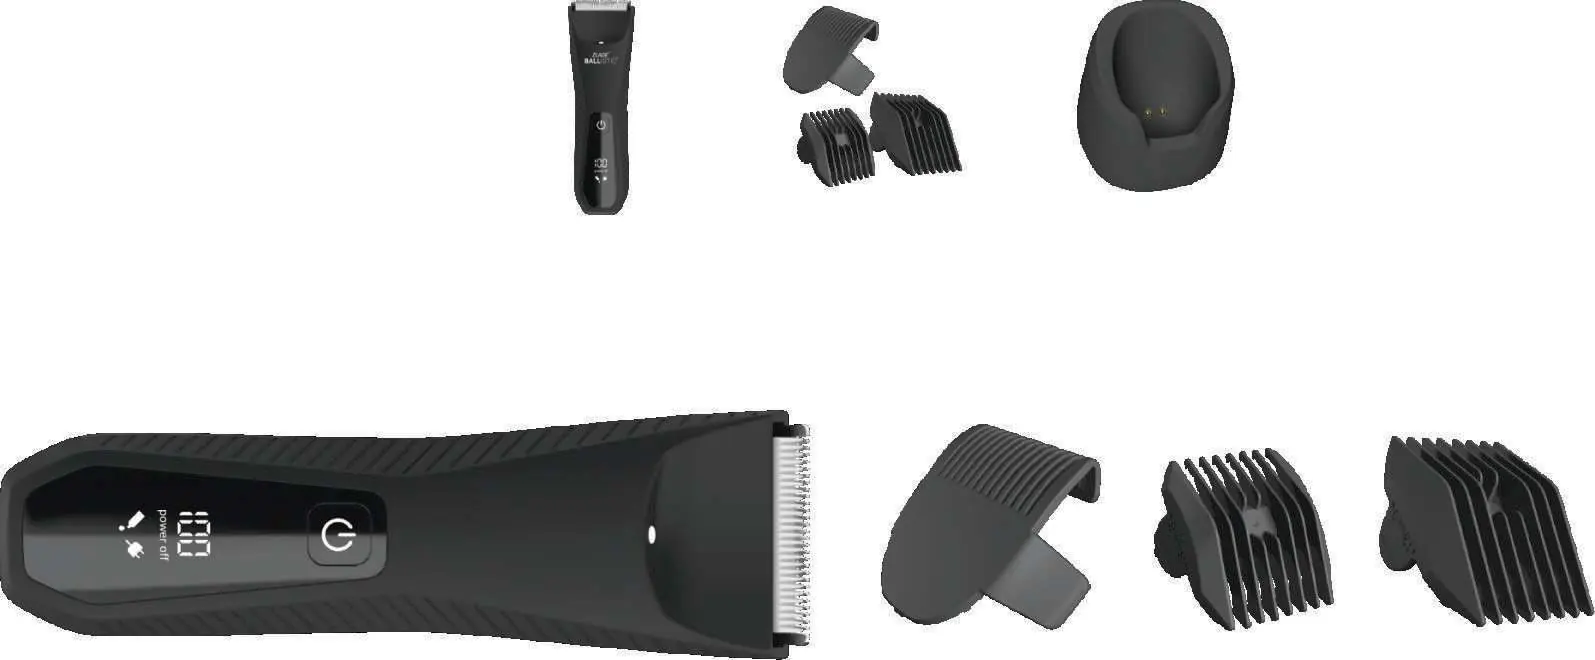
Product Overview
The kit includes the main body trimmer, various guide combs (2mm, 3mm, 6mm, 9mm, 12mm), and a charging base. The device features an LED display showing battery percentage and status icons.
Charging Instructions
Ensure the device is powered off before charging. Connect the USB cable to a compatible 5V/1A power adapter. Note: Do not use fast-charging adapters with power output beyond 5V/1A, as they are not compatible and may damage the device.
Usage Instructions
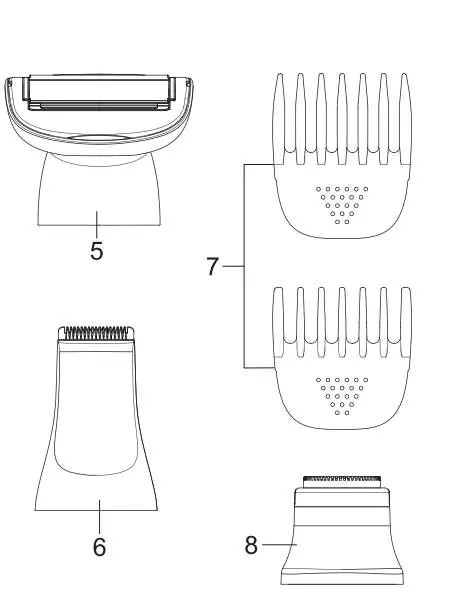
The device features a travel lock to prevent accidental activation. To lock or unlock, press and hold the power switch for 3 seconds. The device includes multiple heads for different grooming needs:
- Body Hair Shaving Head: Use with or without combs for chest, back, arms, and legs.
- Shaver Head: Ideal for short hair in sensitive areas like armpits and the bikini region.
- Facial Shaver: Designed for facial hair removal on the chin and lip area.
Installation and Disassembly
Guide Combs: Align the comb with the groove on the side of the trimmer and slide it until it clicks. To remove, push the comb backward along the groove using your thumb.

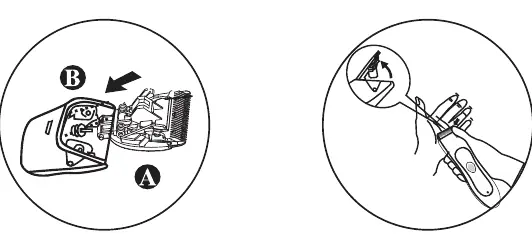
Cutter Head: Insert the cutter (Part-A) into the trimmer socket (Part-B) until it clicks. To remove, press on the front of the cutter head to release it from the socket.
Maintenance
The device features a cleaning reminder; the faucet indicator will flash after 30 minutes of total use. To clean, turn off the device, rinse the body, blades, and cutter head under running water, and dry with a soft cloth. Apply 2-3 drops of acid-free oil to the blades occasionally for smooth operation. Replace the cutter head every 3 months for optimal performance.
Safety Precautions
- Do not use corrosive cleaning agents like gasoline or paint thinner.
- Never charge the device while it is wet.
- Check that all attachments are securely fixed before each use.
- Do not disassemble or attempt repairs yourself to avoid voiding the warranty.
Practical help
Common problems
Device will not turn on
Check if the travel lock is active. Press and hold the second button for 3 seconds to unlock.
Charging issues
Ensure you are using a 5V/1A adapter. Fast chargers are not compatible.
Cleaning reminder flashing
The faucet icon flashes after 30 minutes of use. Clean the device under running water.
Before use
- Ensure the device is fully charged.
- Verify that the chosen attachment is securely clicked into place.
- Check blades for any hair buildup or residue.
- Ensure the device is dry before charging.
Images and diagrams
- Switch Button-A: Primary power button.
- Switch Button-B: Secondary button for speed control or settings.
- LED Display: Shows battery percentage and status icons.
Model compatibility
- Use only 5V/1A power adapters.
- Replace cutter head every 3 months.

Manual page author
David Miller
Documentation analyst
Organizes user manual content into clear summaries, with attention to model details, product context, and everyday usability.