Tools / Air Compressors & Pneumatics
User Manual for Husky 20-Gallon Portable Air Compressor C201H
Comprehensive user guide for the Husky 20-Gallon Portable Air Compressor (Model C201H). Includes setup, operation, safety instructions, maintenance, and troubleshooting steps.
Quick answers from the manual
Quick answer
- The Husky C201H is a 20-gallon portable air compressor. It requires a 120V, 60Hz power source and should be placed in a well-ventilated area with at least 18 inches of clearance. p. 1, 7, 10
Key actions
- Drain the tank condensation daily or every hour depending on conditions. p. 15
- Start the compressor by plugging it in, turning the switch to ON, and allowing pressure to build. p. 12
First start
- Ensure the drain valve is closed, inspect for leaks, plug into a proper receptacle, and turn the switch to ON. p. 11, 12
Show 4 more answers Show less
Problems and fixes
Compressor does not run
Check power, extension cord, fuse/breaker, or thermal overload protector.
p. 16Maintenance and reset
- Thermal Overload Reset: Turn switch OFF, unplug, allow to cool, plug in, and turn switch ON. p. 9
Technical specifications
| Parameter | Value | Meaning | Pages |
|---|---|---|---|
| Air tank capacity | 20 gal. | Storage capacity of the tank. | p. 7 |
| Max pressure | 175 PSI | Maximum operating pressure. | p. 7 |
Where to find it in the PDF
- Safety Information p. 2, 3, 4, 5
- Specifications p. 7
- Troubleshooting p. 16, 17
- Service Parts p. 18, 19, 20, 21
Table of contents
Manual images
Click an image to enlargeQuick guide from the manual
The Husky 20-Gallon Portable Air Compressor (Model C201H) is designed for home improvement tasks. Before use, ensure the unit is placed in a well-ventilated area with at least 18 inches of clearance from walls. Always check for damaged parts, ensure the drain valve is closed, and verify the power supply is 120V, 60Hz. Drain the tank condensation daily or every hour depending on environmental conditions to prevent corrosion.
Safety information
Important: This compressor is not for breathing air. Always wear safety goggles with side shields. Do not operate in explosive atmospheres or near flammable liquids. Keep bystanders away. The unit is heavy; use two people for lifting. Never touch exposed metal parts during or immediately after operation as they remain hot.
Product specifications
- Running horsepower: 1.3 HP
- Air tank capacity: 20 gal.
- Max air pressure: 175 PSI
- Lubrication: Oil-free
- Input: 120V, 60 Hz, Single phase, 15 Amps
- Net weight: 73 lbs.
System components
Key components include the ON/OFF switch, safety valve, tank pressure gauge, air compressor pump, drain valve, check valve, regulator, pressure regulator gauge, and quick connect fitting.
Placement and installation
Place the compressor in a clean, dry, and well-ventilated area. Maintain at least 18 inches of clearance from walls or obstructions to ensure proper airflow. Locate the unit as close to the power supply as possible to minimize the need for long extension cords.
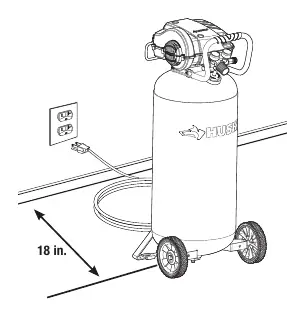
Attaching the hose
Ensure the power is disconnected. Apply thread tape to the hose connections and attach the quick coupler using a wrench. Rotate the pressure regulator knob fully counterclockwise before inserting the hose adapter into the female coupler on the compressor.
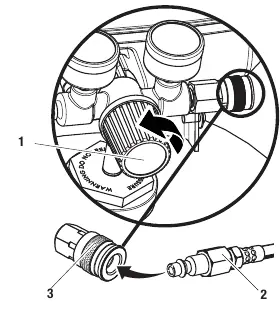
Operation
To start the compressor, plug it into a proper receptacle, turn the switch to the ON position, and allow the tank pressure to build. Adjust the regulator to the required PSI for your specific tool. Always ensure the switch is in the OFF position and the regulator gauge reads zero before disconnecting tools.
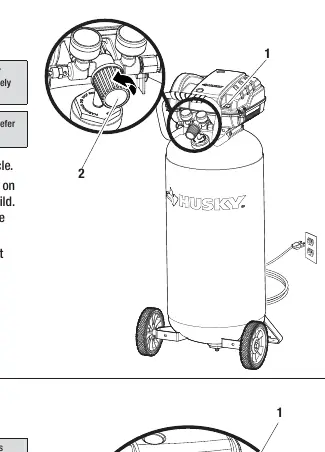
Draining the tank
To drain the tank, turn the unit OFF, pull the safety valve ring to bleed pressure down to approximately 20 psi, and open the drain valve at the bottom of the tank. Close the valve after draining.
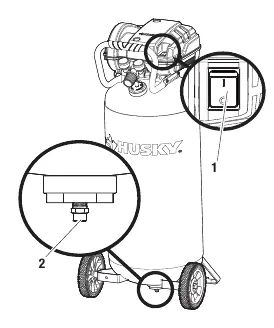
Maintenance
The unit is oil-free and requires no bearing lubrication. Inspect the tank annually for rust or pinholes. Use clean cloths to remove dirt and grease; avoid solvents on plastic parts. Always release all pressure and allow the unit to cool before performing any maintenance.
Troubleshooting
If the compressor does not run, check the power supply, extension cord, or thermal overload protector. If the motor hums or runs slowly, check for low voltage or incorrect extension cord gauge. If fuses blow, ensure you are using a time-delay fuse and that the compressor is on its own branch circuit.
Manufacturer information
Husky
Practical help
Common problems
Compressor does not run
Check power supply, ensure unit is plugged in, check fuse/breaker, or allow thermal overload protector to cool.
Motor hums or runs slowly
Check for low voltage, ensure correct extension cord gauge/length is used, or contact service for motor wiring issues.
Fuses blow or circuit breaker trips
Use a time-delay fuse, disconnect other appliances from the circuit, or check extension cord gauge.
Air receiver pressure drops when shut off
Check all connections for leaks using soap and water solution, or tighten the drain valve.
Before use
- Check for damaged or missing parts.
- Ensure the unit is placed in a well-ventilated area with 18 inches of clearance.
- Verify the power supply is 120V, 60Hz.
- Inspect air lines and fittings for leaks.
- Ensure the drain valve is closed.
- Check that the pressure regulator knob is set correctly.
Show more Show less
Specs in practice
- Running horsepower
- 1.3 HP, indicates the motor power output.
- Air tank capacity
- 20 gallons, the volume of compressed air stored.
- Max pressure
- 175 PSI, the maximum pressure the tank can safely hold.
Images and diagrams
- System Components (Page 9) identifies the switch, gauges, valves, and regulator.
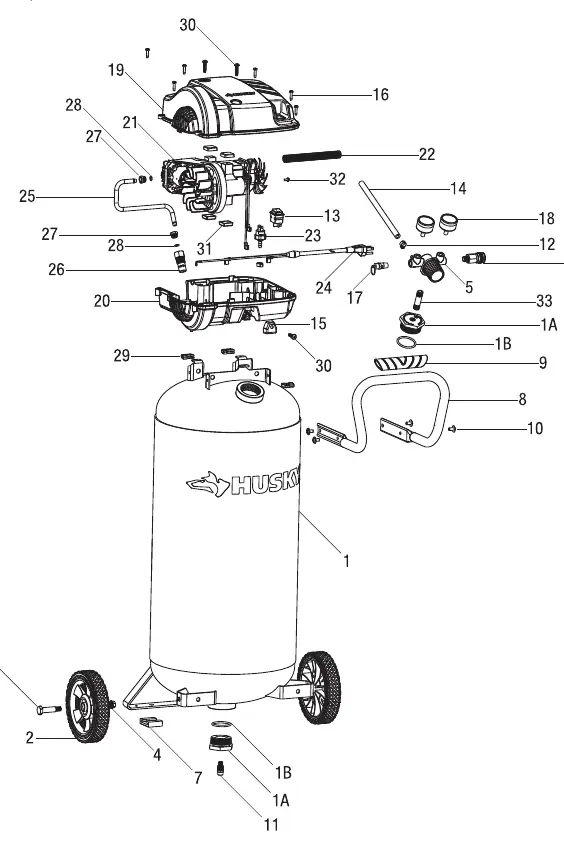
- Service Parts (Page 19) provides an exploded view of the unit for identifying replacement parts.
- Pump/Motor Assembly (Page 22) shows the internal components of the pump.
Model compatibility
- Use only 3-wire extension cords with 3-prong grounding plugs.
- Use time-delay fuses for the circuit.
- Do not use DC power; AC only.

Manual page author
Michael Turner
Technical manual editor