Industrial / Fuel Dispensing Equipment
Husky Conventional BSPP Nozzles Installation and Maintenance Manual
Quick guide for Husky Conventional BSPP Nozzles. Includes installation, maintenance, inspection, spout replacement, and troubleshooting procedures for safe fuel dispensing.
Table of contents
Manual images
Click an image to enlargeQuick guide from the manual
This manual provides essential installation, maintenance, and operation instructions for Husky Conventional BSPP Nozzles. These nozzles are designed exclusively for use at motor fuel dispensing facilities. Always adhere to local, state, and federal regulations. Failure to follow these instructions may result in injury, fire, or hazardous spills.
Installation Instructions
Before installing, ensure the dispenser is turned off and line pressure is relieved.
- Do not use any thread sealant (Teflon tape, anti-seize, or other sealants).
- Tighten the nozzle firmly to approximately 15 - 20 lbf-ft (20.3 - 27.1 N-m). Do not overtighten.
- Use a wrench on the hose nut only.
- Pressurize the system and visually inspect for leaks.
- Test the nozzle for proper automatic shut-off between 5 - 10 gpm (18.9 - 37.9 Lpm).
Operation Instructions
- Activate the dispenser.
- Insert the spout into the fill pipe opening.
- Lower the hose end of the nozzle so the spout spring catches the inside of the fill pipe.
- Raise the lever to begin fueling.
- The nozzle will shut off automatically when the tank is full.
- Wait 15 seconds to allow remaining fuel in the spout to drain.
- Remove the nozzle by raising the hose end and return it to the nozzle boot.
Note: The nozzle is equipped with a Flo-Stop device that shuts off the nozzle if it falls from the fill pipe or is raised above horizontal.
Maintenance and Inspection
Regular maintenance is required to ensure safe operation. Any failure during testing requires immediate equipment replacement or removal from service.
Daily
- Check for leaks or stains.
- Inspect for loose spouts.
- Check for physical damage.
- Inspect for bent levers.
- Check for broken clips or trigger springs.
Monthly
- Perform a flow test to verify automatic shut-off between 5 - 10 gpm (18.9 - 37.9 Lpm).
- Check the "remove after" date.
Annually
- Check for electrical conductivity.
- Lubricate the main valve stem.
Troubleshooting
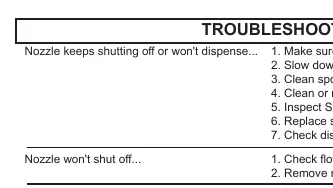
- Nozzle keeps shutting off or won't dispense: Ensure dispenser is activated, slow down flow rate, clean spout tip, clean/replace filter, inspect Safe-T-Break, replace spout assembly, or check dispenser pressure (19 psi / 1.3 bar required).
- Nozzle won't shut off: Check flow rate (minimum 3 gpm / 11.4 Lpm required), remove nozzle and drain hose.
- Nozzle leaks: Check for loose spout, hose connection, or cracks in nozzle/hose threads.
- Low flow rate: Remove Flo-Equalizer (if equipped), verify dispenser is not in slow flow mode, check for system leaks.
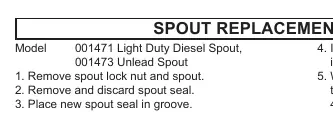
Spout and Guard Replacement
The manual provides specific procedures for replacing spouts, Flo-Equalizers, hold-open clips, and various guards (Nozzle Guard, Reguard, POPD Guard). Always turn off the dispenser and relieve line pressure before performing any replacement or maintenance.
Manufacturer information
Husky
Practical help
Common problems
Nozzle keeps shutting off or won't dispense
Ensure dispenser is on, clean spout tip, check/replace filter, inspect Safe-T-Break, or check dispenser pressure (19 psi / 1.3 bar).
Nozzle won't shut off
Verify flow rate is at least 3 gpm (11.4 Lpm) and drain the hose.
Nozzle leaks
Check for loose spout, inspect hose connections, and check for cracks in threads.
Low flow rate
Remove Flo-Equalizer (if equipped), check for system leaks, or verify dispenser settings.
Before use
- Turn off dispenser and relieve line pressure before maintenance.
- Do not use thread sealant (Teflon tape, anti-seize).
- Ensure fire extinguishing equipment is within 5 ft (1.5 m).
- Discharge static electricity before fueling.
- Verify flow rate is within 5 - 10 gpm (18.9 - 37.9 Lpm).
Images and diagrams
- The manual includes detailed procedural steps for installing the Flo-Equalizer and Hold Open Clip.
- Guard replacement instructions cover various models including Nozzle Guard, Reguard, and POPD Guard.
Model compatibility
- Designed for use at motor fuel dispensing facilities only.
- Not for use with unapproved containers.
- Do not use at flow rates less than 5 gpm (18.9 Lpm).

Manual page author
Emily Carter
User documentation editor
Prepares concise manual descriptions and highlights the most useful setup, operation, and maintenance information for readers.