Garden / Brushcutters & Trimmers
Operator's Manual for Husqvarna 215iL Battery Lawn Trimmer
Comprehensive operator's manual for the Husqvarna 215iL battery lawn trimmer. Includes detailed instructions for assembly, safe operation, battery maintenance, troubleshooting, and technical specifications.
Quick answers from the manual
Quick answer
- The Husqvarna 215iL is a battery-powered lawn trimmer. To start, insert a charged battery, press the start/stop button until the green LED lights up, then push the power trigger lockout and the power trigger. p. 15
Key actions
- Start the trimmer p. 15
- Stop the trimmer p. 16
- Charge the battery p. 15
First start
- Charge the battery fully before first use. p. 15
- Assemble the trimmer guard, head, and handle. p. 14
Show 4 more answers Show less
Problems and fixes
Product does not start
Push the power trigger and press the start button at the same time.
p. 18
Overload
Release the cutting attachment so it can move freely.
p. 17Maintenance and reset
- Clean external parts daily with a dry cloth. p. 16
Technical specifications
| Parameter | Value | Meaning | Pages |
|---|---|---|---|
| Motor type | BLDC | Brushless DC motor | p. 19 |
| Weight | 2.9 kg | Weight without battery | p. 19 |
| Speed of output shaft | 6800 rpm | Maximum rotation speed | p. 19 |
Where to find it in the PDF
- Product Overview p. 7
- Assembly p. 14
- Operation p. 14, 15, 16
- Maintenance p. 16, 17
- Troubleshooting p. 17, 18
Table of contents
Manual images
Click an image to enlargeQuick guide from the manual
The Husqvarna 215iL is a battery-powered lawn trimmer designed for cutting grass and similar soft vegetation. Before using the product, ensure you have read the safety instructions, charged the battery, and correctly assembled the trimmer guard and handle. Always wear appropriate personal protective equipment, including eye protection and sturdy boots.
Product overview
The trimmer consists of several key components:
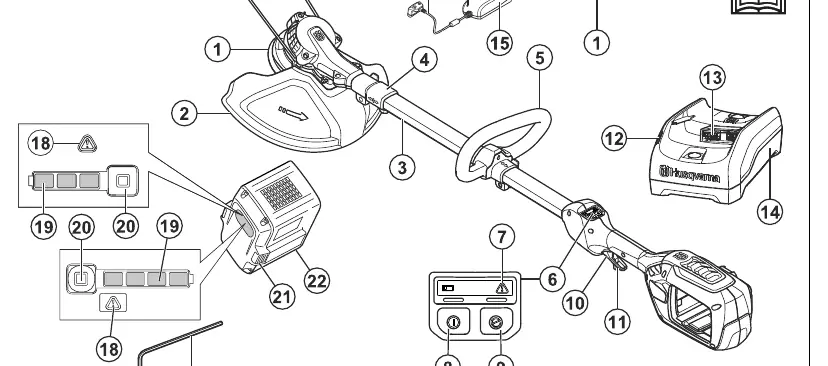
- Trimmer head: The cutting attachment.
- Shaft: Includes telescopic adjustment.
- Keypad: Contains the start/stop button, SaVe button, and warning indicators.
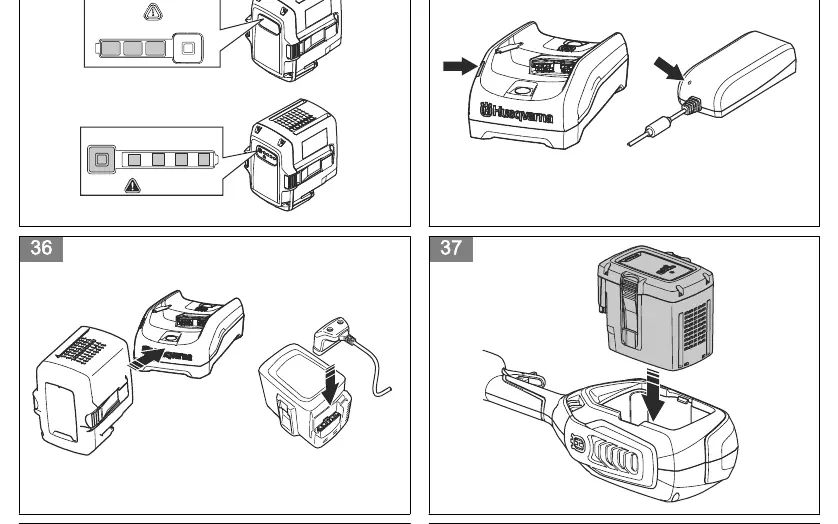
- Battery: Powers the unit (BLi series or 40-B series).
- Battery charger: Used to recharge the battery (QC80 or 40-C80).
Assembly
Follow these steps to prepare the trimmer for use:
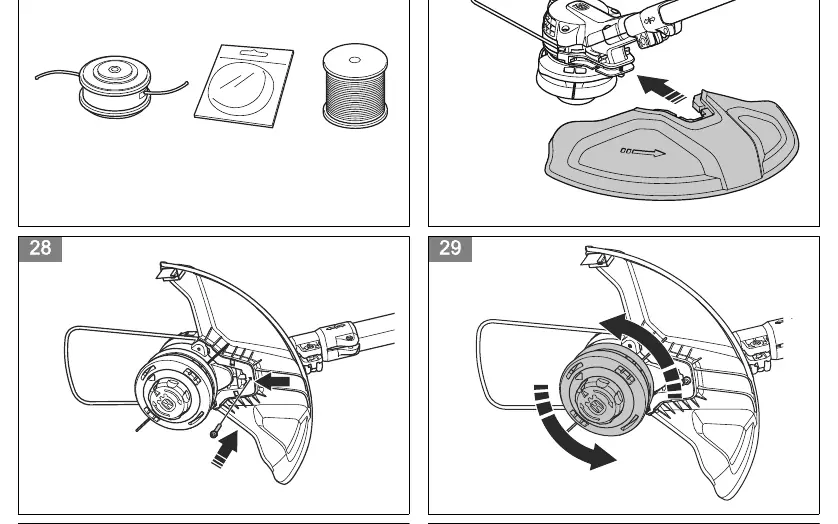
- Trimmer guard: Place against the motor housing and secure with the bolt.
- Trimmer head: Align the output shaft with the hole in the gear housing, lock with the locking pin, and turn the head counterclockwise.
- Loop handle: Install the screw into the handle and attach it to the shaft.
- Battery charger: Can be mounted on a wall using the provided holes.
Operation
To operate the trimmer:
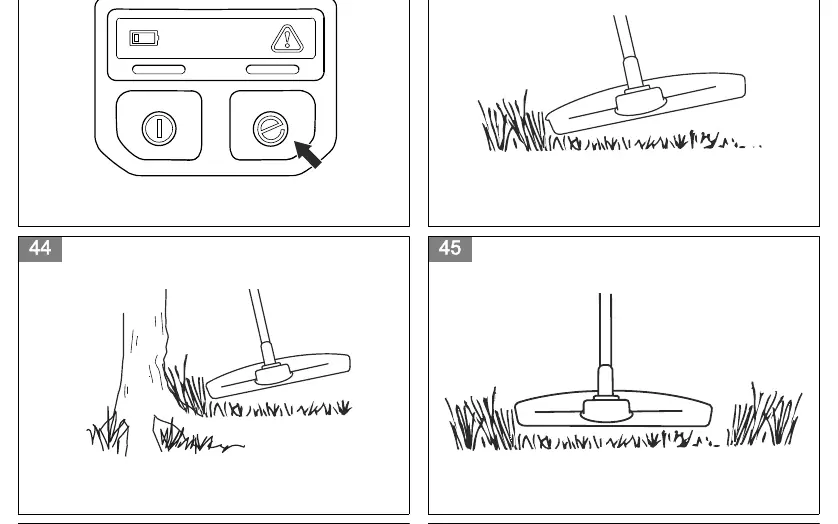
- Starting: Press and hold the start/stop button until the green LED lights up. Push the power trigger lockout and then the power trigger to start the motor.
- SaVe function: Press the SaVe button on the keypad to activate power-saving mode.
- Trimming: Keep the trimmer head parallel to the ground. Use full speed for cutting grass.
- Stopping: Release the power trigger and press the start/stop button until the green LED goes off.
Maintenance
Regular maintenance is essential for safety and performance:
- Daily: Clean external parts with a dry cloth, check that the start/stop button and power trigger work correctly, and ensure the trimmer head and guard are undamaged.
- Weekly: Examine all cables, couplings, and connections for damage.
- Monthly: Check the connection between the battery and the product.
Troubleshooting
If the product does not start, ensure the power trigger and start button are pressed simultaneously. If the error LED flashes, check for overload (release the cutting attachment) or temperature deviation (let the product cool down). If the charging LED flashes red, the battery may be faulty.
Manufacturer information
Husqvarna
Practical help
Common problems
Product does not start
Push the power trigger and press the start button at the same time.
Overload (Error LED flashes)
The cutting attachment cannot move freely. Release the cutting attachment.
Temperature deviation (Error LED flashes)
Let the product cool down.
Charging LED flashes red
Faulty battery. Contact your dealer.
Before use
- Examine the work area for obstacles.
- Inspect the product for damage or cracks.
- Ensure all nuts and screws are tight.
- Check that the trimmer head and guard are correctly attached.
- Wear eye protection and sturdy footwear.
- Ensure the battery is fully charged.
Show more Show less
Images and diagrams
- Fig 1: Product overview and component identification.
- Fig 27-32: Assembly steps for the guard, head, and handle.
- Fig 36-37: Battery installation and charging procedure.
- Fig 43-46: Proper trimming and sweeping techniques.
Model compatibility
- Use only Husqvarna BLi series and 40-B series batteries.
- Use only QC80 or 40-C80 battery chargers.
- Use only approved trimmer heads and lines.

Manual page author
Emily Carter
User documentation editor