Garden / Brushcutters & Trimmers
User Manual for Husqvarna 220iL String Trimmer
Comprehensive user guide for the Husqvarna 220iL battery-powered string trimmer. Includes assembly, operation, maintenance, and troubleshooting instructions.
Quick answers from the manual
Quick answer
- The Husqvarna 220iL is a battery-powered string trimmer. To start, ensure the battery is charged, insert it until it clicks, hold the power button until the green LED turns on, and use the power trigger to control speed. p. 2, 13
Key actions
- Assemble the loop handle p. 11
- Charge the battery p. 13
- Replace the trimmer line p. 16, 17
First start
- Insert battery, hold power button until green LED is on, use power trigger. p. 13
Show 3 more answers Show less
Problems and fixes
Green LED flashing
Charge the battery.
p. 17Technical specifications
| Parameter | Value | Meaning | Pages |
|---|---|---|---|
| Motor | BLDC (brushless) 40 V | Motor type | p. 19 |
Where to find it in the PDF
- Product Overview p. 2
- Assembly p. 11
- Operation p. 12
- Maintenance p. 15
- Technical Data p. 19
Table of contents
Manual images
Click an image to enlargeQuick guide from the manual
The Husqvarna 220iL is a battery-powered grass trimmer. Before use, ensure the battery is fully charged and the trimmer is correctly assembled. Always wear approved protective equipment, including eye protection, gloves, and sturdy boots. Keep a 15-meter safety distance from people and animals during operation.
Product overview
The trimmer consists of a trimmer head, shaft, loop handle, and battery compartment. The keypad allows you to power the unit on/off, adjust rotation direction, and activate the power boost function.
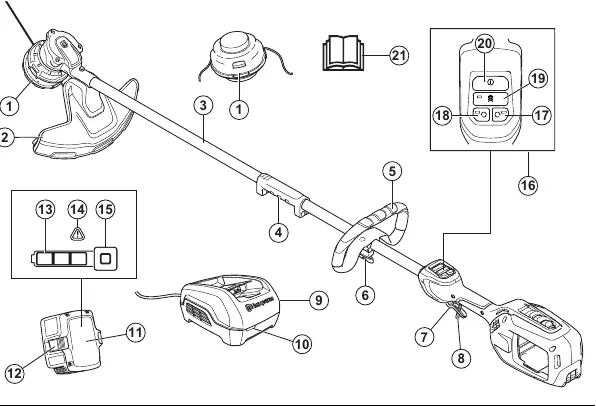
Assembly
To assemble the loop handle
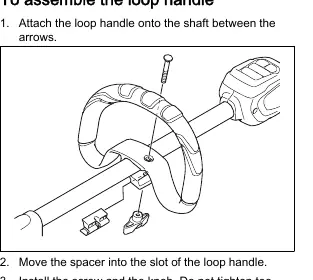
- Attach the loop handle onto the shaft between the arrows.
- Move the spacer into the slot of the loop handle.
- Install the screw and the knob, but do not overtighten.
- Adjust the handle to a comfortable position and tighten the knob.
To assemble the two-piece shaft
- Loosen the shaft coupling knob.
- Push the lock button (A) and insert the shaft into the coupling until the button clicks into the hole (B).
- Tighten the knob fully before operation.
Operation
Starting the product: Push and hold the power button until the green LED turns on. Use the power trigger to control speed.
Trimming and clearing: Hold the trimmer head at an angle just above the ground. Do not push the trimmer line into the ground. Move the trimmer from side to side.
Power boost function: Press the power boost button to operate at high speed for thicker grass. The LED indicates when the function is active.
Rotation direction: You can change the rotation direction of the trimmer head using the buttons on the keypad. The green LED indicates the current direction.
Maintenance
Regular maintenance is essential for safety and performance. Perform daily checks, including inspecting the trimmer head, guard, and controls for damage. Clean the product with a dry cloth after use. Do not use water.
To replace the trimmer line
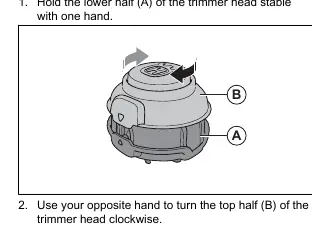
- Hold the lower half of the trimmer head stable.
- Turn the top half clockwise to align the triangles.
- Remove old line and cut approximately 5.5 meters (18 ft) of new line.
- Insert the line through the holes and pull until equal lengths extend from each side.
- Turn the top half counterclockwise to wind the line until approximately 127 mm (5 in) extends from each hole.
Troubleshooting
If the green LED flashes, the battery power is low; charge the battery. If the battery warning LED flashes, there is a temperature deviation; let the battery cool down or warm up. If the battery warning LED stays on, there is a permanent battery error; contact your dealer.
Manufacturer information
Husqvarna
Practical help
Common problems
Green LED flashing
Low battery power. Charge the battery.
Battery warning LED flashes
Temperature deviation. Let the battery cool down or warm up.
Battery warning LED stays on
Permanent battery error. Contact your dealer.
Before use
- Check for damaged parts or cracks
- Ensure all nuts and screws are tight
- Check that the trimmer head is completely attached
- Ensure the battery is fully charged
- Wear approved protective equipment (eye protection, gloves, boots)
Show more Show less
Specs in practice
- Cutting width
- 16 inches / 406 mm
- Weight (without battery)
- 7.7 lb / 3.5 kg
Images and diagrams
- Product overview showing trimmer head, shaft, handle, and battery
- Assembly steps for loop handle and shaft
- Trimmer line replacement procedure
Model compatibility
- Only use BLi22 battery
- Only use Husqvarna branded chargers (QC250)
- Only use approved trimmer head and trimmer line

Manual page author
Michael Turner
Technical manual editor