Garden / Brushcutters & Trimmers
User Manual for Husqvarna 220iR Grass Trimmer
Quick guide for the Husqvarna 220iR battery grass trimmer. Includes assembly instructions, operation, maintenance, troubleshooting, and technical specifications.
Quick answers from the manual
Quick answer
- The Husqvarna 220iR is a battery-powered grass trimmer. To start, ensure the battery is charged, attach the trimmer head, and use the keypad to power on the unit. p. 9, 18
Key actions
- Starting the trimmer p. 18
- Charging the battery p. 18
First start
- Initial setup p. 16, 17, 18
Show 4 more answers Show less
Problems and fixes
Overload (Error LED flashes)
Release the power trigger and clear the cutting attachment.
p. 21Maintenance and reset
- Maintenance schedule p. 19, 20
Technical specifications
| Parameter | Value | Meaning | Pages |
|---|---|---|---|
| Motor type | BLDC | Brushless DC motor | p. 22 |
| Weight | 4.3 kg | Weight without battery | p. 22 |
Where to find it in the PDF
- Introduction p. 9
- Assembly p. 16, 17
- Operation p. 17, 18, 19
- Maintenance p. 19, 20
- Troubleshooting p. 21
- Technical data p. 22, 23
Table of contents
Manual images
Click an image to enlargeQuick guide from the manual
The Husqvarna 220iR is a battery-powered grass trimmer designed for cutting grass and similar soft vegetation. Before use, ensure the battery is fully charged using the 40-C80 charger. Always wear appropriate personal protective equipment, including eye and ear protection, gloves, and sturdy boots. The machine features a keypad for operation, a SaVe power-saving mode, and an automatic shutdown function after 180 seconds of inactivity.
Product overview
The trimmer consists of several key components:
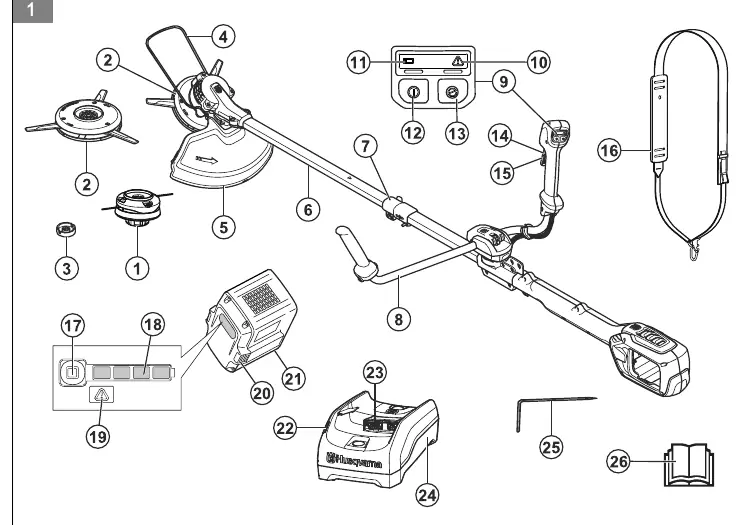
- Trimmer head (R25B or Tri-Cut)
- Shaft with telescopic adjustment
- Handlebar
- Keypad with start/stop and SaVe buttons
- Battery and battery charger
- Shoulder harness
Safety instructions
Safety is paramount when operating the trimmer:
- Work area: Keep the area clean, well-lit, and free of obstacles. Ensure bystanders are at least 15 meters away.
- Personal protective equipment: Always use eye protection, ear protection, gloves, and non-slip footwear.
- Battery safety: Use only approved 40-B series batteries. Keep the battery away from fire, heat, and moisture.
- Operation: Never operate the machine if you are tired or under the influence of substances. Always use two hands to hold the machine.
Assembly
Follow these steps to prepare the trimmer:
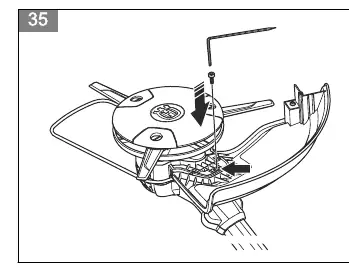
- Trimmer head: Attach the trimmer head to the motor housing. Use the combination wrench to lock the shaft when changing the head.
- Plant guard: Install the plant guard into the holes on the motor housing to protect nearby objects.
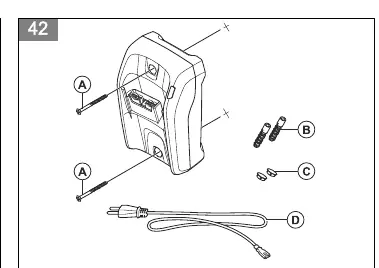
- Charger: The battery charger can be mounted on the wall using the provided screw holes.
Operation
To operate the trimmer:
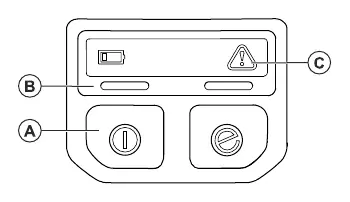
- Battery: Insert the battery into the battery holder until it clicks.
- Starting: Press and hold the start/stop button until the green LED turns on. Then, push the power trigger lockout and the power trigger.
- SaVe function: Press the SaVe button on the keypad to activate power-saving mode.
- Cutting: Keep the trimmer head parallel to the ground. Move the trimmer from side to side.
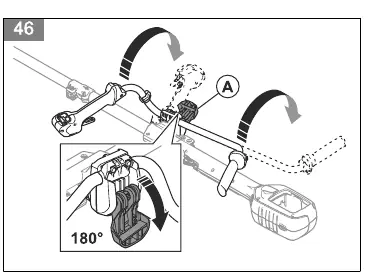
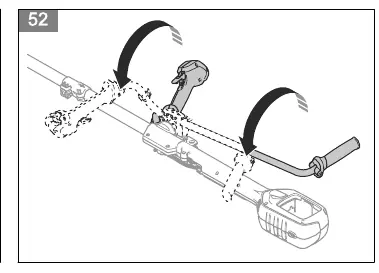
- Storage: Rotate the handlebar to the storage position and hang the machine on the wall.
Maintenance
Regular maintenance ensures longevity:
- Daily: Clean external parts with a dry cloth, check the harness, check start/stop button, check trigger, and inspect the cutting attachment.
- Weekly: Check that external screws and nuts are tight, and inspect the battery release buttons.
- Monthly: Check connections between the battery and the product/charger.
Troubleshooting
If issues arise:
- Overload: If the error LED flashes, the cutting attachment may be stuck. Release the trigger and clear the obstruction.
- Temperature: If the error LED flashes due to temperature, let the product cool down.
- Battery issues: If the green LED flashes, the battery voltage is low; charge the battery.
Technical data
Key specifications include:
- Motor type: BLDC
- Speed of output shaft: 6800 rpm
- Weight (without battery): 4.3 kg
- Sound power level (guaranteed): 94 dB(A)
Manufacturer information
Husqvarna
Practical help
Common problems
Error LED flashes (Overload)
The cutting attachment cannot move freely. Release the power trigger and clear the obstruction.
Error LED flashes (Temperature deviation)
Let the product cool down.
Charging LED flashes red
Faulty battery. Contact your service dealer.
Before use
- Examine the work area for obstacles like stones or branches.
- Inspect the trimmer head for damage or cracks.
- Ensure all nuts and screws are tight.
- Wear eye protection, ear protection, gloves, and sturdy boots.
- Ensure the battery is fully charged.
- Check that the harness is adjusted correctly.
Show more Show less
Specs in practice
- Speed of output shaft
- 6800 rpm
Images and diagrams
- Fig 1: Overview of all components including trimmer head, keypad, and battery.
- Fig 27: Keypad layout showing battery indicator and start/stop buttons.
- Fig 42: Wall mounting instructions for the battery charger.
- Fig 46-48: Adjusting the handlebar and shaft for operation.
Model compatibility
- Use only 40-B series batteries.
- Use only 40-C80 battery charger.
- Use only approved cutting attachments (R25B or Tri-Cut).

Manual page author
David Miller
Documentation analyst