Lighting / Fixtures
User Manual for Ideal Lux Doge SP12 Chandelier
Quick guide for the Ideal Lux Doge SP12 chandelier. Includes assembly steps, wiring instructions, safety warnings, and technical specifications.
Table of contents
Manual images
Click an image to enlargeQuick guide from the manual
The Ideal Lux Doge SP12 is a suspension lamp (chandelier) designed for indoor use. Installation must be performed by a qualified electrician. The assembly process involves a 7-step sequence, including mounting the bracket, connecting the wiring, and installing the arms and bulbs. Always ensure the power is disconnected before starting any installation or maintenance work.
Installation
Follow the numerical progression for assembly:
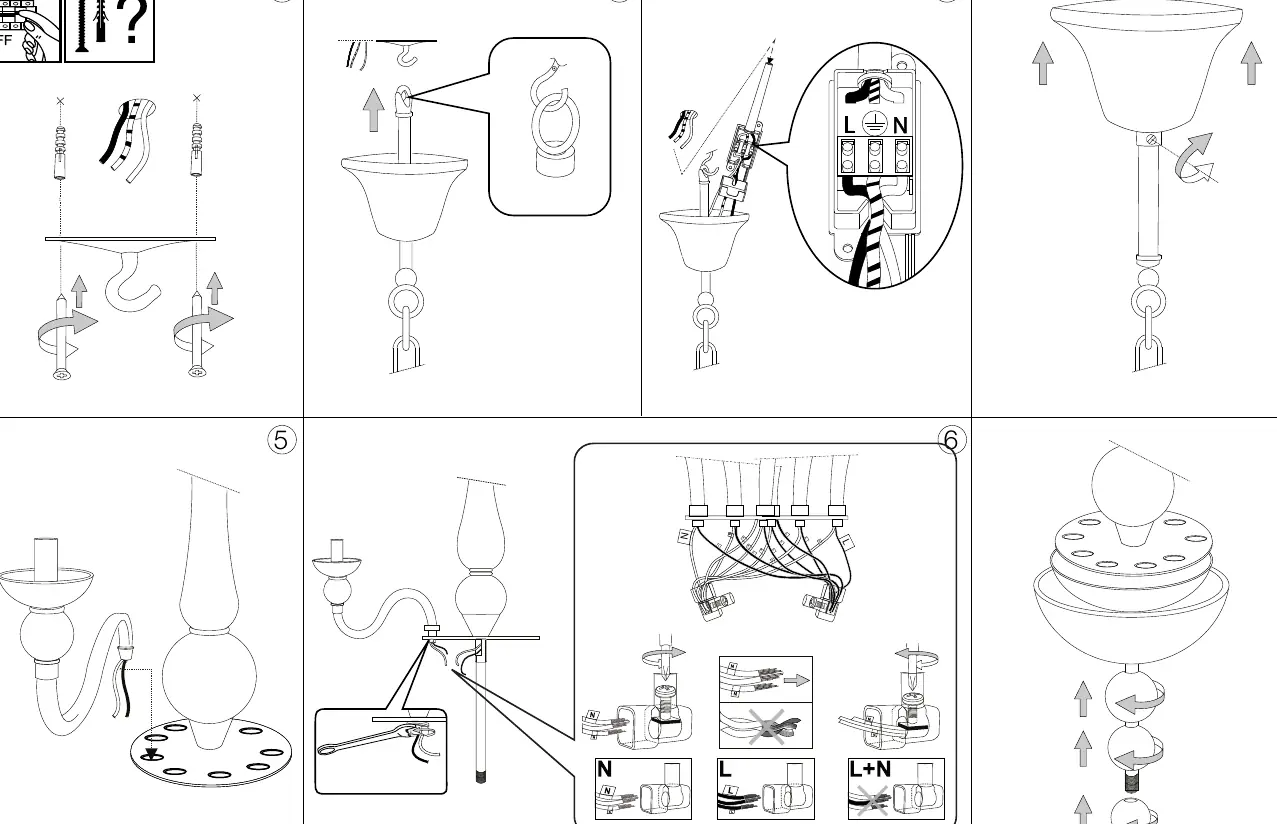

- Preparation: Turn off the main power supply.
- Mounting: Secure the mounting bracket to the ceiling using appropriate screws and plugs for the ceiling material.
- Suspension: Attach the chain and adjust the electric cable length so it is longer than the chain.
- Wiring: Connect the power supply to the terminal block, ensuring correct L (Live) and N (Neutral) connections.
- Canopy: Secure the canopy to the ceiling bracket.
- Assembly: Attach the arms to the central structure.
- Finalization: Install the bulbs and any decorative elements.
Safety Instructions
- Qualified Personnel: Installation must be carried out by a qualified electrician.
- Power Supply: Always isolate the power before commencing installation or maintenance.
- Flammable Surfaces: The fixture is not suitable for direct installation on normally flammable surfaces.
- Bulb Wattage: Do not exceed the maximum specified wattage (E14 max 12 x 40W).
- Safety Distance: Maintain the minimum safety distance between the bulb and the illuminated object as indicated by the icon.
- Glass/Components: If safety glass is cracked or broken, replace it immediately with compliant parts.
Maintenance
If the lamp does not turn on, check the fuse. Clean the fixture with a damp cloth, avoiding strong solvents or detergents. Do not disassemble the product, as the LED diodes (if applicable) can cause eye damage.
Practical help
Common problems
Lamp does not turn on
Check the fuse and ensure all wiring connections are secure.
Contact issues
Ensure all screws are tightened firmly.
Before use
- Ensure the main power supply is turned off.
- Verify that the ceiling material can support the weight of the chandelier.
- Use appropriate screws and plugs for the mounting surface.
- Ensure a qualified electrician performs the installation.
- Check that the bulb wattage does not exceed the maximum limit.
Images and diagrams
- The wiring diagram illustrates the connection of Live (L) and Neutral (N) wires to the terminal block.
- The assembly sequence shows the step-by-step connection of the chain, canopy, and arms.
Model compatibility
- Indoor use only.
- Not suitable for recessed installation on normally flammable surfaces.
- Not suitable for direct mounting on normally flammable surfaces.

Manual page author
David Miller
Documentation analyst
Organizes user manual content into clear summaries, with attention to model details, product context, and everyday usability.