Lighting / Fixtures
Ideal Lux Pashà PL14 Ceiling Lamp
A comprehensive guide for the Ideal Lux Pashà PL14 ceiling lamp, covering installation, safety precautions, technical specifications, and maintenance.
Table of contents
Manual images
Click an image to enlargeQuick Guide from the Manual
The Ideal Lux Pashà PL14 is a ceiling-mounted lighting fixture. Installation must be performed by a qualified electrician. Ensure the main power is switched off before starting any installation or maintenance work. The fixture is designed for indoor use only and must not be installed on normally flammable surfaces.
Safety Instructions
- Electrical Safety: Ensure the power is isolated before commencing installation.
- Installation Environment: This fitting is for indoor use only. Do not install on normally flammable surfaces.
- Weight Support: The weight of the lamp must be supported by the ceiling structure.
- Bulb Usage: Use only bulbs that do not exceed the maximum specified wattage (14 x 40W).
- Safety Distance: Maintain the minimum safety distance between the bulb and the illuminated object as indicated by the icon.
- Maintenance: If the safety glass is cracked or broken, it must be replaced immediately with manufacturer-approved parts.
Installation Steps
Follow the numerical progression for assembly as shown in the manual:
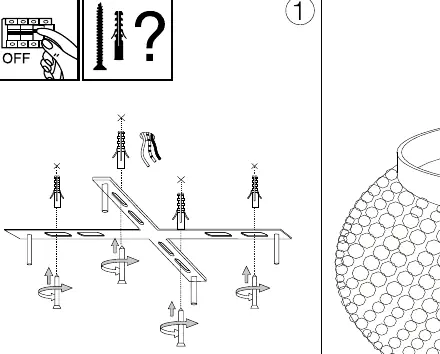


- Mounting Bracket: Secure the mounting bracket to the ceiling using appropriate screws and wall plugs suitable for the ceiling material.
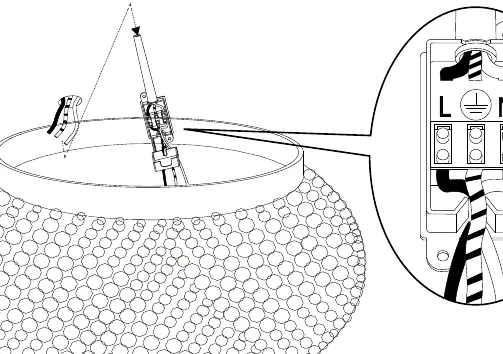
- Wiring: Connect the electrical wires to the terminal block (L, N, and Earth). Ensure all screws are tightened firmly to avoid contact problems.
- Fixture Attachment: Attach the lamp fixture to the mounting bracket.
- Bulb Installation: Install the light bulbs into the sockets.
- Cover Installation: Attach the bottom cover to the fixture.
Technical Specifications
- Model: Pashà PL14
- Socket: E14
- Max Wattage: 14 x 40W
- Voltage: 220-240V 50/60Hz
- Protection Rating: IP20
Maintenance
Clean the fixture with a damp cloth. Avoid using strong solvents or detergents. If the lamp does not turn on, check the fuse and ensure all electrical connections are secure.
Practical help
Common problems
Lamp does not turn on
Check the fuse and ensure the power supply is connected correctly.
Safety glass is cracked
Replace immediately using only manufacturer-approved spare parts.
Before use
- Ensure main power is switched off
- Verify the ceiling can support the weight of the fixture
- Use a qualified electrician for installation
- Check that the bulb wattage does not exceed the maximum limit
- Ensure the mounting surface is not flammable
Images and diagrams
- Step 1: Installation of the mounting bracket to the ceiling.
- Step 2: Wiring connection showing Live (L), Earth, and Neutral (N) terminals.
- Step 3: Securing the main fixture body to the bracket.
- Step 4: Installing the light bulbs.
- Step 5: Final assembly of the bottom cover.
Model compatibility
- Not suitable for recessed installation on flammable surfaces.
- Only for ceiling mounting.

Manual page author
Emily Carter
User documentation editor
Prepares concise manual descriptions and highlights the most useful setup, operation, and maintenance information for readers.