Tools / Power Tools
IGM 137-JIG2 Mortising Jig User Guide
Quick guide for the IGM 137-JIG2 mortising jig. Includes setup, operation for rebated and non-rebated doors, maintenance, and troubleshooting tips.
Table of contents
Manual images
Jump to the sectionQuick guide from the manual
The IGM 137-JIG2 is a precision jig designed for creating mortises for door locks in wooden or aluminum doors using a drill. This guide covers the setup and operation for different door types, as well as essential maintenance.
Safety instructions
- Always check the condition of the jig and cutting tool before use.
- Use only sharp, undamaged cutting tools.
- Work in a clean, well-lit area with sufficient space.
- Wear appropriate protective gear: eye, ear, and respiratory protection, and work gloves.
- Keep hands and fingers away from the cutting area; use both hands to operate.
- Ensure the jig is securely clamped to the door; never hold it by hand during operation.
- Keep the jig away from children and unauthorized persons.
- Do not expose the jig to moisture or rain.
Operation
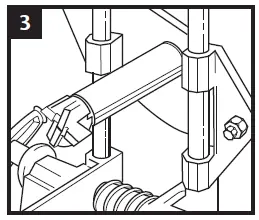
The jig is attached to the edge of the door using clamps. The lower clamp is fixed, while the upper clamp is adjustable to define the length of the mortise. The drill bit moves within an aluminum guide between the clamps.

General procedure
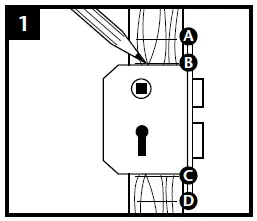
- Use the lock as a template to mark the top and bottom edges of the lock body and the faceplate.
- Select the appropriate cutter diameter based on the lock body thickness and secure it to the shaft.
- Attach the jig to the door and set the upper and lower stops approximately 5 mm beyond the marked edges.
- Set the depth stop on the shaft according to the lock depth.
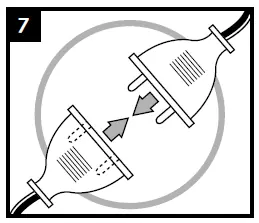
- Connect the drill and operate at 2000–3000 rpm.
- Mill the opening by moving the guide up and down, avoiding excessive force.
Maintenance and troubleshooting
- Loose guide or uneven mortise: Tighten the nut that adjusts the guide position. Do not overtighten.
- Shaft loose in guide: Replace the shaft.
- Jig won't clamp on thick doors (>55mm): Use a wider drill guide version.
- Guide slides with difficulty: Clean the guide rods and bushings, then lubricate with WD40 or similar lubricant.
- Cutter sharpening: Carbide cutters can be sharpened using a diamond stone. Always sharpen the face, never the profile.
Manufacturer information
IGM Tools & Machinery
Practical help
Common problems
Guide is loose or mortise is not straight
Tighten the nut adjusting the guide position (do not overtighten).
Shaft is loose in the guide
Replace the shaft with a new one.
Jig cannot be clamped on doors thicker than 55 mm
Replace the standard drill guide with a wider version.
Guide slides with difficulty
Clean guide rods and bushings, then lubricate with WD40 or similar.
Before use
- Check the technical condition of the jig and cutting tool.
- Ensure the cutting tool is sharp and undamaged.
- Ensure the work area is clean and well-lit.
- Wear eye, ear, and respiratory protection, and work gloves.
- Ensure the jig is securely clamped to the door.
- Verify the drill speed is set to 2000–3000 rpm.
Specs in practice
- Operating speed
- 2000 - 3000 rpm for optimal cutting performance.
- Max mortise depth
- 100 mm (can be extended with optional longer shaft).
- Cutter diameters
- 16 mm, 20 mm, 22 mm included for different lock sizes.
Images and diagrams
- Step 1: Marking the lock dimensions on the door.
- Step 2: Attaching the cutter to the shaft.
- Step 3: Inserting the shaft into the guide.
- Step 4: Setting the depth stop.
- Step 5: Operating the drill with the jig.
Model compatibility
- Designed for wooden doors with rebates, non-rebated wooden doors, and aluminum doors.
- For doors thicker than 55 mm, a wider guide is required.
- For lock depths exceeding 100 mm, a longer shaft (up to 180 mm) is available.

Manual page author
David Miller
Documentation analyst
Organizes user manual content into clear summaries, with attention to model details, product context, and everyday usability.