Garden / Outdoor Furniture
Assembly Instructions for Duisburg Alu. K.D. Bench
A comprehensive assembly and maintenance guide for the Duisburg Alu. K.D. Bench. Includes a parts list, step-by-step mounting instructions, and care tips to ensure the longevity of your outdoor furniture.
Quick answers from the manual
Quick answer
- The Duisburg Alu. K.D. Bench is assembled by attaching the two leg frames to the seat using the provided screws and washers. Do not fully tighten screws until all are inserted. p. 1, 2
Key actions
- Assemble on a soft mat to avoid scratches. p. 1
- Do not fully tighten screws until all are fixed. p. 1
Problems and fixes
Bare metal showing due to scratch
Treat with a rust repelling varnish or similar.
p. 2Maintenance and reset
- Wipe with a damp cloth. Do not use bleach or abrasive cleaners. p. 2
Where to find it in the PDF
- Assembly Instructions p. 1
- Care and Cleaning p. 2
Table of contents
Manual images
Click an image to enlargeQuick Guide
The Duisburg Alu. K.D. Bench is designed for simple assembly. Important: Do not fully tighten any screws until all screws are inserted and the bench is aligned. Assemble the unit on a soft surface to prevent scratching the finish.
Parts List
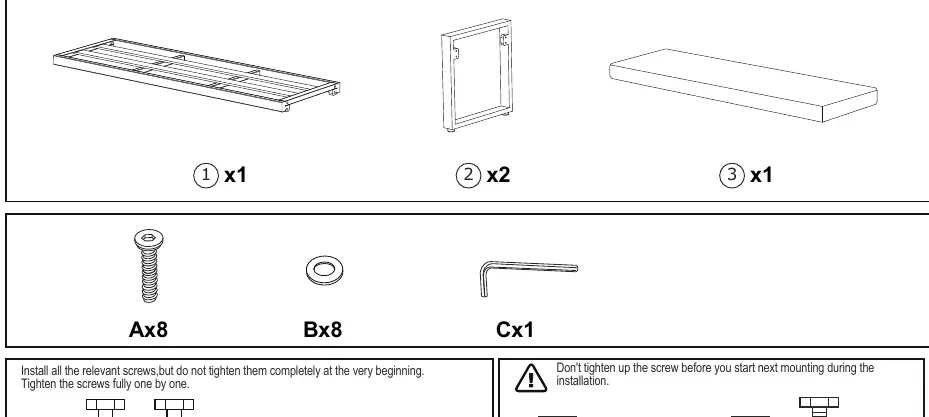
- 1: Seat (x1)
- 2: Leg frames (x2)
- 3: Hardware kit containing:
- Ax8: Screws
- Bx8: Washers
- Cx1: Hex key
Assembly Instructions
- Preparation: Identify all parts and ensure you have the correct quantities. Prepare a soft mat or carpeted area to protect the bench components during assembly.
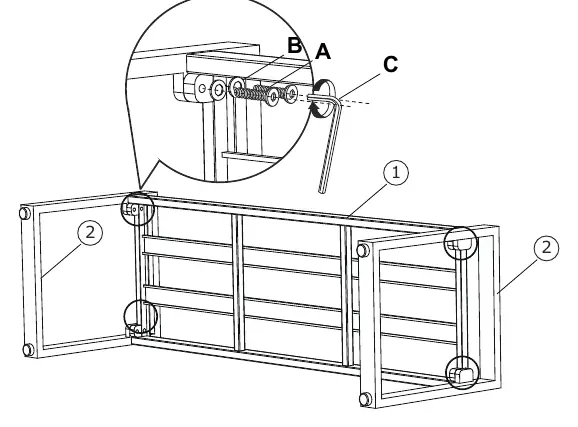
- Step 1: Align the leg frames (2) with the seat (1). Insert the screws (A) with washers (B) through the frame into the seat. Use the provided hex key (C) to tighten them partially. Do not fully tighten the screws at this stage.
- Step 2: Once all screws are in place, go back and fully tighten each screw one by one to ensure the frame is secure and stable.
Care and Cleaning
- Cleaning: Wipe the bench with a damp cloth. Do not use bleach, acid solvents, or abrasive cleaners, as these may damage the frame finish.
- Maintenance: Periodically check all screws and ensure they remain completely tightened.
- Storage: During winter or varying weather conditions, store the bench in a dry area. Using a matching furniture cover is strongly recommended to extend the lifespan of the product.
- Repairs: If the metal finish is scratched and bare metal is exposed, treat the area with a rust-repelling varnish or similar product to prevent corrosion.
Manufacturer information
IKEA
Practical help
Common problems
Difficulty aligning screws during assembly
Ensure you do not fully tighten any screws until all screws are inserted into the frame.
Scratches on the metal frame
Treat exposed metal with a rust-repelling varnish or similar protective coating.
Before use
- Verify all parts (Seat, 2x Legs, 8x Screws, 8x Washers) are present.
- Prepare a soft mat or cloth to assemble on.
- Ensure you have the provided hex key.
- Check that the assembly area is dry.
Images and diagrams
- The parts diagram illustrates the seat and two leg frames.
- The assembly diagram shows the correct placement of screws and washers through the frame into the seat.
- The maintenance diagram highlights the importance of checking screw tightness periodically.
Model compatibility
- Recommended to use a matching furniture cover for outdoor storage.
- Suitable for outdoor use, but storage in a dry area is recommended during winter.

Manual page author
Emily Carter
User documentation editor
Prepares concise manual descriptions and highlights the most useful setup, operation, and maintenance information for readers.