Electronics / Speakers & Soundbars
User Guide for JBL Club 194T Tweeter
Quick guide for the JBL Club 194T tweeter. Includes installation instructions, wiring diagrams, mounting options, and technical specifications.
Table of contents
Manual images
Click an image to enlargeQuick guide from the manual
This document provides essential instructions for the installation and connection of the JBL Club 194T tweeter. It outlines the necessary components, mounting procedures, and wiring requirements to ensure proper operation.
Package contents
The package includes the following components (labeled A through J):

- A: Tweeter unit (2x)
- B: Tweeter housing (2x)
- C: Mounting cup (2x)
- D: Locking ring (2x)
- E: Mounting bracket (2x)
- F: Mounting adapter (2x)
- G: Nut (2x)
- H: Washer (2x)
- I: Screws (6x)
- J: Crossover module (2x)
Installation
The JBL Club 194T supports multiple mounting configurations depending on your vehicle's interior:
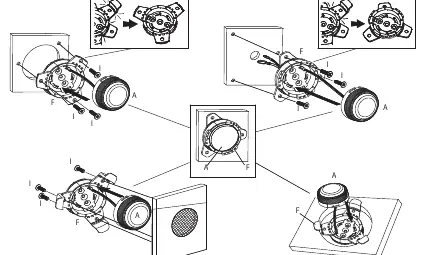
- Flush Mount: Use the appropriate housing and mounting cup to secure the tweeter into a panel opening.
- Surface Mount: Utilize the mounting brackets and screws provided to attach the tweeter to a flat surface.
- Assembly: Ensure the tweeter (A) is securely locked into the housing (B/C) using the provided nut (G) and washer (H) where applicable.
Wiring
Proper wiring is critical for sound quality and equipment safety:
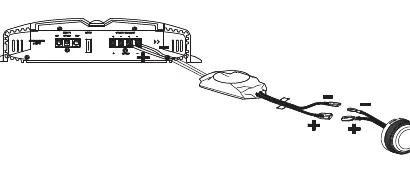
- Connect the tweeter to the provided crossover module (J).
- Ensure correct polarity is maintained when connecting to the amplifier output (+ to +, - to -).
- The crossover module must be installed between the amplifier and the tweeter to filter frequencies correctly.
Technical specifications
The JBL Club 194T features the following specifications:
- Type: 3/4" (19mm) Edge-Driven dome tweeter
- Power Handling: 50W RMS, 150W peak
- Sensitivity (@ 2.83V): 92dB
- Frequency Response: 3kHz – 20kHz
- Nominal Impedance: 3.0 ohms
Manufacturer information
JBL
Practical help
Common problems
Distorted sound or poor high-frequency response
Verify that the crossover module (J) is correctly connected and that the wiring polarity (+/-) is consistent.
Tweeter does not fit in the mounting location
Ensure you are using the correct mounting adapter (F) or housing (B/C) for your specific installation method.
Before use
- Verify all parts (A-J) are present in the box.
- Ensure the mounting surface is flat and clear of obstructions.
- Check that your amplifier is stable at 3.0 ohms impedance.
- Confirm wiring polarity (+/-) before making final connections.
- Ensure the crossover module is securely mounted.
Specs in practice
- Power Handling
- 50W RMS / 150W peak power capacity; do not exceed these limits to prevent damage.
- Frequency Response
- 3kHz to 20kHz range, defining the high-frequency sounds the tweeter reproduces.
- Nominal Impedance
- 3.0 ohms; ensure your amplifier is compatible with this load.
Images and diagrams
- Page 2 illustrates the parts list and basic assembly components.
- Page 3 details the physical installation steps for different mounting scenarios.
- Page 4 shows the wiring connection diagram between the amplifier, crossover, and tweeter.
Model compatibility
- Ensure the amplifier used is compatible with 3.0 ohms impedance speakers.

Manual page author
Michael Turner
Technical manual editor
Reviews PDF manuals for structure, safety notes, and practical product details so readers can find the right information quickly.