Electronics / Audio
JBL Spinner BT Bluetooth Turntable User Guide
Comprehensive setup, assembly, and operation guide for the JBL Spinner BT Bluetooth turntable, including tonearm balancing, Bluetooth pairing, and technical specifications.
Table of contents
Manual images
Jump to the sectionProduct Overview
The JBL Spinner BT is a high-quality Bluetooth-enabled turntable designed for vinyl enthusiasts who appreciate both modern convenience and classic audio fidelity. It features a belt-driven aluminum platter, a high-quality moving magnet cartridge, and a removable headshell for easy upgrades. With built-in Bluetooth 5.3 and aptX HD encoding, you can stream your record collection wirelessly to speakers or headphones without compromising sound quality. For traditional setups, it also includes analog RCA outputs with a switchable phono pre-amp.
Assembly and Setup
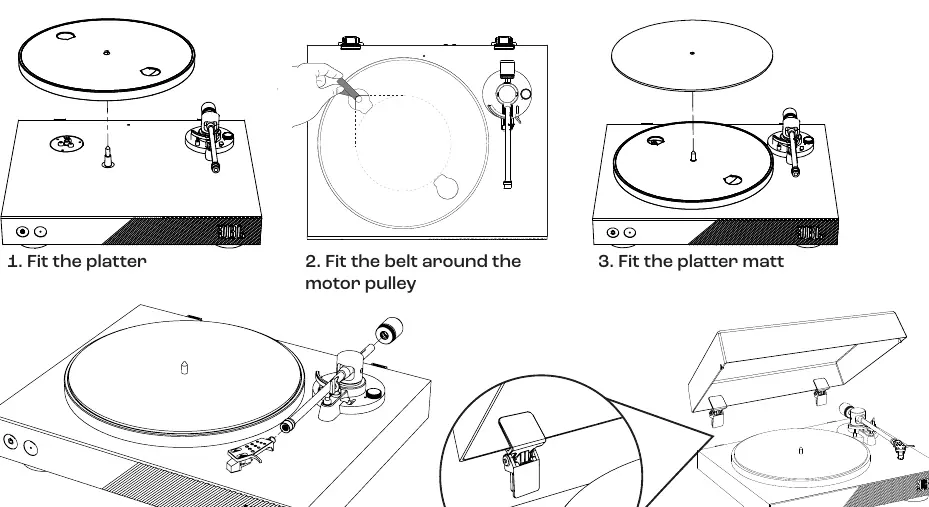
Setting up your JBL Spinner BT is straightforward. Begin by placing the platter on the spindle and fitting the drive belt around the motor pulley. Place the platter mat on top. Attach the headshell to the tonearm and install the counterweight. The dust cover can be attached using the provided hinges. Ensure the turntable is placed on a stable, level surface away from heat sources and direct sunlight.
Balancing the Tonearm
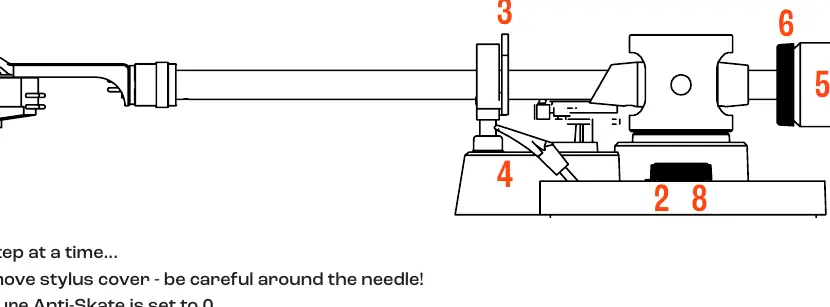
Proper tonearm balance is critical for optimal playback and record longevity. First, remove the stylus cover and ensure the anti-skate dial is set to 0. Unclip the tonearm and ensure the lift lever is in the down position. Rotate the counterweight until the tonearm floats perfectly level. Once balanced, set the counterweight dial to 0 without moving the weight itself. Finally, rotate the counterweight one full turn anti-clockwise to apply the correct tracking force and set the anti-skate dial to 3.
Bluetooth Pairing and Operation
To pair your turntable, press and hold the Bluetooth button on the rear panel for 2 seconds until the blue LED flashes. Once connected, the LED will turn solid blue. To reconnect, simply tap the button. To clear previous pairings, hold the button for 10 seconds. When playing records, ensure the stylus cover is removed, place the record on the platter, unclip the tonearm, raise the lift lever, position the cartridge over the start of the record, and lower the lever to begin playback.
Safety and Maintenance
Always handle the stylus with care. Keep the turntable clean and dry. If connecting to an amplifier with a dedicated Phono input, ensure the built-in pre-amp is switched to the OFF position. For disposal, follow local regulations regarding electronic waste, as this product contains recyclable materials and should not be discarded with household trash.
Manufacturer information
JBL
Practical help
Common problems
No sound when connected to an amplifier
Check if the amplifier is connected to the Phono input; if so, ensure the turntable's Pre-amp switch is set to OFF.
Bluetooth pairing fails
Ensure the turntable is in pairing mode (flashing blue LED) and clear previous pairing records by holding the Bluetooth button for 10 seconds.
Before use
- Remove the stylus cover
- Ensure the turntable is on a level surface
- Verify the drive belt is correctly fitted
- Balance the tonearm correctly
- Set anti-skate to 3
- Check Pre-amp switch position based on your amplifier
Specs in practice
- Bluetooth 5.3 with aptX HD
- High-resolution wireless audio transmission for superior sound quality.
- Defeatable MM Phono stage
- Allows the turntable to connect to both standard line-level inputs and dedicated Phono inputs.
- DC Belt Drive
- Reduces motor vibration for cleaner audio playback.
Images and diagrams
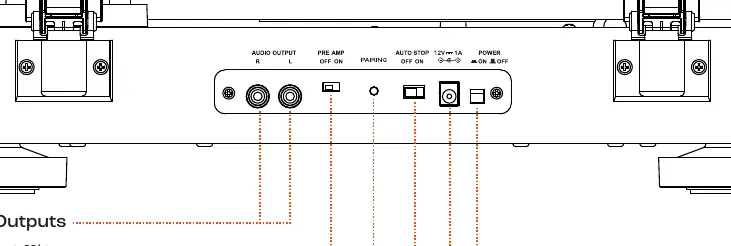
- The rear panel contains the Analog Outputs, Pre-amp switch, Bluetooth pairing button, Auto Start/Stop switch, and Power inlet.
- The tonearm balancing process involves floating the arm, zeroing the dial, and applying tracking force by rotating the counterweight.
Model compatibility
- Compatible with Bluetooth speakers and headphones supporting A2DP/AVRCP profiles.
- The included cartridge is an Audio Technica AT3600L.

Manual page author
Michael Turner
Technical manual editor
Reviews PDF manuals for structure, safety notes, and practical product details so readers can find the right information quickly.