Home / Smoke Detectors
User Guide for Kidde 10SDR-CA Photoelectric Smoke Alarm
Comprehensive user guide for the Kidde 10SDR-CA Photoelectric Smoke Alarm. Includes step-by-step installation instructions, battery replacement guidelines, troubleshooting for LED and audible indicators, and essential safety information.
Quick answers from the manual
Quick answer
- This manual provides installation, operation, maintenance, and troubleshooting instructions for the Kidde 10SDR-CA Photoelectric Smoke Alarm. p. 1, 2, 3
Key actions
- Install the alarm by attaching the mounting bracket to the wall or ceiling, pulling the battery tab, and rotating the alarm onto the bracket. p. 14, 15
- Test the alarm weekly by pressing and releasing the button. p. 16
- Clean the alarm annually using compressed air or a vacuum cleaner hose. p. 18
- Replace batteries with approved brands (Energizer E91, Gold Peak 15A, or Golden Power GLR6A) at least once a year. p. 17, 18
First start
- Remove the dust cover. p. 14
- Attach the mounting bracket to the wall or ceiling. p. 14
- Pull the battery pull tab to activate the unit. p. 14
- Install the alarm on the mounting bracket. p. 15
Show 4 more answers Show less
Problems and fixes
Low Battery
Push button once to silence for 24 hours or replace batteries.
p. 6
Smoke Sensor Fault
Clean the alarm or push button to reset; if error continues, replace unit.
p. 6
Fatal Fault
Push button to reset; if error continues, replace unit.
p. 6
End of Unit Life
Replace unit immediately.
p. 6
Stuck Button
Push button to dislodge; if it cannot be unstuck, replace unit.
p. 6Maintenance and reset
- Reset the unit by pushing the button. p. 6
- Silence the alarm for 8-10 minutes using Hush feature. p. 17
Technical specifications
| Parameter | Value | Meaning | Pages |
|---|---|---|---|
| Sensor Type | Photoelectric | Detects products of combustion | p. 7 |
| Power | 2 AA batteries | Battery powered | p. 7 |
| Temperature Operating Range | 4.4°C to 37.8°C (40°F to 100°F) | Operating temperature limits | p. 7 |
| Humidity Operating Range | Up to 95% RH non-condensing | Operating humidity limits | p. 7 |
| Audible Alarm | 85+ dB at 3m (10ft) | Alarm volume | p. 7 |
Where to find it in the PDF
- Installation and Activation p. 14, 15
- Troubleshooting Guide p. 6
- Product Specifications p. 7
- Cleaning p. 18
Table of contents
Manual images
Click an image to enlargeQuick Guide from the Manual
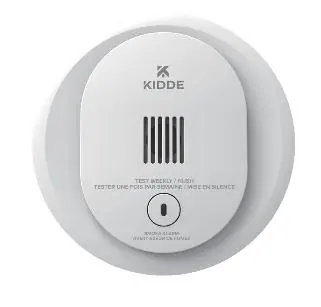
The Kidde 10SDR-CA is a photoelectric smoke alarm powered by two replaceable AA batteries. Key features include a Hush button to silence nuisance alarms, self-testing capabilities, and an end-of-life warning. Ensure the dust cover is removed before operation and test the unit weekly.
Installation and Activation
Proper installation is critical for safety. Follow these steps to install your alarm:
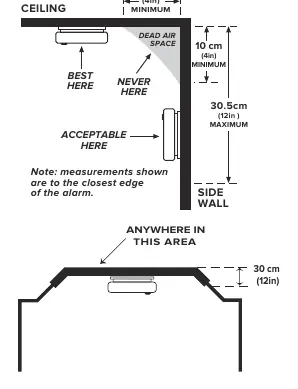
- Select Location: Install on the ceiling (preferred) or wall. Avoid garages, dusty areas, humid areas, or within 1.8m (6ft) of heating/cooking appliances.
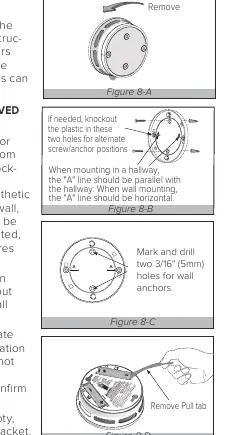
- Mounting Bracket: Remove the bracket from the back of the unit by rotating it counterclockwise. Attach the bracket to the wall or ceiling.
- Activation: Pull the battery pull tab to activate the unit. A beep confirms activation.
- Final Assembly: Install the alarm onto the mounting bracket by rotating it clockwise.
Note: The dust cover must be removed for the alarm to operate. Do not install on recessed surfaces.
Operation and Testing
The alarm is active once installed and tested. Perform a manual test weekly by pressing and releasing the test button. The unit will emit a sequence of beeps. If the alarm does not sound or produces erratic volume, replace the unit immediately.
Hush Feature: If the alarm sounds due to a known nuisance (e.g., cooking), press the button to silence it for 8-10 minutes. Dense smoke will override this feature.
Troubleshooting
The alarm uses specific LED and audible patterns to indicate status:
- Low Battery: Chirp every 60s, LED blinks every 60s. Replace batteries immediately.
- Smoke Sensor Fault: 3 chirps every 60s, LED blinks every 60s. Clean the unit; if the fault persists, replace it.
- Fatal Fault: 3 chirps every 60s, LED blinks 3 times every 60s. Reset or replace the unit.
- End of Unit Life: 2 chirps every 60s, LED blinks twice every 60s. Replace the unit immediately.
- Stuck Button: 3 chirps every 60s, LED blinks 4 times every 60s. Attempt to dislodge the button.
Maintenance and Cleaning
Clean your alarm at least once a year. Use compressed air or a vacuum cleaner hose to clean the sensing chamber through the openings. Do not use water, detergents, or solvents. Never paint the unit or disassemble it.
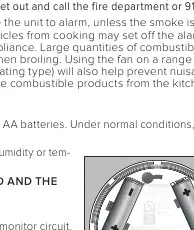
Battery Replacement: Replace batteries at least once a year. Use only approved brands: Energizer E91, Gold Peak 15A, or Golden Power GLR6A. Do not use lithium batteries.
Safety and Limitations
Smoke alarms have limitations and may not detect fires in chimneys, walls, or on the other side of closed doors. Develop and practice a home escape plan twice a year. Ensure all family members recognize the alarm sound and know how to exit the home safely.
Practical help
Common problems
Low Battery
Chirp every 60s. Replace batteries with approved brands (Energizer E91, Gold Peak 15A, or Golden Power GLR6A).
Smoke Sensor Fault
3 chirps every 60s. Clean the sensing chamber with compressed air or vacuum. If the fault persists, replace the unit.
End of Unit Life
2 chirps every 60s. The unit has reached its 10-year lifespan. Replace immediately.
Stuck Button
3 chirps every 60s, LED blinks 4 times. Try to dislodge the button. If unsuccessful, replace the unit.
Before use
- Remove the dust cover.
- Pull the battery tab to activate the unit.
- Confirm activation with a beep.
- Test the alarm after installation.
- Ensure batteries are installed in the correct orientation.
Show more Show less
Specs in practice
- Operating Temperature
- 4.4°C (40°F) to 37.8°C (100°F).
- Humidity Range
- Up to 95% RH non-condensing.
- Audible Alarm
- 85+ dB at 3m (10ft).
Images and diagrams
- Figure 6-A: Shows correct mounting distances from walls and ceilings to avoid dead air space.
- Figure 8-A/B/C/D: Illustrates the installation process, including bracket mounting and battery activation.
- Figure 11: Details the battery compartment and status indicators.
Model compatibility
- Use only specified batteries: Energizer E91, Gold Peak 15A, or Golden Power GLR6A.
- Do not use lithium batteries.
- Not designed for recessed mounting.

Manual page author
David Miller
Documentation analyst