Computers / Keyboards Input
User Manual for Universal 2-in-1 Smoke and Fire Alarm USI/SM/10YR/MINI
Quick guide for the Universal 2-in-1 Smoke and Fire Alarm USI/SM/10YR/MINI. Includes installation steps, testing procedures, troubleshooting, and maintenance instructions.
Quick answers from the manual
Quick answer
- This is a photoelectric smoke and fire alarm with a 10-year sealed battery. It requires activation by pulling the battery tab and should be tested weekly. p. 1, 2
Key actions
- Activate the alarm p. 2
- Test the alarm p. 1
- Silence the alarm p. 1
First start
- Pull the battery tab to activate the unit, then mount the bracket to the ceiling or wall and rotate the alarm clockwise until it clicks. p. 2
Show 4 more answers Show less
Problems and fixes
Alarm chirps every 48 seconds
Battery is depleted; replace the smoke alarm.
p. 1
Unwanted alarms
Press test button to silence, clean the unit, or move to a new location.
p. 1Maintenance and reset
- Clean the alarm at least once a year using a vacuum cleaner with a soft brush. p. 1
Technical specifications
| Parameter | Value | Meaning | Pages |
|---|---|---|---|
| Power | DC3V Lithium battery | Built-in, non-replaceable | p. 1 |
| Alarm Volume | >85 dB | At 3 meters | p. 1 |
Where to find it in the PDF
- Specifications and Operation p. 1
- Installation and Warranty p. 2
Table of contents
Manual images
Click an image to enlargeImportant Information
This unit is a photoelectric smoke and fire alarm designed for residential use. It features a 10-year sealed, non-replaceable battery. The alarm is designed to detect slow smoldering fires. It is not intended for use in recreational vehicles (RV) or boats.
- Weekly Testing: Test the alarm weekly by pressing the test button.
- Silence Feature: If the alarm sounds, you can silence it for approximately 8 minutes by pressing the test button.
- End-of-Life: The alarm will chirp every 48 seconds when the battery reaches the end of its life. It must be replaced immediately.
Installation
Proper installation is critical for the alarm to function correctly.
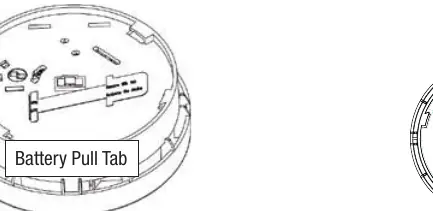
- Activation: Before installation, pull the battery activation tab (see Diagram 6).
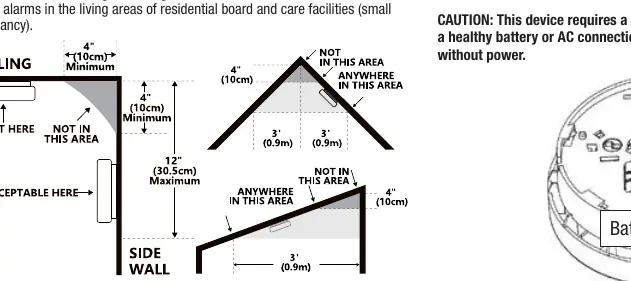
- Placement: Install alarms on every level of the home, including basements, and inside every bedroom. Place alarms in the middle of the ceiling or on the wall.
- Avoid: Do not install within 3 feet (0.9m) of kitchen doors, bathroom doors, forced air supply ducts, or near fluorescent lights. Avoid dusty, humid, or insect-infested areas.
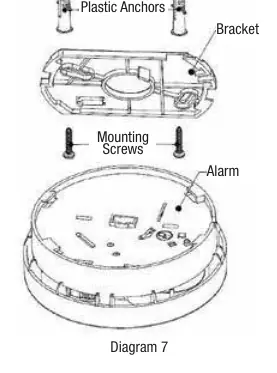
- Mounting: Use the provided bracket. Drill holes, insert plastic anchors, and screw the bracket to the ceiling or wall. Rotate the alarm clockwise onto the bracket until it clicks.
Operation
The alarm uses a red LED indicator to communicate status:
- Standby: Flashes every 48 seconds.
- Alarm: Flashes rapidly (once per second) with a pulsating sound.
- Silence Mode: Flashes every 8 seconds.
- Low Battery/Fault: Intermittent chirp every 48 seconds.
Maintenance and Disposal
Clean the alarm at least once a year using a vacuum cleaner with a soft brush to remove dust and debris. Do not attempt to open the cover, as this voids the warranty.
Disposal: When the battery reaches the end of its life, remove the alarm from the bracket. Use a screwdriver to turn the switch on the base to the OFF position. Allow the battery to discharge for at least seven days before disposing of the unit according to local regulations.
Troubleshooting
If the alarm chirps intermittently, it indicates a low battery or fault. If the alarm sounds unwantedly, press the test button to silence it. If problems persist, clean the unit or replace it if it is out of warranty. Do not attempt to repair the alarm yourself.
Practical help
Common problems
Alarm chirps every 48 seconds
The battery is depleted. The unit must be replaced.
Alarm sounds unwantedly (e.g., during cooking)
Press the test button to silence the alarm for 8 minutes. Ensure the unit is at least 10 feet from cooking appliances.
Alarm does not sound when tested
Clean the unit. If the problem persists and the unit is under warranty, return it to the retailer.
Before use
- Pull the battery activation tab to power on the unit.
- Test the alarm by pressing the test button.
- Ensure the installation location is at least 10 feet from cooking appliances.
- Verify the mounting surface is suitable for the bracket.
Show more Show less
Specs in practice
- Alarm Volume
- >85 dB at 3 meters.
- Silence Period
- Approximately 8 minutes.
Images and diagrams
- Diagram 2/3: Shows proper mounting distance from walls and ceiling peaks.
- Diagram 6: Shows the battery pull tab location for activation.
- Diagram 7-9: Shows the mounting bracket installation and locking plug usage.
Model compatibility
- Not for use in recreational vehicles (RV) or boats.
- Not for use with detector guards.

Manual page author
Michael Turner
Technical manual editor