Home / Smoke Detectors
Kidde Smoke and Carbon Monoxide Alarm User Guide
Comprehensive user guide for Kidde smoke and combination smoke/CO alarms. Includes installation, wiring, battery activation, troubleshooting, and safety procedures for models 20SAR, 30CUAR, and others.
Quick answers from the manual
Quick answer
- This guide provides instructions for installing, operating, and maintaining Kidde smoke and combination smoke/CO alarms. Key steps include proper AC wiring, battery activation, and weekly testing. p. 3, 14, 19
Key actions
- Activate the battery p. 16
- Test the alarm p. 20
First start
- Wiring and Mounting p. 14, 17
Show 4 more answers Show less
Problems and fixes
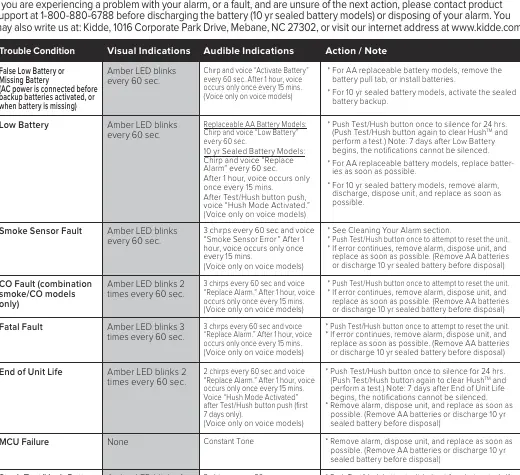
Low Battery
Replace batteries (AA models) or replace unit (10yr sealed).
p. 7
Smoke Sensor Fault
Clean alarm, press Test button, or replace unit.
p. 7Maintenance and reset
- Cleaning p. 28
Technical specifications
| Parameter | Value | Meaning | Pages |
|---|---|---|---|
| Power | 120VAC | Standard household power | p. 8 |
| Operating Temperature | 40°F to 100°F | Safe operating range | p. 8 |
Where to find it in the PDF
- Troubleshooting Guide p. 7
- Installation p. 14, 15, 16, 17
Table of contents
Manual images
Click an image to enlargeQuick Guide from the Manual
This guide covers the installation, operation, and maintenance of Kidde smoke and combination smoke/CO alarms. Important: Always remove the dust cover before operation. If the alarm sounds, evacuate immediately and call emergency services. Test your alarm weekly by pressing the Test/Hush button.
Product Overview
These alarms are designed for residential use and are powered by 120V AC with either replaceable AA batteries or a 10-year sealed battery backup. Combination models also detect carbon monoxide (CO). Features include a Hush button to silence nuisance alarms, self-testing circuitry, and an interconnect capability for multiple units.
Installation
Wiring Requirements
- AC alarms must be installed on a UL-listed junction box by a qualified electrician.
- Use standard household wire in accordance with local codes.
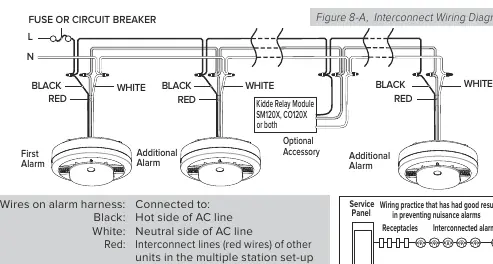
- Wiring Harness: Connect the black wire to the hot side of the AC line, the white wire to the neutral side, and the red wire to the interconnect line (if using multiple units).
- Do not connect the red wire if using the unit as a single station.
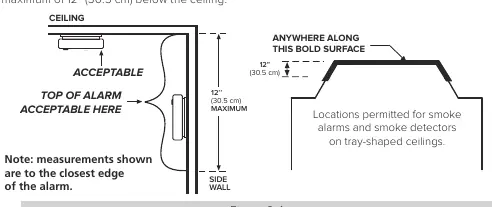
Mounting
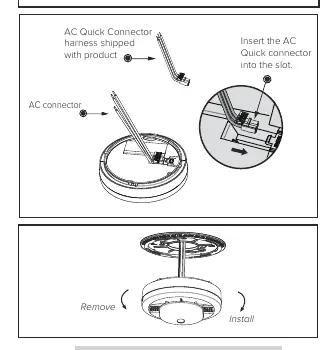
- Attach the mounting bracket to the electrical box.
- Ensure the "A" line on the bracket is parallel with the hallway or horizontal for wall mounting.
- Pull the AC connector through the center hole and plug it into the back of the alarm.
- Rotate the alarm clockwise onto the bracket until it snaps into place.
Operation and Testing
Testing: Press and release the Test/Hush button weekly. The alarm will sound a sequence of beeps and voice messages (on voice models) to confirm operation.
Hush Feature: If the alarm sounds due to a known non-emergency (e.g., cooking smoke), press the Test/Hush button to silence the alarm for 8-10 minutes.
Troubleshooting
If the alarm chirps or indicates a fault:
- Low Battery: Replace batteries (AA models) or replace the unit (10-year sealed models).
- Sensor Fault: Clean the alarm using compressed air or a vacuum. If the fault persists, replace the unit.
- End of Unit Life: The alarm has reached its 10-year service limit and must be replaced.
Maintenance and Disposal
Clean the alarm at least once a year by vacuuming around the perimeter. Do not use water, detergents, or solvents. For 10-year sealed models, follow the specific instructions in the manual to permanently disable and discharge the battery before disposal.
Practical help
Common problems
False Low Battery Chirp
Ensure AC power is connected, the battery pull tab is removed, or the 10-year battery is activated.
Alarm sounds during cooking
Press the Test/Hush button to silence the alarm for 8-10 minutes. Ensure the alarm is not installed within 6 feet of cooking appliances.
Sensor Fault
Clean the alarm with a vacuum or compressed air. If the error persists, the unit must be replaced.
Before use
- Remove the dust cover.
- Verify AC power is turned off before wiring.
- Activate the battery (pull tab or red wheel).
- Test the alarm by pressing the Test/Hush button.
- Write the installation date on the label.
Show more Show less
Images and diagrams
- Figure 8-A: Wiring diagram showing connections for multiple interconnected alarms.
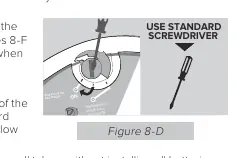
- Figure 8-D: Battery activation using the red wheel on the back of the unit.
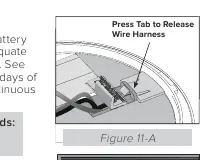
- Figure 11-A: How to release the wiring harness using the tab.
Model compatibility
- Interconnectable with other compatible Kidde safety devices.
- Not designed for use in recreational vehicles (RV) or boats.
- Not intended to alert hearing-impaired individuals.

Manual page author
Michael Turner
Technical manual editor