Toys / Ride-on Toys
User Manual for Kidzone 060-ROT-33L Licensed McLaren Ride-On
Quick guide for the Kidzone 060-ROT-33L Licensed McLaren Ride-On. Includes assembly instructions, remote control pairing, charging steps, and troubleshooting.
Table of contents
Manual images
Click an image to enlargeQuick guide from the manual
The Kidzone 060-ROT-33L is a 12V ride-on toy designed for children aged 37-72 months with a maximum weight capacity of 55 lbs (25 kg). Assembly must be performed by an adult. Before the first use, ensure the battery is fully charged (8-12 hours) and connected to the vehicle control unit. Always supervise children during use and ensure they wear protective equipment like a helmet.
Assembly Instructions
Assembly requires a screwdriver (not included). Follow these steps:
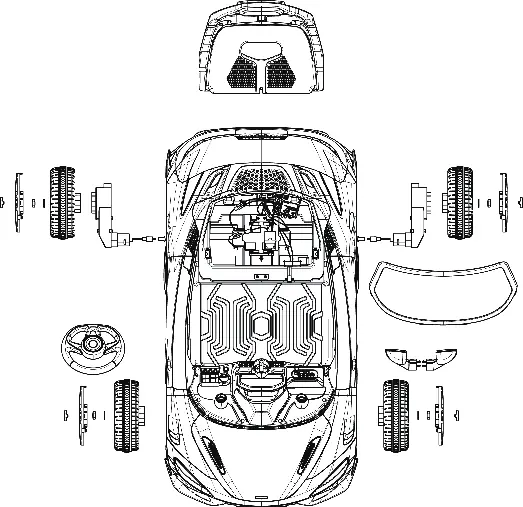

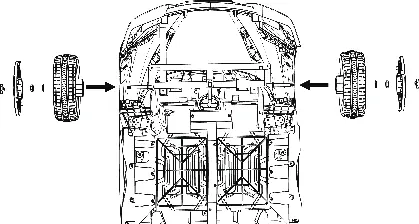
- Rear Axle: Place the vehicle body upside down. Remove pre-installed washers and nuts from the rear axle. Install the motors (D) and wheels (E), then secure with washers (I) and nuts (J). Attach wheel covers (K) and hubcaps (F).
- Front Axle: Remove pre-installed washers and nuts from the front axle (keep one washer on each side). Install wheels (E), secure with washers (I) and nuts (J), and attach wheel covers (K) and hubcaps (F).
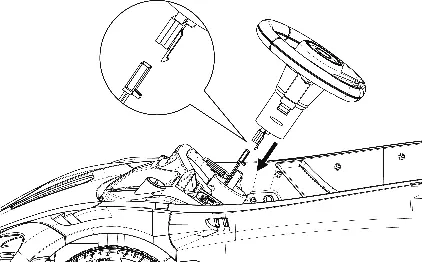
- Steering Wheel: Connect the wires from the steering wheel (G) to the vehicle, then insert the steering wheel into the steering column.
- Windshield: Attach the windshield (B) by fitting the tabs into the grooves until it clicks into place.
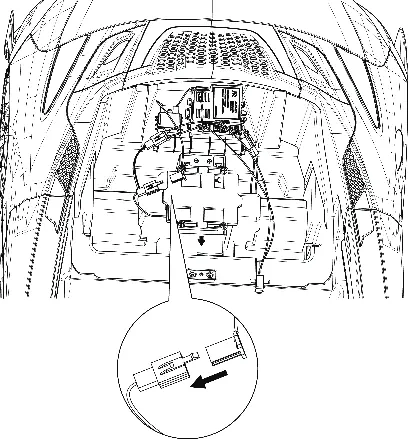
- Wiring: Connect the motor cables and the battery cable to the vehicle control unit located under the seat well.
- Seat: Remove the pre-installed screw from the seat well, align the seat (C), and secure it with the screw.
- Mirrors: Insert the side mirrors (H) into the sides of the vehicle body.
Operation
The vehicle is controlled via the dashboard and foot pedal:
- Power Button: Turns the vehicle ON or OFF.
- Forward/Reverse Switch: Selects the direction of travel. Do not change direction until the vehicle comes to a complete stop.
- Foot Pedal: Press down to move; release to slow and stop.
- Media Player: Features Bluetooth connectivity. Select 'Kidzone Ride on' on your mobile device to pair. Use the buttons to play/pause, skip tracks, or adjust volume.
- Remote Control: Must be paired before first use. Insert 2 AAA batteries. Turn on the vehicle, then press and hold the forward and reverse buttons on the remote for 3 seconds until the indicator flashes. The remote overrides the foot pedal.
Charging
Charge the battery using the provided charger. The vehicle must be OFF during charging. The indicator on the charger turns red while charging and green when complete. Charge for 8-12 hours; do not exceed 20 hours. Charge at least once a month if the vehicle is not in use.
Care and Maintenance
Regularly check for loose parts or cracked plastic. Clean with a cloth; do not use a hose or immerse in water. The vehicle features a thermal fuse that trips if the system is overloaded. If the vehicle stops, turn it OFF for 20 seconds to reset the fuse. Do not bypass the fuse.
Troubleshooting
If the vehicle does not move, check the battery charge, fuse status, and wire connections. If the vehicle runs slowly, ensure the user weight is within limits and the battery is fully charged. For persistent issues like 'dead spots' on the motor or damaged equipment, contact customer service.
Manufacturer information
Kidzone Toys
Practical help
Common problems
Vehicle does not move
Check battery charge, ensure the fuse has reset (turn off for 20 seconds), and verify all wire connections.
Vehicle runs very slow
Charge the battery fully, ensure the user weight is under 55 lbs, and avoid using in harsh environments.
Battery does not charge
Ensure the charger is firmly plugged into the power source and the charging port.
Remote control not working
Replace batteries in the remote and repeat the pairing process (hold forward/reverse buttons for 3 seconds).
Before use
- Charge the battery for 8-12 hours.
- Ensure all parts are assembled by an adult.
- Verify the child is 37-72 months old.
- Check that the user weight is under 55 lbs (25 kg).
- Connect the battery cable to the control unit.
- Pair the remote control if using it for operation.
Images and diagrams
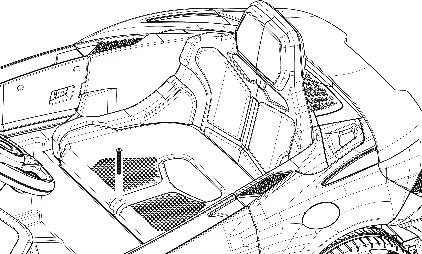
- Assembly diagrams illustrate the installation of wheels, motors, steering wheel, and seat.
- Wiring diagram shows the connection of the battery and motor cables to the control unit.
Model compatibility
- Remote control requires 2 AAA 1.5V batteries (not included).

Manual page author
David Miller
Documentation analyst
Organizes user manual content into clear summaries, with attention to model details, product context, and everyday usability.