Toys / Games
User Manual for Kidzone 060-ROT-58 Ride On UTV
Quick guide for the Kidzone 060-ROT-58 Ride On UTV. Includes assembly instructions, safety warnings, charging procedures, and troubleshooting tips.
Table of contents
Manual images
Jump to the sectionQuick guide from the manual
This ride-on UTV is designed for children aged 3+ years with a maximum weight capacity of 66 lb (30 kg). Assembly must be performed by an adult. The battery requires 8-12 hours to charge and should not be charged for more than 20 hours. Always supervise children during use and ensure they wear protective equipment like a helmet.
Safety Instructions
- Age and Weight: Designed for children 3+ years old; do not exceed 66 lb (30 kg).
- Supervision: Adult supervision is required at all times.
- Environment: Do not use on public roads, near motor vehicles, steep inclines, steps, or slippery surfaces (rain, snow, ice).
- Operation: This product does not have brakes. Do not use in the dark.
- Safety Gear: Ensure the seatbelt is fastened and the child wears a helmet.
- Chemical Warning: Contains lead and other chemicals; do not open the battery.
Product Specifications
- Model: 060-ROT-58
- Battery: 12V 7Ah
- Charger Output: DC 12V 1000mA
- Charge Time: 8-12 hours
- Speed: 1 - 3.3 mph (1.7 - 5.3 km/h)
Assembly
Assembly should be performed by an adult. Ensure all parts are present before starting.
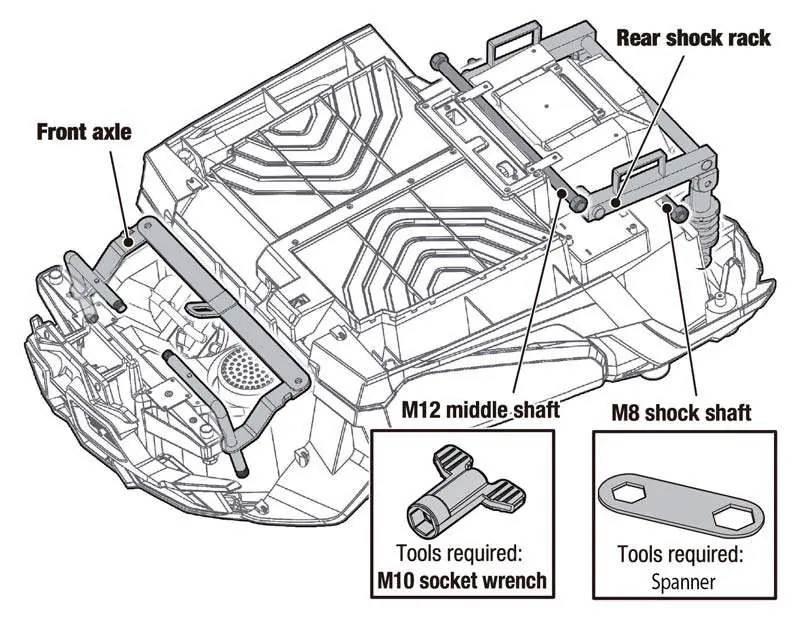
- Axles and Shock Rack: Turn the body upside down. Unpack the front axle, rear shock rack, and shafts. Fit the rear shock rack to the body and secure with M10 and M8 nuts.
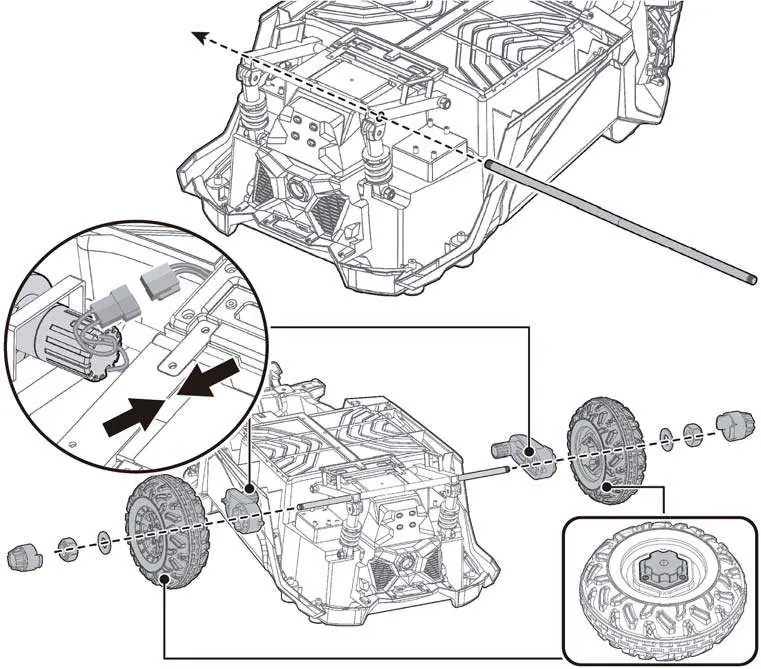
- Motors and Rear Wheels: Insert the rear axle into the shock rack. Connect motors to the axle and vehicle wiring. Slide on drive wheels, secure with washers and nuts, and attach hubcaps.
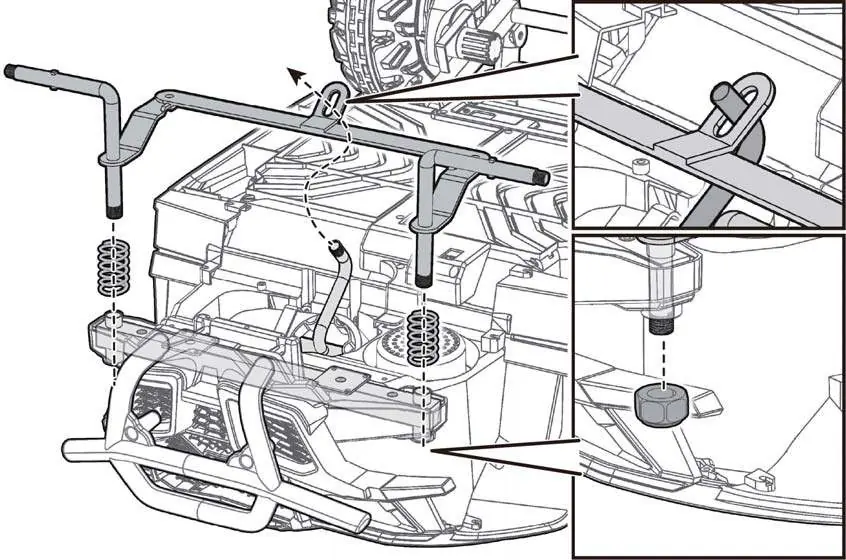
- Front Axle: Assemble the front axle support and shock springs. Ensure the steering column passes through the linkage. Secure with M10 nuts.
- Front Wheels: Slide washers and wheels onto the front axle, secure with washers and nuts, and attach hubcaps.
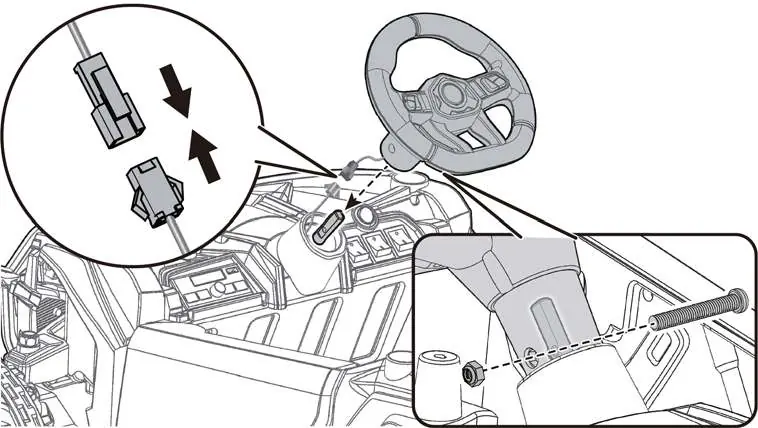
- Steering Wheel: Connect the steering wheel wiring to the vehicle body. Insert the steering wheel onto the column and secure with the M5x32 screw and nut.
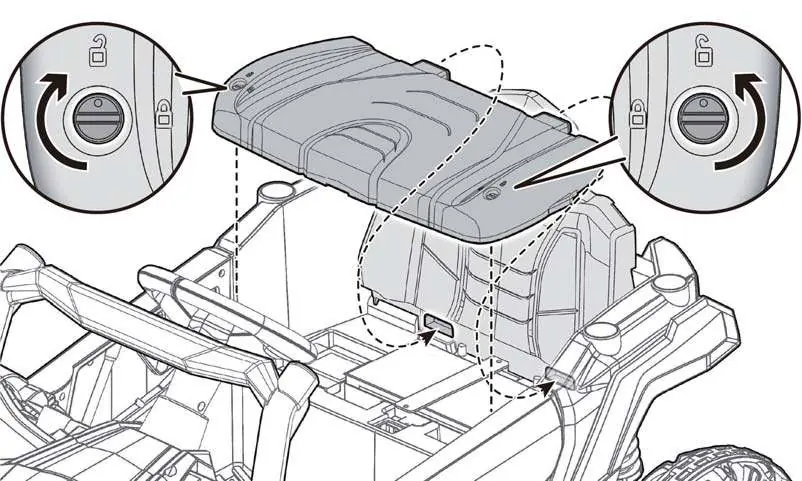
- Roll Bars and Seat: Attach the front roll bar to the body. Connect battery wires. Align and attach the seat backrest and seat. Assemble the rear roll bar and attach it to the body.
Operation
Vehicle Controls:
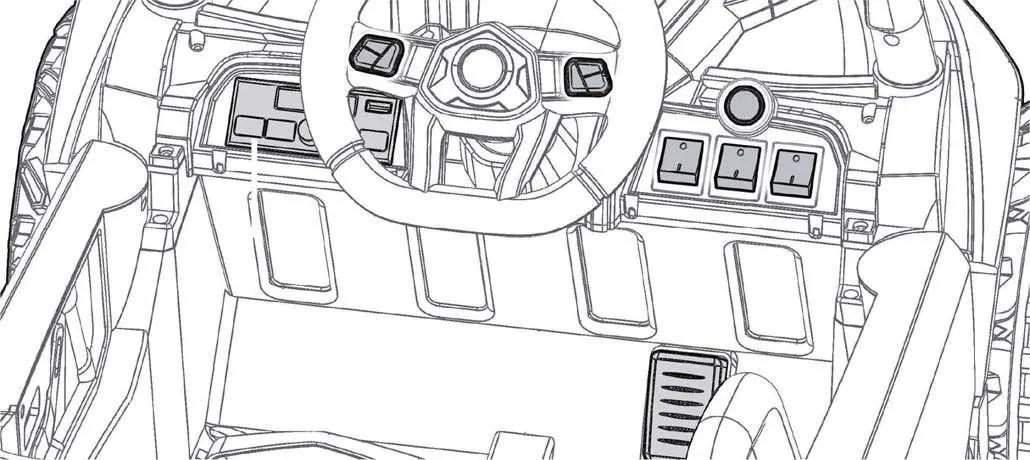
- Power Switch: Turns the vehicle ON/OFF.
- Speed Switch: Selects high or low speed mode.
- Forward/Reverse Switch: Controls direction. Stop the vehicle completely before changing direction.
- Foot Pedal: Press to drive, release to slow down and stop.
- Multimedia Player: Includes volume control, mode selection (FM, USB, Bluetooth), and track navigation.
Remote Control:
- Requires 2 AAA 1.5V batteries.
- Pairing: Hold forward and reverse buttons for 3 seconds until the indicator flashes, then turn on the vehicle.
- Emergency Brake: Press the 'P' button to disable all functions.
Charging
The battery should only be charged by an adult. Ensure the vehicle is OFF during charging.
- Connect the charger to the charging port on the vehicle.
- Plug the charger into a wall outlet.
- Charge for 8-12 hours. Do not exceed 20 hours.
- Charge at least once every 3 months if not in use.
Care and Maintenance
- Regularly check for loose parts and tighten if necessary.
- Clean with a cloth; do not use a hose or immerse in water.
- Store away from heat sources and wet weather.
- Dispose of old batteries properly at an approved recycling center.
Troubleshooting
- Vehicle does not move: Check for low battery, disconnected wires, or a tripped thermal fuse (wait 20 seconds).
- Vehicle runs slow: Check for low battery, overload (over 66 lb), or harsh terrain.
- Battery does not charge: Check connections or charger functionality.
Manufacturer information
Kidzone Toys
Practical help
Common problems
Vehicle does not move
Check battery charge, ensure all connectors are secure, or wait 20 seconds for the thermal fuse to reset.
Vehicle runs very slow
Ensure the user weight is under 66 lb (30 kg), charge the battery, or avoid harsh driving environments.
Battery does not charge
Verify the charger is firmly plugged into the wall and the vehicle charging port.
Loud grinding sound
This indicates a damaged motor or gearbox; contact customer service.
Before use
- Charge the battery for 8-12 hours before the first use.
- Ensure all parts are assembled and nuts are tightened.
- Verify the child is at least 3 years old and under 66 lb.
- Test the remote control pairing.
- Check that the battery connectors are securely plugged in.
- Ensure the area is safe, flat, and away from traffic.
Images and diagrams
- Assembly steps show the correct placement of axles, shock racks, and wheels.
- Dashboard diagram identifies the power switch, speed switch, and multimedia controls.
- Remote control diagram shows the location of the emergency brake (P) and speed (S) buttons.
Model compatibility
- For residential use only.
- Not for use on public roads or near motor vehicles.
- Requires 2 AAA batteries for the remote control (not included).

Manual page author
David Miller
Documentation analyst
Organizes user manual content into clear summaries, with attention to model details, product context, and everyday usability.