Toys / Ride-on Toys
User Manual for Kidzone 060-ROT-07 Ride On Bumper Car
Quick guide for the Kidzone 060-ROT-07 Ride On Bumper Car. Learn how to assemble, charge, operate in indoor/outdoor modes, pair the remote control, and troubleshoot common issues.
Table of contents
Manual images
Click an image to enlargeQuick guide from the manual
The Kidzone 060-ROT-07 is a 12V ride-on bumper car designed for children aged 18-72 months. It features two distinct driving modes: Indoor (using control sticks or remote control) and Outdoor (using the steering wheel and foot pedal). The vehicle must be assembled by an adult, and the battery must be connected before the first use.
Safety Warnings
- Adult Supervision: Continuous adult supervision is required at all times.
- Weight Limit: Maximum user weight is 66 lbs (30 kg).
- Age Restriction: Not for children under 18 months or over 72 months.
- Environment: Do not use on roadways, near motor vehicles, steep inclines, steps, or swimming pools. Use only on flat, hard surfaces.
- Electrical Safety: Do not immerse the battery or charger in liquids. Do not modify electrical wiring.
- Protective Gear: A helmet is required when operating the vehicle.
Assembly Instructions
Assembly must be performed by an adult. Ensure all small parts are kept away from children during this process.
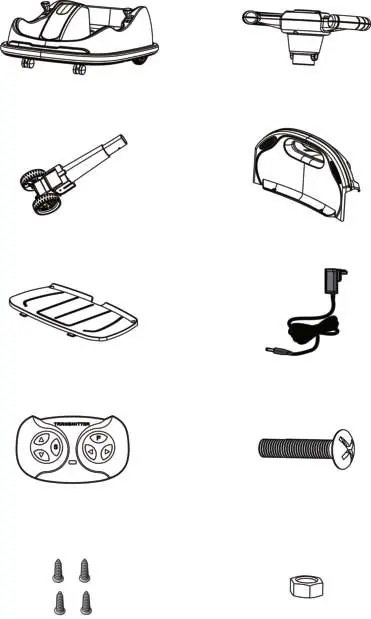
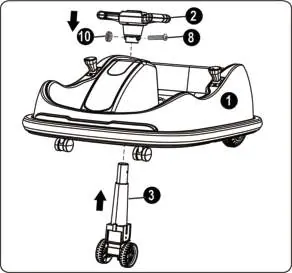

- Steering Wheel & Front Wheel: Lift the vehicle body and insert the steerable front wheel through the opening. Unscrew the M5x39 screw and M5 nut from the steering wheel, then align and fix the steering wheel to the front wheel column using the screw and nut.
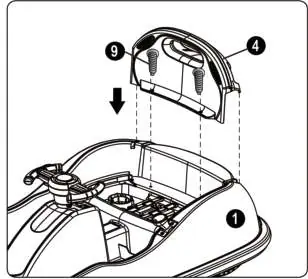
- Backrest: Insert the backrest into the vehicle body and secure it using two M4x10 tapping screws.
- Seat: Place the seat onto the vehicle body and secure it using two M4x10 tapping screws.
- Battery Connection: The power supply is located under the seat. Plug the connector into the terminal on the battery.
Operating Modes
The vehicle has two modes, which can be switched using the Indoor/Outdoor switch.
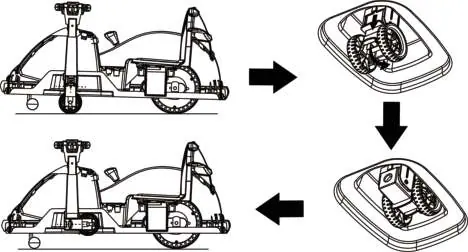
- Indoor Mode: Fold the steerable front wheel into the body. Use the control sticks on the side of the vehicle to move forward, backward, or spin. The remote control can only be used in this mode.
- Outdoor Mode: Fold down the steerable front wheel. Use the steering wheel to steer and the foot pedal to move the vehicle. Do not use the remote control in this mode.
Remote Control
The remote control is for adult use only and overrides the vehicle's manual controls. It must be paired with the vehicle: press the Forward and Reverse buttons simultaneously until the indicator light flashes, then turn on the vehicle power. The light will stay on when pairing is successful.

Charging
The battery must be charged by an adult. The vehicle must be turned OFF during charging.
- Insert the charging cable into the charging port located in front of the Indoor/Outdoor switch.
- Plug the charger into a wall outlet. The indicator turns red when charging and green when complete.
- Charge for 8-12 hours (first charge 10-12 hours). Do not exceed 20 hours.
- Charge at least once a month to maintain battery life.
Care and Maintenance
- Regularly check for loose parts and re-tighten if necessary.
- Keep the product away from heat and humidity.
- Clean with a cloth; do not use abrasive cleaners or a hose.
- Disconnect the battery if the product will not be used for an extended period.
Troubleshooting
- Vehicle does not move: Check battery connection, reset fuse, or fully charge the battery.
- Vehicle runs slow: Check if the battery is low, old, or if the vehicle is overloaded (exceeding 66 lbs).
- Battery does not charge: Ensure the charger is firmly plugged into the power source and the charging port.
- Loud grinding/clicking: Contact customer service as this may indicate a damaged motor or gearbox.
Technical Specifications
- Motor: 12V 25W x 2
- Battery: 6V 4.5AH x 2
- Speed: 1.2~1.9 mph (2~3 km/h)
- Dimensions: 31.50 x 21.26 x 15.75 inches
- Operating Time: 1-2 hours
Manufacturer information
Kidzone Toys
Practical help
Common problems
Vehicle does not move
Check battery connection, reset fuse, or fully charge the battery.
Vehicle runs very slow
Ensure the battery is fully charged, not old, and the user weight is under 66 lbs.
Battery does not charge
Verify the charger is firmly connected to the power source and the charging port.
Loud grinding or clicking sound
This may indicate a damaged motor or gearbox; contact customer service.
Before use
- Assemble the vehicle by an adult only.
- Charge the battery for 10-12 hours before the first use.
- Ensure the battery connector is plugged into the terminal.
- Check that all parts are secure and not loose.
- Verify the child is between 18 and 72 months old.
- Ensure the user weight is under 66 lbs (30 kg).
Images and diagrams
- Assembly: Shows installation of steering wheel, front wheel, backrest, and seat.
- Indoor Mode: Illustrates folding the front wheel and using control sticks.
- Outdoor Mode: Illustrates unfolding the front wheel and using steering wheel/pedal.
- Remote Control: Identifies buttons for forward, reverse, speed, stop, and steering.
Model compatibility
- Remote control only operates in indoor mode.
- Steering wheel and foot pedal only operate in outdoor mode.
- Do not use remote control in outdoor mode to prevent damage.

Manual page author
David Miller
Documentation analyst
Organizes user manual content into clear summaries, with attention to model details, product context, and everyday usability.