Toys / Ride-on Toys
User Manual for Kidzone 060-ROT-03 Ride On Retro Scooter
Quick guide for the Kidzone 060-ROT-03 Ride On Retro Scooter. Includes assembly steps, charging instructions, safety warnings, and troubleshooting tips.
Table of contents
Manual images
Click an image to enlargeQuick Guide
The Kidzone 060-ROT-03 is an electric ride-on toy designed for children aged 3 and older. This manual provides essential instructions for assembly, safe operation, and maintenance. Important: The vehicle is packed with the battery disconnected; you must connect the battery before the first use. Adult assembly is required.
Safety Information
- Age Restriction: Not for children under 3 years old.
- Weight Limit: Maximum user weight is 66 lb (30 kg).
- Supervision: Continuous adult supervision is required. Never leave children unattended.
- Environment: Do not use on roadways, near motor vehicles, steep inclines, steps, or swimming pools. Use only on flat, dry surfaces.
- Electrical Safety: Do not immerse the battery or charger in water. Do not modify the electrical wiring.
- Protective Gear: Always ensure the child wears a helmet and shoes while operating the vehicle.
Product Specifications
- Battery: DC 6V 4.0 AH
- Speed: 1.5 mph (2.5 km/h)
- Charge Time: 8-12 hours (do not exceed 20 hours)
- Fuse: F5A self-resetting fuse
- Dimensions: 42 x 18.3 x 28.6 inches
Assembly Instructions
Assembly must be performed by an adult. Tools required: screwdriver, pliers, hammer, spanner.
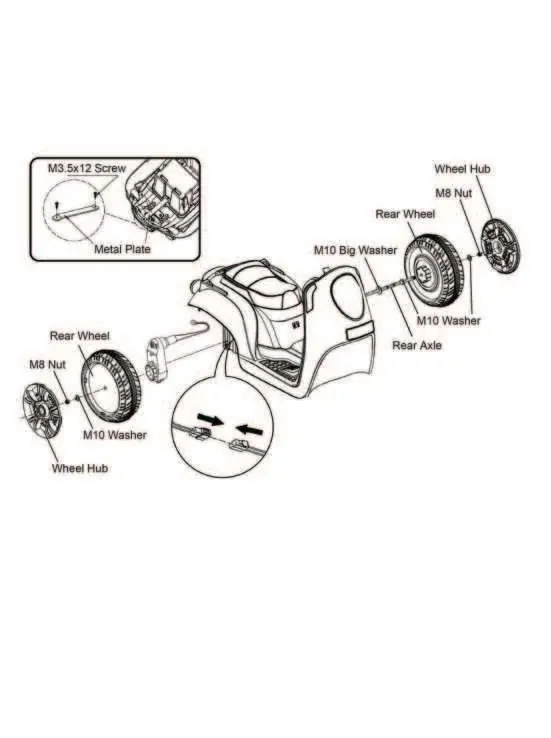
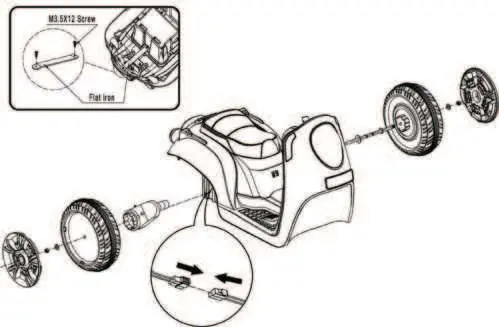
Rear Axle and Wheels
Disassemble the M8 nuts and washers pre-installed on the rear axle, keeping the big washer. Insert the rear axle through the vehicle body. Assemble the gear box with motor, rear wheel, M10 washer, M8 nut, and wheel hub. Ensure there is a gap between the rear axle screw thread and the rear wheel; add washers if the gap is too big, but ensure the wheel rotates smoothly.
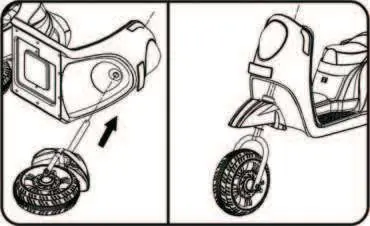
Front Wheel and Handle
Insert the front wheel and mudguard into the front fork. Assemble the handle on the front axle and secure it using the M5 x 65 bolt and M5 nut. Note: The hand brakes on the handle have no actual function.
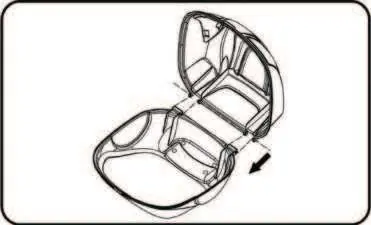
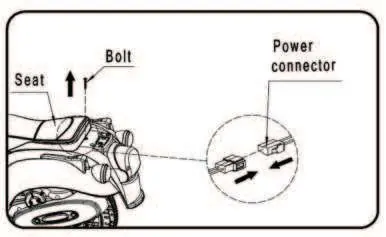
Seat and Toolbox
Remove the seat to access the power connector. Connect the battery wires. Replace the seat and secure it with the bolt. Attach the toolbox to the rear of the vehicle body using the provided screws.
Operating the Vehicle
To turn on the vehicle, insert the key into the power switch and turn it to the right. Use the direction switch to select forward or backward, then press the pedal to move. Release the pedal to stop. Always ensure the vehicle is at a complete stop before changing direction to prevent damage to the motor.
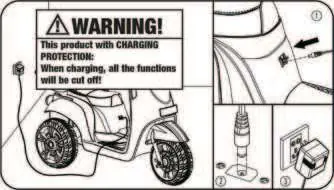
Charging the Battery
The charging port is located below the seat. Ensure the power switch is turned off before charging. Connect the charger to the port and then to a wall outlet. Charge for 8-12 hours. Do not charge for more than 20 hours to prevent overheating. Charge the battery at least once a month even if the vehicle is not in use.
Care and Maintenance
- Regularly check for loose parts or damaged wires.
- Clean the product with a cloth; do not use abrasive cleaners or a hose.
- Disconnect the battery if the product will not be used for a long period.
- Store in a dry area away from heat.
Troubleshooting
If the vehicle does not move, check the battery connection, ensure the battery is charged, or check if the fuse has tripped (wait 10-15 seconds for automatic reset). If the battery does not charge, ensure the charger is properly connected to power.
Manufacturer information
Kidzone Toys
Practical help
Common problems
Vehicle does not move
Check if the battery is connected, fully charged, or if the fuse has tripped (wait 10-15 seconds). Ensure wheel nuts are not too tight.
Battery does not charge
Ensure the charger is properly connected to the power outlet and the charging port.
Battery life is short
Ensure the battery is fully charged (8-12 hours). If the battery is old, it may need replacement.
Before use
- Charge the battery for 8-12 hours before first use.
- Ensure all parts are assembled by an adult.
- Check that the battery is connected.
- Verify the child is 3+ years old and under 66 lbs.
- Ensure the area is safe, flat, and away from traffic or water.
- Check that the child is wearing a helmet and shoes.
Images and diagrams
- Rear axle assembly showing gear box, wheels, and washers.
- Front wheel and handle installation steps.
- Battery connection under the seat.
- Charging port location and connection procedure.
- Circuit diagram for electrical troubleshooting.
Model compatibility
- Not intended for children under 3 years old.
- For residential use only; not for commercial or rental use.
- Use only the provided battery and charger.

Manual page author
Emily Carter
User documentation editor
Prepares concise manual descriptions and highlights the most useful setup, operation, and maintenance information for readers.