Lighting / Portable Lighting
User Manual for BLACK+DECKER BDCF20 20V MAX LED Flashlight
Quick guide for the BLACK+DECKER BDCF20 20V MAX LED Flashlight. Includes instructions for battery installation, operation, pivoting the light head, maintenance, and troubleshooting.
Quick answers from the manual
Quick answer
- The BDCF20 is a 20V MAX LED flashlight featuring a pivoting 12 LED light housing. It is powered by BLACK+DECKER 20V MAX lithium-ion batteries. p. 1, 4
Key actions
- Turn the light on/off p. 7
- Pivot the light housing p. 7
- Install the battery pack p. 6
First start
- Ensure the battery is fully charged using a compatible BLACK+DECKER charger before first use. p. 5, 6
Problems and fixes
Light will not illuminate
Check battery pack installation and charging status.
p. 8
Battery pack will not charge
Ensure charger is plugged in and ambient temperature is within 40°F-105°F.
p. 8Maintenance and reset
- Clean the tool using only mild soap and a damp cloth. Never immerse the tool in liquid. p. 7
Technical specifications
| Parameter | Value | Meaning | Pages |
|---|---|---|---|
| Voltage | 20V MAX (initial), 18V (nominal) | Maximum initial voltage vs nominal voltage under workload. | p. 1 |
| Light Source | 12 LEDs | Number of LED lights in the housing. | p. 4 |
Where to find it in the PDF
- Safety Guidelines p. 2, 3
- Battery Charger Safety p. 4, 5
- Operation p. 6, 7
- Troubleshooting p. 8
Table of contents
Manual images
Click an image to enlargeQuick guide from the manual
The BLACK+DECKER BDCF20 is a 20V MAX LED flashlight designed for household use. This guide covers essential operation, battery management, and safety precautions. Always ensure the battery is fully charged before use and follow all safety guidelines to prevent injury or property damage.
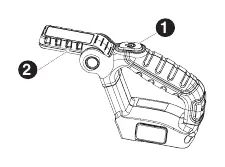
Product Description
The flashlight features a pivoting 12 LED light housing that allows for a 180-degree range of motion. It is powered by BLACK+DECKER 20V MAX lithium-ion batteries.
Battery Installation and Removal
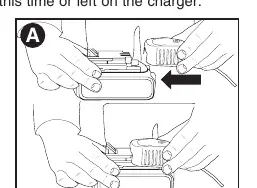
To Install: Insert the battery pack into the flashlight until an audible click is heard. Ensure the battery is fully seated and latched into position.
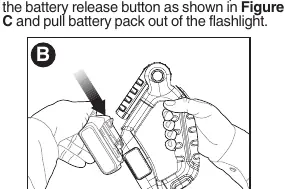

To Remove: Depress the battery release button and pull the battery pack out of the flashlight.
Operation
Turning the Light On/Off: Press the on/off button located on the top of the unit.
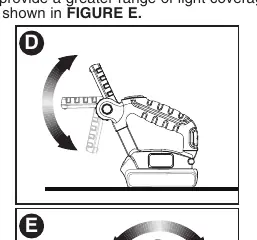
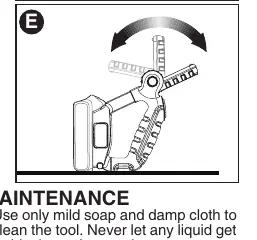
Pivoting the Light Housing: The LED light housing can be pivoted by lifting it to different positions within a 180-degree range. The flashlight can also be positioned on the handle and battery ends to provide a greater range of light coverage.
Maintenance
Clean the tool using only mild soap and a damp cloth. Never allow liquid to enter the tool and never immerse any part of the tool in liquid. Repairs and adjustments should be performed by authorized service centers using identical replacement parts.
Troubleshooting
- Light will not illuminate: Check battery installation and ensure the battery is charged.
- Battery will not charge: Ensure the charger is plugged into a working outlet. Check that the ambient temperature is between 40°F (4.5°C) and 105°F (40.5°C).
- Unit shuts off abruptly: The battery may have reached its maximum thermal limit (allow to cool) or is depleted (place on charger).
Safety Warnings
- Burn Hazard: The lens gets very hot during use. Do not touch the lens when the light is lit or immediately after use.
- Flammable Materials: Do not operate the flashlight near flammable liquids or in gaseous/explosive atmospheres.
- Water Exposure: Do not expose the light or charger to rain, snow, or wet conditions. Do not wash with water.
- Lens Cover: Do not operate without the lens cover assembly attached.
Practical help
Common problems
Light will not illuminate
Check battery pack installation and ensure the battery is charged.
Battery pack will not charge
Ensure charger is plugged into a working outlet. Move charger and battery to an area with an ambient temperature between 40°F (4.5°C) and 105°F (40.5°C).
Unit shuts off abruptly
Allow the battery pack to cool down if it reached its thermal limit, or place it on the charger if it is depleted.
Before use
- Ensure the battery pack is fully charged.
- Check that the lens cover is securely attached.
- Verify the work area is free of flammable liquids or gases.
- Ensure the battery is properly installed until it clicks.
Images and diagrams
- Figure A: Battery charging procedure.
- Figure B: Installing the battery pack.
- Figure C: Removing the battery pack.
- Figure D: Pivoting the LED light housing.
- Figure E: Positioning the flashlight on handle and battery ends.
Model compatibility
- Use only BLACK+DECKER 20V MAX lithium-ion batteries.
- Use only BLACK+DECKER chargers specified for these batteries.

Manual page author
Emily Carter
User documentation editor
Prepares concise manual descriptions and highlights the most useful setup, operation, and maintenance information for readers.