Lighting / Portable Lighting
User Manual for FlinQ Indoor Rechargeable Spotlights 2-pack
Comprehensive user guide for FlinQ Indoor Rechargeable Spotlights (FQC8500, FQC8501). Includes installation methods, remote control operation, charging instructions, and safety guidelines.
Quick answers from the manual
Quick answer
- The FlinQ Indoor Rechargeable Spotlights are controlled via remote or manual button presses. They require a 5V/2A power adapter for charging and offer adjustable brightness, color temperature, and timer settings. p. 1
Key actions
- Charge the device using a 5V/2A adapter. p. 1
- Mount the light using adhesive tape or screws. p. 1
First start
- Remove the insulation sheet from the remote and fully charge the battery. p. 1
Problems and fixes
Red light remains after full charge
This is normal and not a defect.
p. 1Maintenance and reset
- Recharge the battery at least once every 90 days if not in use. p. 1
Technical specifications
| Parameter | Value | Meaning | Pages |
|---|---|---|---|
| Dimensions | 100 x 100 x 68 mm | Physical size of the unit. | p. 1 |
| Power | 1.8W | Power consumption. | p. 1 |
Where to find it in the PDF
- Instruction Manual p. 1
Table of contents
Manual images
Click an image to enlargeQuick Guide
The FlinQ Indoor Rechargeable Spotlights are designed for indoor use and feature adjustable brightness, color temperature, and timer settings via the included remote control. Before first use, ensure you remove the insulation sheet from the remote and fully charge the lights using a 5V/2A power adapter.
Remote Control Functions
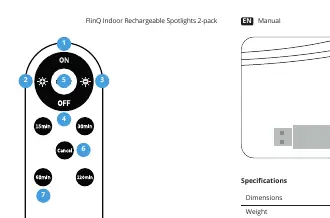
- Light ON/OFF: Dedicated buttons for power control.
- Brightness: Increase (+) or decrease (-) brightness levels.
- Color Temperatures: Switch between 3000K, 4200K, and 6500K.
- Timer Settings: Set automatic shut-off timers for 15, 30, 60, or 120 minutes.
- Cancel Timer: Button to cancel all active timers.
Installation Methods
There are two ways to mount the spotlights:

Adhesive Mounting
- Remove the protective film from the double-sided tape on the iron plate.
- Ensure the wall surface is clean for optimal adhesion.
- Align the lamp body with the center of the attached iron plate.
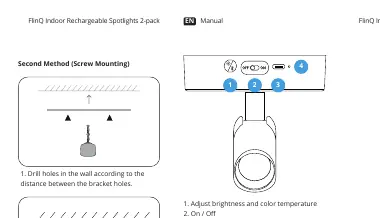
Screw Mounting
- Drill holes in the wall according to the distance between the bracket holes.
- Secure the iron plate with two screws in the desired position.
- Align the lamp body with the center of the attached iron plate.
Charging Instructions
To charge the device:
- Plug the Type-C cable into the charging port.
- Connect the cable to a 5V/2A power adapter.
- Note: Do not use the light while it is charging.
- Indicators: A red light indicates charging is in progress; a green light indicates the battery is fully charged. If the red light reappears after a full charge, this is normal and not a defect.
Operation and Adjustments
The lamp body offers flexible positioning:
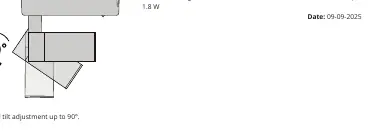
- Horizontal Rotation: Up to 350°.
- Vertical Tilt: Up to 90°.
- Manual Controls: You can also control the light directly on the unit:
- Single press: Turn ON/OFF.
- Double press: Switch color temperature.
- Long press: Adjust brightness.
Safety Instructions
- Inspect the product for damage upon arrival; do not use if damaged.
- Do not place the light in areas where the temperature exceeds 45°C (113°F).
- Charge the battery only in environments between -10°C and 45°C.
- Recharge the battery when empty, and at least once every 90 days if not in use, to maintain battery health.
- Store in a cool, dry place away from children.
- Stop using the battery immediately if it smells unusual, gets hot, changes color, or shows deformation.
Technical Specifications
- Dimensions: 100 x 100 x 68 mm
- Weight: 190 grams
- Power: 1.8W
- Input: 5V/2A
- Color Temperatures: 3000K, 4200K, 6500K
- Operating Temperature: 0°C – 40°C
- Materials: Plastic (ABS + PC)
Manufacturer information
FlinQ
Practical help
Common problems
Red light reappears after full charge
This is normal behavior and does not indicate a defect.
Remote control not responding
Ensure the insulation sheet has been removed from the remote and point the remote directly at the front of the light.
Battery health maintenance
Recharge the battery when empty and at least once every 90 days if the light is not in use.
Before use
- Remove the insulation sheet from the remote control
- Inspect the product for any shipping damage
- Fully charge the battery before the first use
- Ensure the mounting surface is clean (for adhesive method)
Specs in practice
- Color Temperatures
- Adjustable between 3000K (Warm), 4200K (Neutral), and 6500K (Cool) light.
- Operating Temperature
- The device should be operated between 0°C and 40°C.
Images and diagrams
- Adhesive mounting: Clean surface, remove film, press plate to wall, attach lamp.
- Screw mounting: Drill holes, screw plate to wall, attach lamp.
- Rotation: Lamp can rotate 350° horizontally and tilt 90° vertically.
Model compatibility
- Requires 5V/2A power adapter (not included).
- Indoor use only.

Manual page author
David Miller
Documentation analyst
Organizes user manual content into clear summaries, with attention to model details, product context, and everyday usability.