Lighting / Fixtures
Installation Manual for Lucci Decor Adele 13LT Pendant
Comprehensive installation and safety guide for the Lucci Decor Adele 13LT pendant light. Includes step-by-step instructions for both pendant and close-to-ceiling configurations, wiring diagrams, and technical specifications.
Table of contents
Manual images
Click an image to enlargeQuick Guide from the Manual
The Lucci Decor Adele 13LT is a Class I lighting fixture that must be installed by a licensed electrician. Due to its weight of 18.6kg, two people are required for the installation process. The luminaire can be installed in two configurations: as a pendant or as a close-to-ceiling fixture. Always ensure the power is switched off before beginning any electrical work.
Installation Requirements
- Professional Installation: Must be assembled and installed by a licensed electrician.
- Safety: This is a Class I product and must be earthed.
- Location: Suitable for indoor use only. The mounting point must support at least 2 times the weight of the luminaire.
- Environment: Ensure the area is well-ventilated if prone to moisture. Avoid installation in direct line of air vents.
- Handling: Lay out all components on a smooth, non-scratch surface. Check for missing or damaged parts before assembly.
Pendant Installation
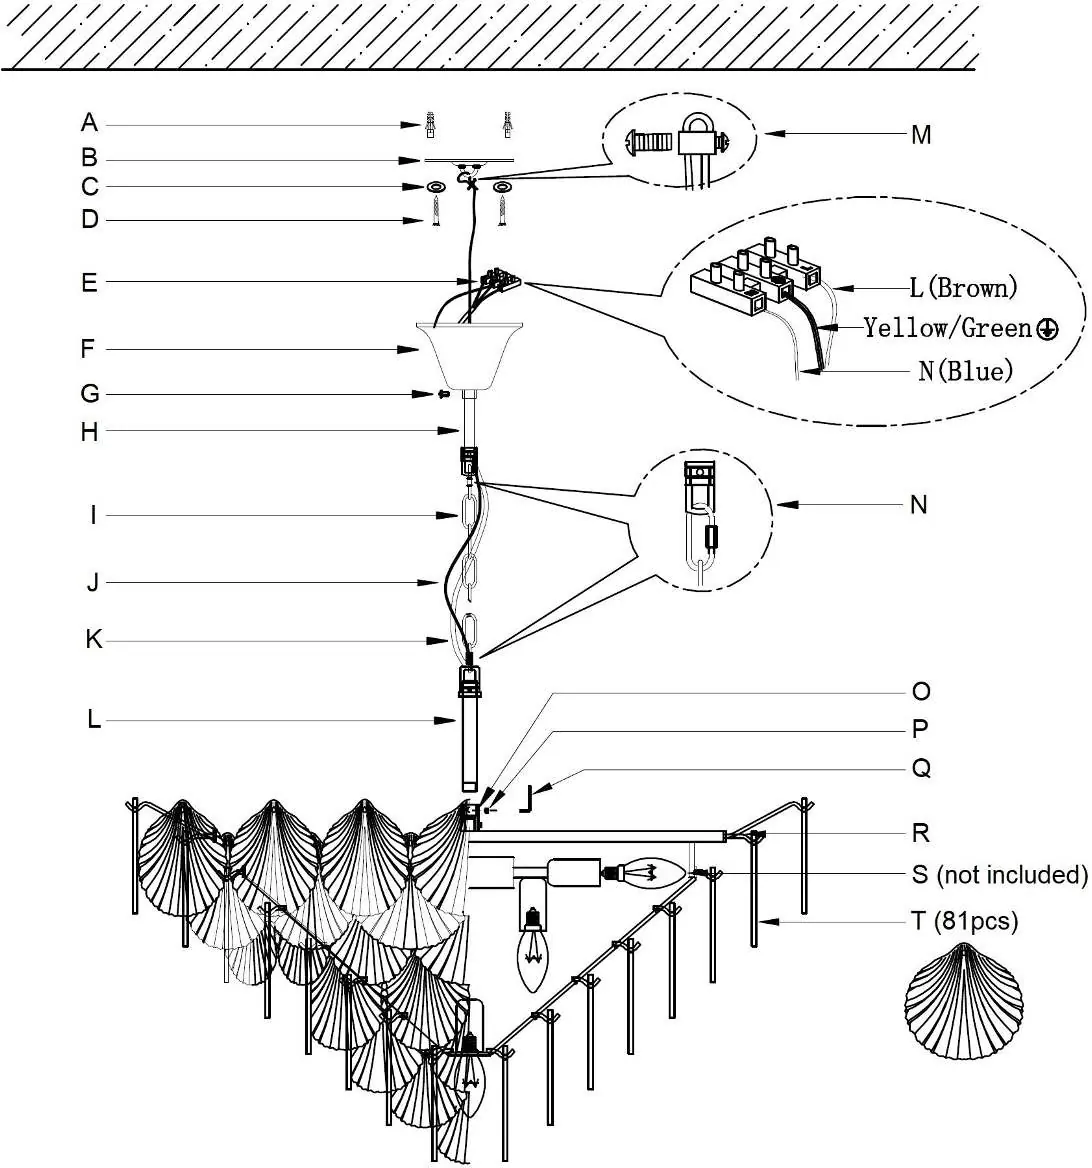
- Use the mounting bracket (B) to mark screw positions on the ceiling.
- Install the mounting bracket (B) using appropriate screws, washers, and anchors.
- Install the rod (L) onto the threaded hole (O) and secure with the grub screw (P).
- Adjust the chain suspension (I) length using chain-link connectors (N).
- Attach the safety lanyard (J) to the mounting bracket (B) and secure with screw (M).
- Hang the luminaire onto the mounting bracket (B) ring. Ensure the weight is supported by the chain suspension (I), not the cord (K) or lanyard (J).
- Connect wires to the terminal block (E): Earth (Yellow/Green), Neutral (Blue/Black), Live (Brown/Red).
- Secure the canopy (F) flush to the ceiling with screw (G).
- Install globes (S) and hang glass shades (T).
Close to Ceiling Installation

- Remove the mounting bracket (B) from the canopy (I).
- Feed the luminaire cord (K) through the rod (L) and secure the rod to the threaded hole (N) with the grub screw (O).
- Install the canopy (I) onto the rod (L) and secure with nut (H). Ensure the star washer, earth ring, lock washer, and nut are in the correct sequence.
- Mark and install the mounting bracket (B) on the ceiling.
- Attach the safety lanyard (F) to the mounting bracket (B).
- Connect wires to the terminal block (G): Earth (Yellow/Green), Neutral (Blue/Black), Live (Brown/Red).
- Secure the canopy (I) to the mounting bracket (B) using nuts (J).
- Install globes (R) and hang glass shades (S).
Safety Tips
- Always ensure power is OFF and the luminaire has cooled down before maintenance or cleaning.
- Clean by wiping with a soft, damp cloth. Do not soak or immerse in water.
- Avoid contact with corrosive chemicals, solvents, or abrasive cleaners.
- Ensure all screws and power leads are secure before connecting power.
Technical Specifications
- SKU: 050236
- Rated Voltage: 220-240V~ 50Hz
- Rated Wattage: 585W Max (13 x 45W Max)
- Lamp Holder: SES / E14
- Weight: 18.6kg
- Dimensions: H:550mm, Dia:780mm, Suspension: 2000mm MAX
Practical help
Common problems
Missing or damaged parts
Do not install the product. Return the complete unit to the place of purchase for inspection or replacement.
Weight support concerns
Ensure the mounting point is capable of supporting 2 times the weight of the luminaire (18.6kg).
Wiring issues
Ensure all wires are secure and no bare wires are exposed. Verify the earth connection is properly made as this is a Class I product.
Before use
- Ensure power is switched OFF at the circuit.
- Verify the mounting surface can support 2x the luminaire weight.
- Confirm you have a licensed electrician for installation.
- Ensure two people are available to lift the luminaire during installation.
- Check that all components are present and undamaged.
Specs in practice
- Rated Wattage
- Maximum 585W total (13 bulbs x 45W max each).
Images and diagrams
- Pendant installation relies on the chain suspension (I) to bear the load.
- Close-to-ceiling installation uses the rod (L) and canopy (I) assembly.
- Wiring diagram shows connection to terminal block (E or G) for Earth, Neutral, and Live wires.
Model compatibility
- Indoor use only.
- Class I product (must be earthed).
- Not suitable for areas with high moisture unless well-ventilated.

Manual page author
Michael Turner
Technical manual editor
Reviews PDF manuals for structure, safety notes, and practical product details so readers can find the right information quickly.