Toys / RC Models & Drones
User Manual for Maisto 82860 Series RC Vehicle
Quick guide for the Maisto 82860 Series RC vehicle. Learn how to charge the built-in battery, install controller batteries, pair the remote, and operate your RC car.
Quick answers from the manual
Quick answer
- To pair the controller with the vehicle, turn both power switches to the ON position. The vehicle's Power LED will flash for less than 3 seconds and then remain solid, indicating the connection is established. p. 1
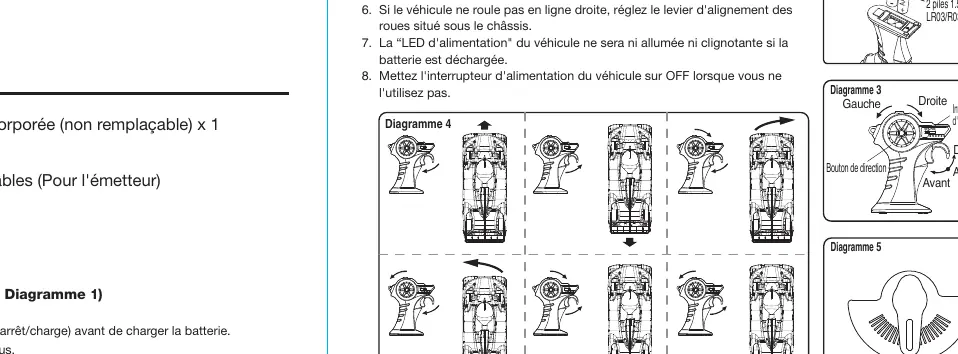
Key actions
- Charging the vehicle p. 1
- Adjusting wheel alignment p. 1
First start
- Charge the vehicle and install 2 AAA batteries in the controller before the first use. p. 1
Problems and fixes
Vehicle not driving straight
Adjust the wheel alignment lever under the chassis.
p. 1Technical specifications
| Parameter | Value | Meaning | Pages |
|---|---|---|---|
| Frequency | 2.4GHz | Operating frequency for the remote control. | p. 1 |
Where to find it in the PDF
- User Manual p. 1
Table of contents
Manual images
Click an image to enlargeQuick guide from the manual
This guide provides essential instructions for operating your Maisto 82860 Series RC vehicle. Ensure the vehicle is fully charged and the controller has fresh batteries before use. The vehicle and controller pair automatically when switched on.
Charging the vehicle
The vehicle features a built-in rechargeable battery.
- Open the charging port cover on the vehicle.
- Ensure the power switch is in the OFF/CHARGE position.
- Connect the provided USB cable to a certified USB port.
- The LED indicator will light up red while charging.
- Once the LED turns off, the vehicle is fully charged.
- Disconnect the cable and replace the port cover.
Controller battery installation
The controller requires 2 x 1.5V AAA (LR03/R03) batteries (not included).
- Switch the controller power to OFF.
- Use a screwdriver to loosen the battery cover screw.
- Insert 2 new AAA batteries, ensuring correct polarity (+/-) as marked in the compartment.
- Replace the cover and tighten the screw.
Operation and pairing
- Set both the controller and vehicle power switches to the ON position.
- The Power LED on the vehicle will flash for less than 3 seconds and then stay on, indicating successful frequency matching.
- If the LED flashes for more than 3 seconds, turn both units OFF and try again.
- Use the trigger on the transmitter to drive forward or backward.
- Use the steering wheel on the transmitter to turn left or right.
- Always turn the switches to OFF when not in use.
Wheel alignment
If the vehicle does not drive in a straight line, locate the wheel alignment lever under the chassis and adjust it until the vehicle tracks straight.
Performance tips and safety
- Do not drive on grass, sand, or through water.
- Avoid driving in windy or rainy weather.
- Do not drive into hard objects.
- Keep fingers, hair, and loose clothing away from the vehicle.
- Do not dispose of batteries in fire.
- Do not dismantle the battery or USB cable.
- Adult supervision is recommended for charging.
Manufacturer information
Maisto
Practical help
Common problems
Vehicle does not move or respond
Check if batteries in the controller are fresh and correctly installed. Ensure both vehicle and controller are switched ON and have successfully paired (LED stops flashing).
Vehicle does not drive in a straight line
Adjust the wheel alignment lever located under the chassis.
LED flashes for more than 3 seconds
Turn both the vehicle and the controller OFF, then turn them back ON to restart the pairing process.
Before use
- Charge the vehicle's built-in battery using the provided USB cable.
- Install 2 new 1.5V AAA batteries in the controller.
- Ensure the vehicle power switch is in the OFF/CHARGE position during charging.
- Remove all packaging and accessories before giving the toy to a child.
Specs in practice
- Controller Batteries
- Requires 2 x 1.5V AAA (LR03/R03) non-rechargeable batteries.
Images and diagrams
- Diagram 1: Charging port location and USB connection.
- Diagram 2: Battery compartment access and polarity orientation.
- Diagram 3: Controller layout showing trigger and steering wheel.
- Diagram 5: Location of the wheel alignment lever under the chassis.
Model compatibility
- Use only certified USB ports for charging.
- Do not mix old and new batteries or different types of batteries in the controller.

Manual page author
David Miller
Documentation analyst
Organizes user manual content into clear summaries, with attention to model details, product context, and everyday usability.