Hvac / Air Conditioners
Noaton NEBULA Ceiling Fan User Manual
Comprehensive user manual for the Noaton NEBULA ceiling fan, including installation, remote control operation, maintenance, and troubleshooting.
Table of contents
Manual images
Jump to the sectionProduct Overview
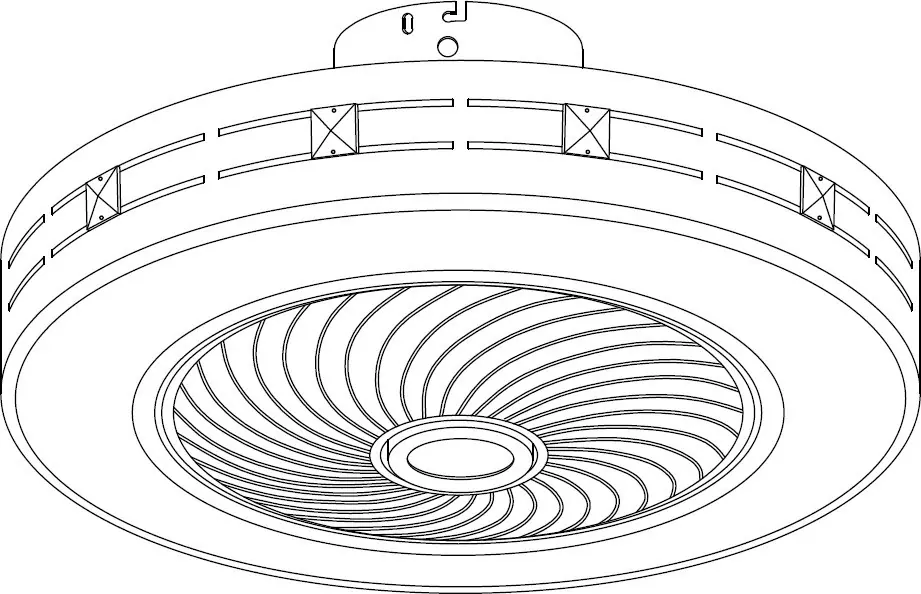
The Noaton NEBULA is a ceiling fan designed for indoor domestic use. It features integrated LED lighting with adjustable color temperature and intensity, controlled via the included infrared remote control. The fan is available in two sizes (50 cm and 60 cm diameter) and is suitable for mounting on ceilings or walls with a maximum slope of 90 degrees.
Safety Instructions
Installation must be performed by a qualified electrician in compliance with local electrical regulations. Ensure the mounting surface can support at least 30 kg. The fan blades must be at least 230 cm above the ground and 30 cm from any wall or obstacle. Do not connect the fan to dimmers or wall switches, as this may damage the motor. Use only the provided remote control for operation.
Installation
1. Mount the bracket to the ceiling or wall using the provided hardware. 2. Disconnect the power supply. 3. Connect the household wiring to the fan conductors. 4. Secure the fan body to the bracket, ensuring no wires are pinched. 5. Verify all screws are tightened. 6. Restore power.

Remote Control
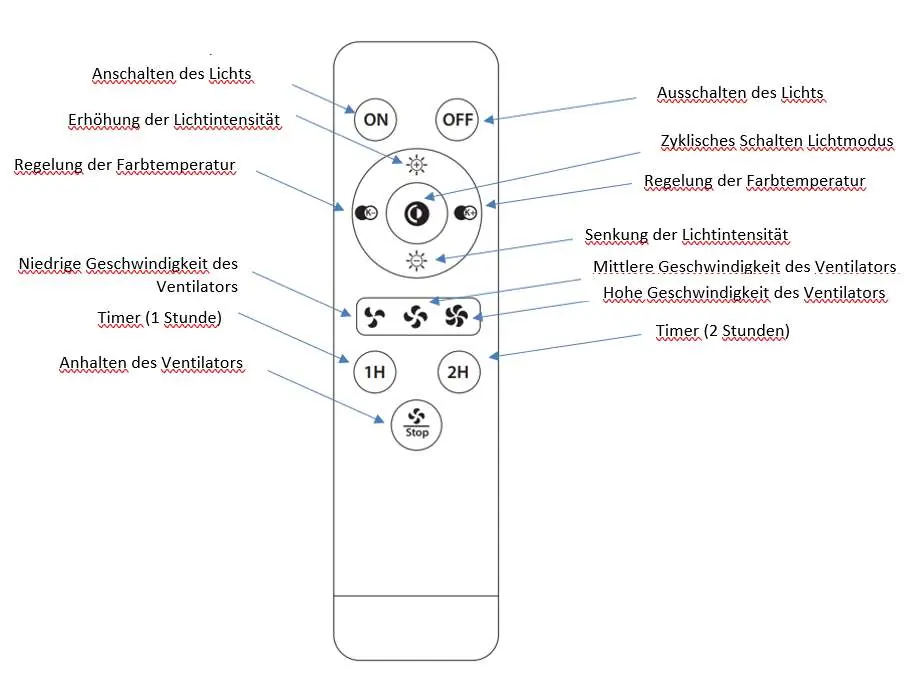
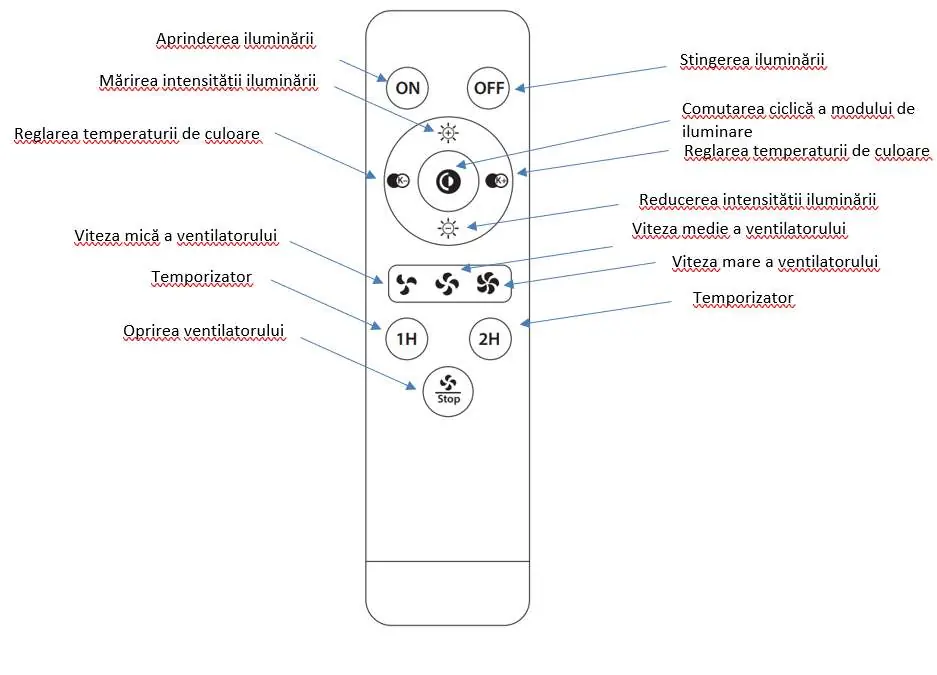
The remote control uses an infrared signal and does not require pairing. For optimal performance, keep the remote within 4 meters of the fan and ensure there are no obstacles between the remote's IR diode and the fan. The remote allows for fan speed control, timer settings (1 or 2 hours), and full control over the LED lighting (intensity and color temperature).

Maintenance
Regularly check and tighten all screws at least twice a year, as the fan's rotation can cause them to loosen. Clean the surface with a soft, damp cloth. Do not use water, chemicals, or abrasive cleaners, as these can damage the motor or electronic components.
Troubleshooting
If the fan does not rotate, check the fuses, electrical connections, and remote control batteries. If the fan is noisy, ensure all screws and the mounting bracket are secure. Allow the fan to run for at least 8 hours during the first use to allow parts to settle. If issues persist, contact a professional service center.
Manufacturer information
Noaton
Practical help
Common problems
Fan does not rotate
Check household fuses, verify electrical connections (by a qualified electrician), replace remote batteries, or re-sync the remote.
Noisy operation
Tighten all screws and the mounting bracket. Ensure only the original remote control is being used.
Mechanical noise during first use
Let the fan run for at least 8 hours to allow all parts to settle into their positions.
Insufficient airflow
Remove objects in close proximity to the fan that may restrict airflow, or ensure the fan diameter is appropriate for the room size.
Before use
- Ensure the mounting surface can support at least 30 kg.
- Verify blades are at least 230 cm above the ground.
- Ensure at least 30 cm distance from walls or obstacles.
- Confirm the power supply is disconnected before installation.
- Check that no wires are pinched during assembly.
- Verify all screws are properly tightened after installation.
Specs in practice
- Protection Class
- Class II for model 11050, Class I for model 11060.
- Light Colors
- Adjustable between warm white (3000K), daylight white (4000K), and cool white (6000K).
- Remote Control
- Infrared (IR) signal; requires direct line-of-sight and distance under 4 meters.
Images and diagrams
- The remote control features a central pad for lighting adjustments, speed buttons for the fan, timer buttons (1H/2H), and a stop button.
Model compatibility
- Not suitable for rooms with high humidity (e.g., bathrooms, swimming pools).
- Do not connect to external dimmers, potentiometers, or wall switches.
- Use only the remote control supplied by the manufacturer.

Manual page author
David Miller
Documentation analyst
Organizes user manual content into clear summaries, with attention to model details, product context, and everyday usability.