Tools / Laser Engraving Accessories
Omtech 150W Laser Tube User Manual
Quick guide for the Omtech 150W CO2 laser tube. Includes installation steps, safety warnings, maintenance procedures, and technical specifications.
Table of contents
Important Information from the Manual
This document provides essential instructions for the installation, operation, and maintenance of the Omtech 150W CO2 laser tube. This is a Class 4 laser device; improper use can lead to serious injury or property damage. Always ensure the cooling system is functioning correctly before activating the laser.
Safety Information
- Class 4 Laser: This device can cause serious injuries or property damage if used improperly.
- Electrical Safety: The tube operates with high voltage. Only trained technicians should make or adjust electrical connections.
- Environment: Do not use in overly hot or humid environments. Keep away from combustible materials or volatile fumes.
- Personal Protection: Always wear appropriate protective eyewear. Secure the worksite and use protective screens.
- Operation: Never leave the laser unattended during operation. Do not allow minors or untrained personnel to use the device.
- Fire Safety: The working area must be equipped with appropriate firefighting equipment.
Installation
- Preparation: Disconnect the engraver from power, drain the cooling water system, and wait 30 minutes for internal power supplies to discharge. Open side panels, remove extension boxes, and disconnect existing tubing and wiring.
- Inspection: Gently raise and shake the new tube to check for damage during shipment.
- Positioning: Place the tube with the correct side facing up. The emission lens should be 1.3–1.9 cm (½–¾ inches) from the engraver's first mirror.
- Mounting: Retighten the brackets to hold the tube snugly without excessive pressure.
- Wiring and Plumbing: Reconnect water pipes and wiring. Solder wire pairs (black to black, red to red). Fill the ceramic cap with slow-drying liquid silicone and press the red wire connection into the cap. Wrap the cap and black wire connection in electrical tape. Ensure no wiring is exposed and the red wire connection is away from the metal frame to prevent arcing.
- Finalizing: Wait six hours for the silicone to set before reconnecting power, restarting the cooling system, and testing the laser.
Maintenance
- Cleaning: Remove dust or debris from the tube surface using a soft dry cloth. Clean the semitransparent mirror at the end of the tube with a cotton swab soaked in alcohol using gentle circular motions. Only clean when the tube is fully cooled.
- Cooling: Maintain a constant flow of cool (not ice-cold) water. Distilled water is highly recommended to avoid contaminant build-up. Visually confirm the cooling pathway is filled and free of air bubbles before activation.
- Usage: Never exceed the tube's rated power and allow the tube to rest after every few hours of continuous work.
Specifications
- Max. Input Voltage: 30kV
- Rated Power: 150W
- Peak Power: 180W
- Peak Current: 35 mA
- Rec. Water Flow Rate: 0.8–3.4 gpm (3–13 L/min.)
- Rec. Water Temperature: 70–85°F (20–30°C)
- Rec. Operational Temperature: 60–90°F (15–32°C)
- Recommended Humidity: 30–60%
Contact Us
For questions or comments, contact support at [email protected]. For the latest version of these instructions, scan the QR code provided in the manual using your smartphone.
Practical help
Common problems
Arcing or electrical failure
Ensure the red wire connection is fully insulated in the ceramic cap with silicone and kept away from the metal frame.
Tube damage during shipment
Gently raise and shake the new tube before installation to check for any damage.
Overheating
Maintain constant water flow (3–13 L/min) and ensure water temperature is between 20–30°C.
Before use
- Disconnect power and drain cooling system.
- Wait 30 minutes for internal power supplies to discharge.
- Verify the tube is free of damage.
- Ensure the emission lens is 1.3–1.9 cm from the first mirror.
- Verify water cooling pathway is filled and free of air bubbles.
Specs in practice
- Max. Input Voltage: 30kV
- Indicates the high voltage required; extreme caution is necessary.
- Rated Power: 150W
- The standard operating power for the laser tube.
- Peak Power: 180W
- The maximum burst power the tube can handle.
- Rec. Water Temperature: 20–30°C
- Crucial range to prevent tube damage and ensure longevity.
Images and diagrams
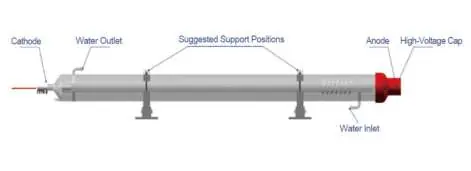
- The diagram illustrates the laser tube layout, identifying the Cathode, Anode, Water Inlet, Water Outlet, and suggested support positions.
Model compatibility
- This is a Class 4 laser.
- Requires distilled water for cooling to prevent contaminant build-up.
- Wiring requires soldering and silicone insulation.

Manual page author
Emily Carter
User documentation editor
Prepares concise manual descriptions and highlights the most useful setup, operation, and maintenance information for readers.