Tools / Laser Engraving Accessories
Genmitsu 10W Compressed Spot Laser Fixed Focus Module
Quick guide for the Genmitsu 10W laser module. Includes installation steps for Jinsoku and PROVer XL 4030 machines, LaserGRBL software setup, focusing procedures, and safety precautions.
Table of contents
Manual images
Click an image to enlargeQuick guide from the manual
The Genmitsu 10W compressed spot laser fixed focus module is designed for desktop CNC machines. Key specifications include a 10W laser power, 445nm wavelength, and a 40mm focal length. It requires a 12V/3A power supply. Always wear laser safety goggles, ensure the room is well-ventilated, and keep a fire extinguisher nearby during operation.
Package contents
- Laser module with air assist nozzle
- Focus calibration tool (16x40mm)
- Connection cables (XH2.54-3P) for various machines
- Safety goggles (FDA-certified)
- Allen wrench (2.0mm)
- Mounting screws
Installation on Jinsoku LC-60A and LE-1620
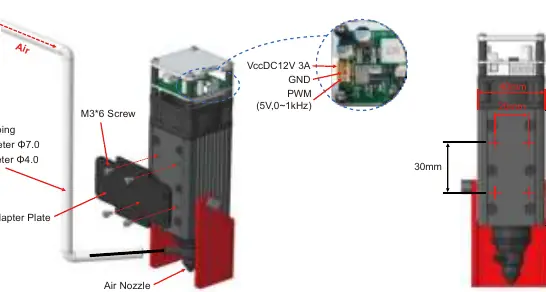
- Prepare the air tubing (4mm ID, 7mm OD) and connect it to the air assist nozzle and your air pump.
- Select the appropriate adapter plate for your machine.
- Fix the laser module to the adapter plate using four M3x6 screws.
- Install the plate onto your machine using four M3 screws.
- Connect the laser control cable to the machine controller, ensuring the correct sequence (PWM, GND, 12V).
Installation on Genmitsu PROVer XL 4030
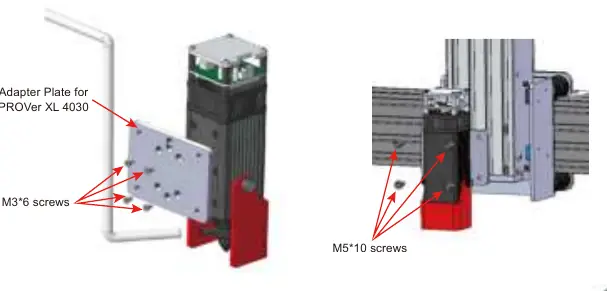
- Locate the adapter plate included with your PROVer XL 4030.
- Attach the laser module to the adapter plate using four M3x6 screws.
- Mount the plate to the machine using four M5x10 screws.
- Connect the 3-pin cable for GND, PWM, and 12V+ to the machine's laser control module.
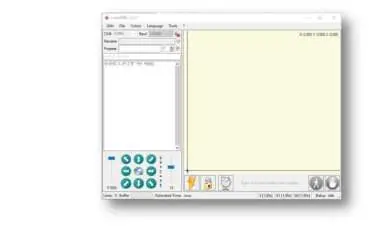
LaserGRBL software setup
LaserGRBL is used to control the laser. After installation:
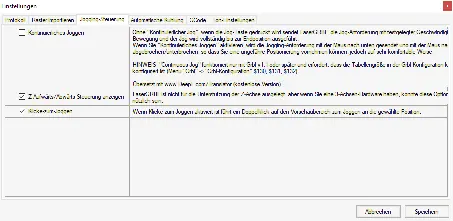
- Enable Z-axis Jog: Go to Grbl > Settings > Jog Control tab and enable 'Click'n Jog'.
- Add Custom Buttons: Download 'CustomButtons.gz' from the SainSmart wiki. Right-click in the Buttons pane, select 'Import Custom buttons', and import the file.
- Laser Power: The laser power is controlled by the 'S' value (e.g., S100). This depends on your maximum spindle speed ($30) setting. Typically, the S value should be 10% of the $30 setting.
Focusing the laser
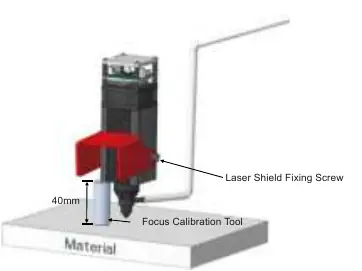
- Loosen the screws on the laser shield and move it out of the way.
- Place the focus calibration tool on the workpiece surface.
- Lower the laser module until the heatsink rests on the calibration tool (40mm focal length).
- Set the zero point in your software.
- Remove the tool and lower the laser shield.
Safety and maintenance
Safety: Never leave the laser unattended. Do not stare at the laser beam. Ensure the cutting area is non-flammable. Disconnect power before cleaning or maintenance.
Maintenance: Regularly clean the laser lens using a cotton swab dipped in alcohol, especially after working with oily materials like pine.
Official resources from the manual
Practical help
Common problems
Fan or laser not working after power on
Check that the correct connection cable is used and that it is plugged in firmly to the machine controller.
Reflective materials (e.g., stainless steel) not engraving
Paint the material surface black with a marker before engraving to prevent reflection and damage.
Lens dirty or residue buildup
Clean the lens regularly with a cotton swab dipped in alcohol, especially after cutting oily materials.
Before use
- Wear laser safety goggles.
- Ensure the room is well-ventilated.
- Keep a fire extinguisher nearby.
- Verify input voltage is 12V/3A.
- Check cable sequence (PWM, GND, 12V) before connecting.
Specs in practice
- Focal Length
- 40mm distance from the laser heatsink to the workpiece surface.
Images and diagrams
- Installation diagrams show the correct mounting of the adapter plate and screw locations.
- Wiring diagrams illustrate the pinout sequence for the laser control card.
- Focusing diagram demonstrates the use of the calibration tool to set the 40mm height.
Model compatibility
- Designed for Jinsoku LC-60A, LE-1620, and Genmitsu PROVerXL 4030.
- Highly compatible with many other desktop CNC machines.

Manual page author
Michael Turner
Technical manual editor
Reviews PDF manuals for structure, safety notes, and practical product details so readers can find the right information quickly.