Home Appliances / Kitchen Utensils
User Manual for Oypla Buffet Server 3135/3903
Quick guide for the Oypla Buffet Server 3135/3903. Learn how to safely operate, clean, and maintain your food warmer, including preheating instructions and parts identification.
Quick answers from the manual
Quick answer
- The Oypla Buffet Server is designed to keep cooked food warm. It features a warming plate, three serving dishes with lids, and an adjustable thermostat. Always preheat for 10 minutes before use. p. 3
Key actions
- Preheat the appliance for 10 minutes before adding food. p. 3
- Clean parts in warm, soapy water after the appliance has cooled down. p. 4
First start
- Place on a flat surface, plug in, adjust the thermostat, and preheat for 10 minutes. p. 3
Show 2 more answers Show less
Maintenance and reset
- Allow to cool completely before cleaning. Do not use abrasive cleaners. p. 4
Where to find it in the PDF
- Safety Instructions p. 2
- Operating Instructions p. 3
- Cleaning p. 4
Table of contents
Manual images
Click an image to enlargeQuick guide from the manual
The Oypla Buffet Server is designed exclusively to keep cooked food warm. It is not intended for cooking or reheating food, as it will not reach the temperatures required to kill bacteria. Always preheat the appliance for 10 minutes before placing food on it.
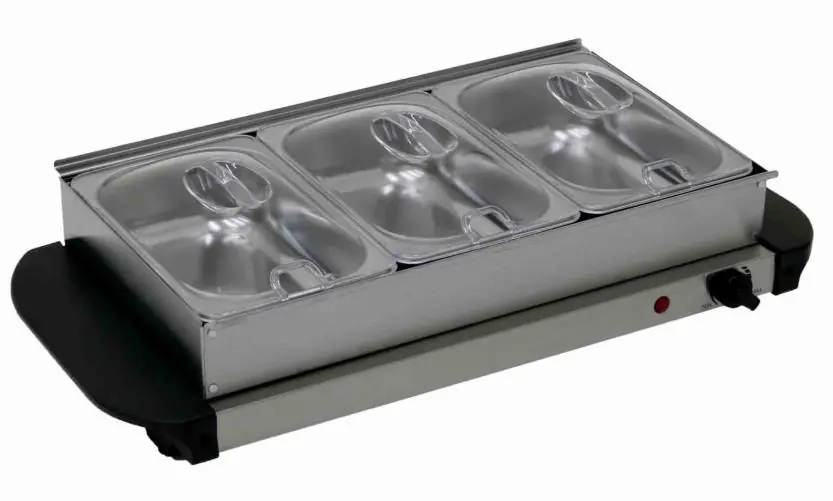
Safety Instructions
- Placement: Use only on a stable, flat, and heat-resistant surface. Do not place under wall cabinets, near curtains, or near flammable soft furnishings.
- Electrical Safety: Ensure the power supply matches the rating label and the socket is earthed. Do not immerse the cord, plug, or appliance in water.
- Usage: For indoor use only. Never leave the appliance unattended while in use. Do not use near plastic kitchenware.
- Handling: The stainless steel surfaces and heating elements become extremely hot. Always allow the appliance to cool down completely before moving or cleaning.
Parts List
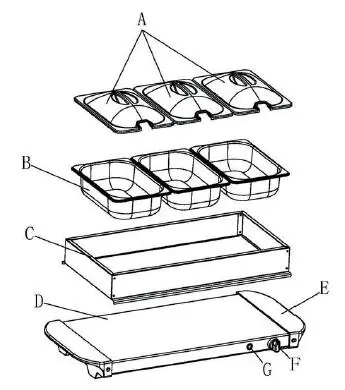
- A: Three lids
- B: Three serving dishes
- C: Frame for serving dishes
- D: Warming plate
- E: Cool touch handles
- F: Thermostat
- G: Heating indicator light
Operating Instructions
How to use the Food Trays
- Place the appliance on a flat, heat-resistant surface.
- Plug into the mains supply; the red heating indicator will light up.
- Adjust the temperature control knob to the desired setting.
- Preheat for 10 minutes. The light will turn off when the temperature is reached.
- Place the rectangular frame onto the tray, then position the three serving dishes.
How to use the Warming Trays
- Remove the serving dishes and frame if you wish to use only the warming plate.
- Place the warming tray on a flat surface and plug it in.
- Adjust the temperature control knob and preheat for 10 minutes.
- You may place heat-resistant casserole dishes or plates directly onto the warming plate.
Cleaning and Maintenance
- Allow the appliance to cool down completely before cleaning.
- Remove all food and liquid from the serving dishes.
- Remove lids and dishes from the frame.
- Clean the frame, dishes, and lids in warm, soapy water.
- Rinse well and dry thoroughly with a soft, dry cloth.
- Warning: Do not use abrasive cleaners as they can damage the parts.
Practical help
Common problems
Food is not staying hot enough
Ensure the appliance was preheated for 10 minutes and the thermostat is adjusted to the appropriate setting.
Appliance does not turn on
Check that the power cable is securely plugged into an earthed mains socket.
Before use
- Place on a flat, heat-resistant surface.
- Ensure the buffet warmer is the correct way up.
- Verify the power supply matches the rating label.
- Preheat for 10 minutes before adding food.
- Ensure sufficient space around the appliance for heat to escape.
Show more Show less
Specs in practice
- Buffet Server Function
- Designed to keep cooked food warm; not for cooking or reheating food.
Images and diagrams
- The parts diagram identifies the lids, serving dishes, frame, warming plate, handles, thermostat, and indicator light.
- The frame sits on the warming plate to hold the serving dishes.
Model compatibility
- Indoor use only.
- Do not use near plastic kitchenware.
- Do not place under wall cabinets or near flammable materials.

Manual page author
David Miller
Documentation analyst